Home Assistant has been on my radar for a while. I’ve always liked the idea of having a small local server running 24x7 that I could use to “automate stuff”. Two things put me off doing anything about it. There was low level anxiety over picking the right hardware and OS to run it on, but more importantly there was the lack of anything that really needed automating.
That changed this week. We got a new EV charger, the Hypervolt Home 3 Pro. I wasn’t expecting to replace our existing 5 year old EO Mini Pro 2. Then the manufacturer EOLed it.
Normally, my response would be who cares. Keep using it until it breaks, then replace it. However, like most big ticket tech items these days, much of the EO Mini’s functionality relies on a cloud backend. EO are turning the servers off and effectively bricking the device.
Intelligent Octopus Go
Our energy provider, Octopus, has a dedicated tariff for EV owners that provides extremely low rates when charging, in exchange for letting Octopus control when the charging happens. It’s compatible with our new Hypervolt charger.
The tariff includes fixed off-peak rates between 23.30 and 5.30 but may schedule charging outside that period. If it does, you get charged the off-peak rates for those times too.
Alpha ESS Home Battery
We also have a home storage battery, the Alpha ESS Smile-5. We charge the battery overnight at off-peak rates and then use the stored energy during the day. I can configure the battery to charge during the dedicated off-peak period, but what happens if EV charging is scheduled outside that time?
Simple, the battery discharges flat out to try and meet the required load and quickly empties itself.
Adjusting the battery configuration manually to match the Octopus charging schedule is tedious. Also futile, because the Octopus schedule frequently changes based on current and expected demand for energy.
I want to make full use of my new toy, so I really need a way to automate the battery configuration.
Existing Integrations
A few quick internet searches found people with similar problems that had solved them with Home Assistant combined with existing open source integrations.
- homeassistant-alphaESS and AlphaESS Home Assistant via Modbus
- HomeAssistant-OctopusEnergy
- home-assistant-hypervolt-charger
There were also a couple of recommendations for hardware to run it on.
Home Assistant Green
Home Assistant Green is a dedicated package that comes with Home Assistant preinstalled. It’s roughly equivalent to a Raspberry Pi supplied with an enclosure and a power supply. The device uses passive cooling and needs little power, around 1.5W at idle.
Before jumping in, I wanted to make sure that I really could control my battery via API.
Alpha ESS Open API
In theory, you can integrate with Alpha ESS systems locally via a modbus API, or via the cloud hosted Alpha ESS Open API. There are Home Assistant integrations available for both.
I’d prefer to use the modbus API and remove the dependency on someone else’s cloud hosted backend. Unfortunately, Alpha ESS only expose the modbus API via a hardwired ethernet connection. My battery connects via wifi as it’s an inconveniently long way from my router.
I decided to try the Open API route first. You have to register at https://open.alphaess.com/ to get access to the API. You need to provide your serial number and the check code from the sticker on the side of the inverter. Be careful with these values. It looks like anyone that gets access to them can get control over your system.
Postman
The maintainer of the Home Assistant Alpha ESS integration has a Postman collection for the API. I used it to verify that I did indeed have API access.
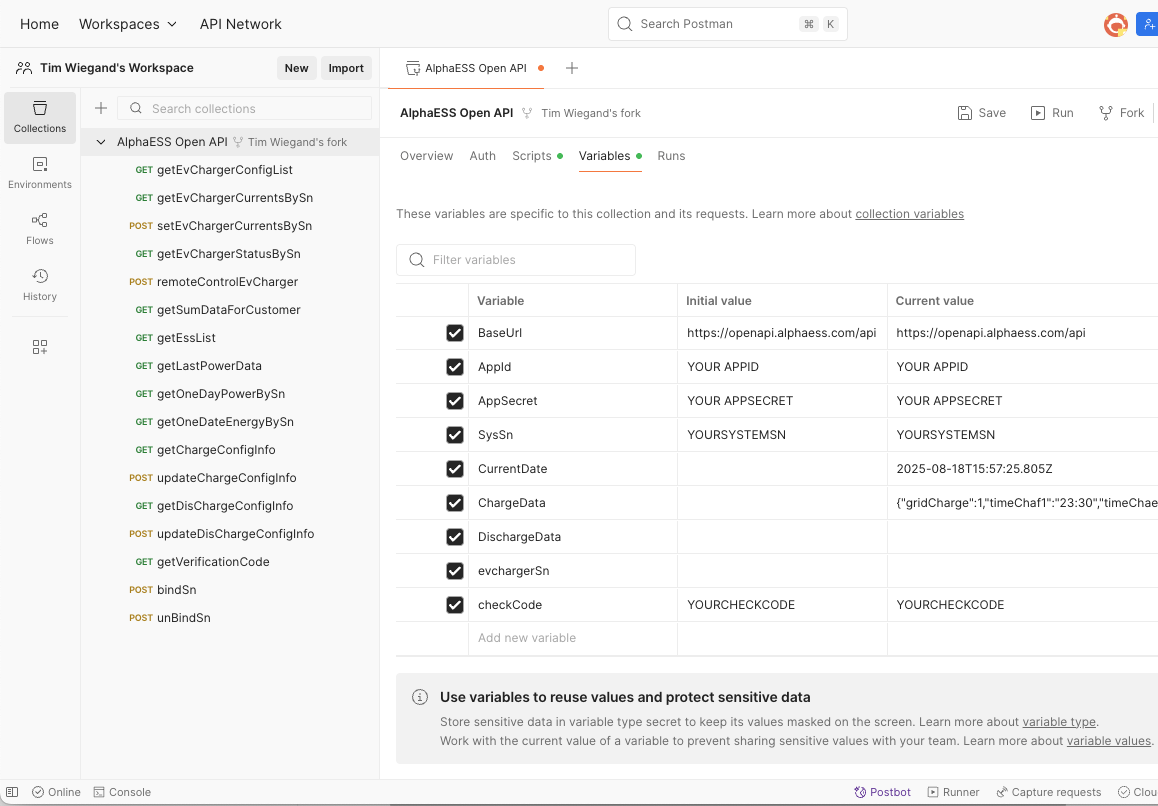
You need to create a free Postman account so that you can fork the collection and edit the config. Click on the root node in the left hand tree and fill in the required collection level variables: AppId, AppSecret, serial number, etc. You can find all these in the Alpha ESS Open API portal. Use the “current value” fields to restrict how far the values are shared.
Remember to press save before you try making a request. It look like you’ve changed variable values, the changes persist when you navigate to another page in the Postman web UI and come back, but won’t be used until you explicitly save them.
Ignore the Auth tab in Postman. Authentication is handled by a pre-request script that signs each request using the AppId and AppSecret. If you have any issues, click on the console button in the bottom left footer to see the actual requests being made by Postman.
After some fiddling around I got the API to work. If you already have Home Assistant, I suggest skipping this part. Getting the integration working in Home Assistant is much easier.
Unboxed
I got my Home Assistant Green from Pimoroni for £85. They were much more expensive on Amazon when I looked, so shop around.
I enjoyed the lovely recyclable cardboard packaging. Unfortunately, I was in too much of a hurry to get it plugged in to take a photo first.
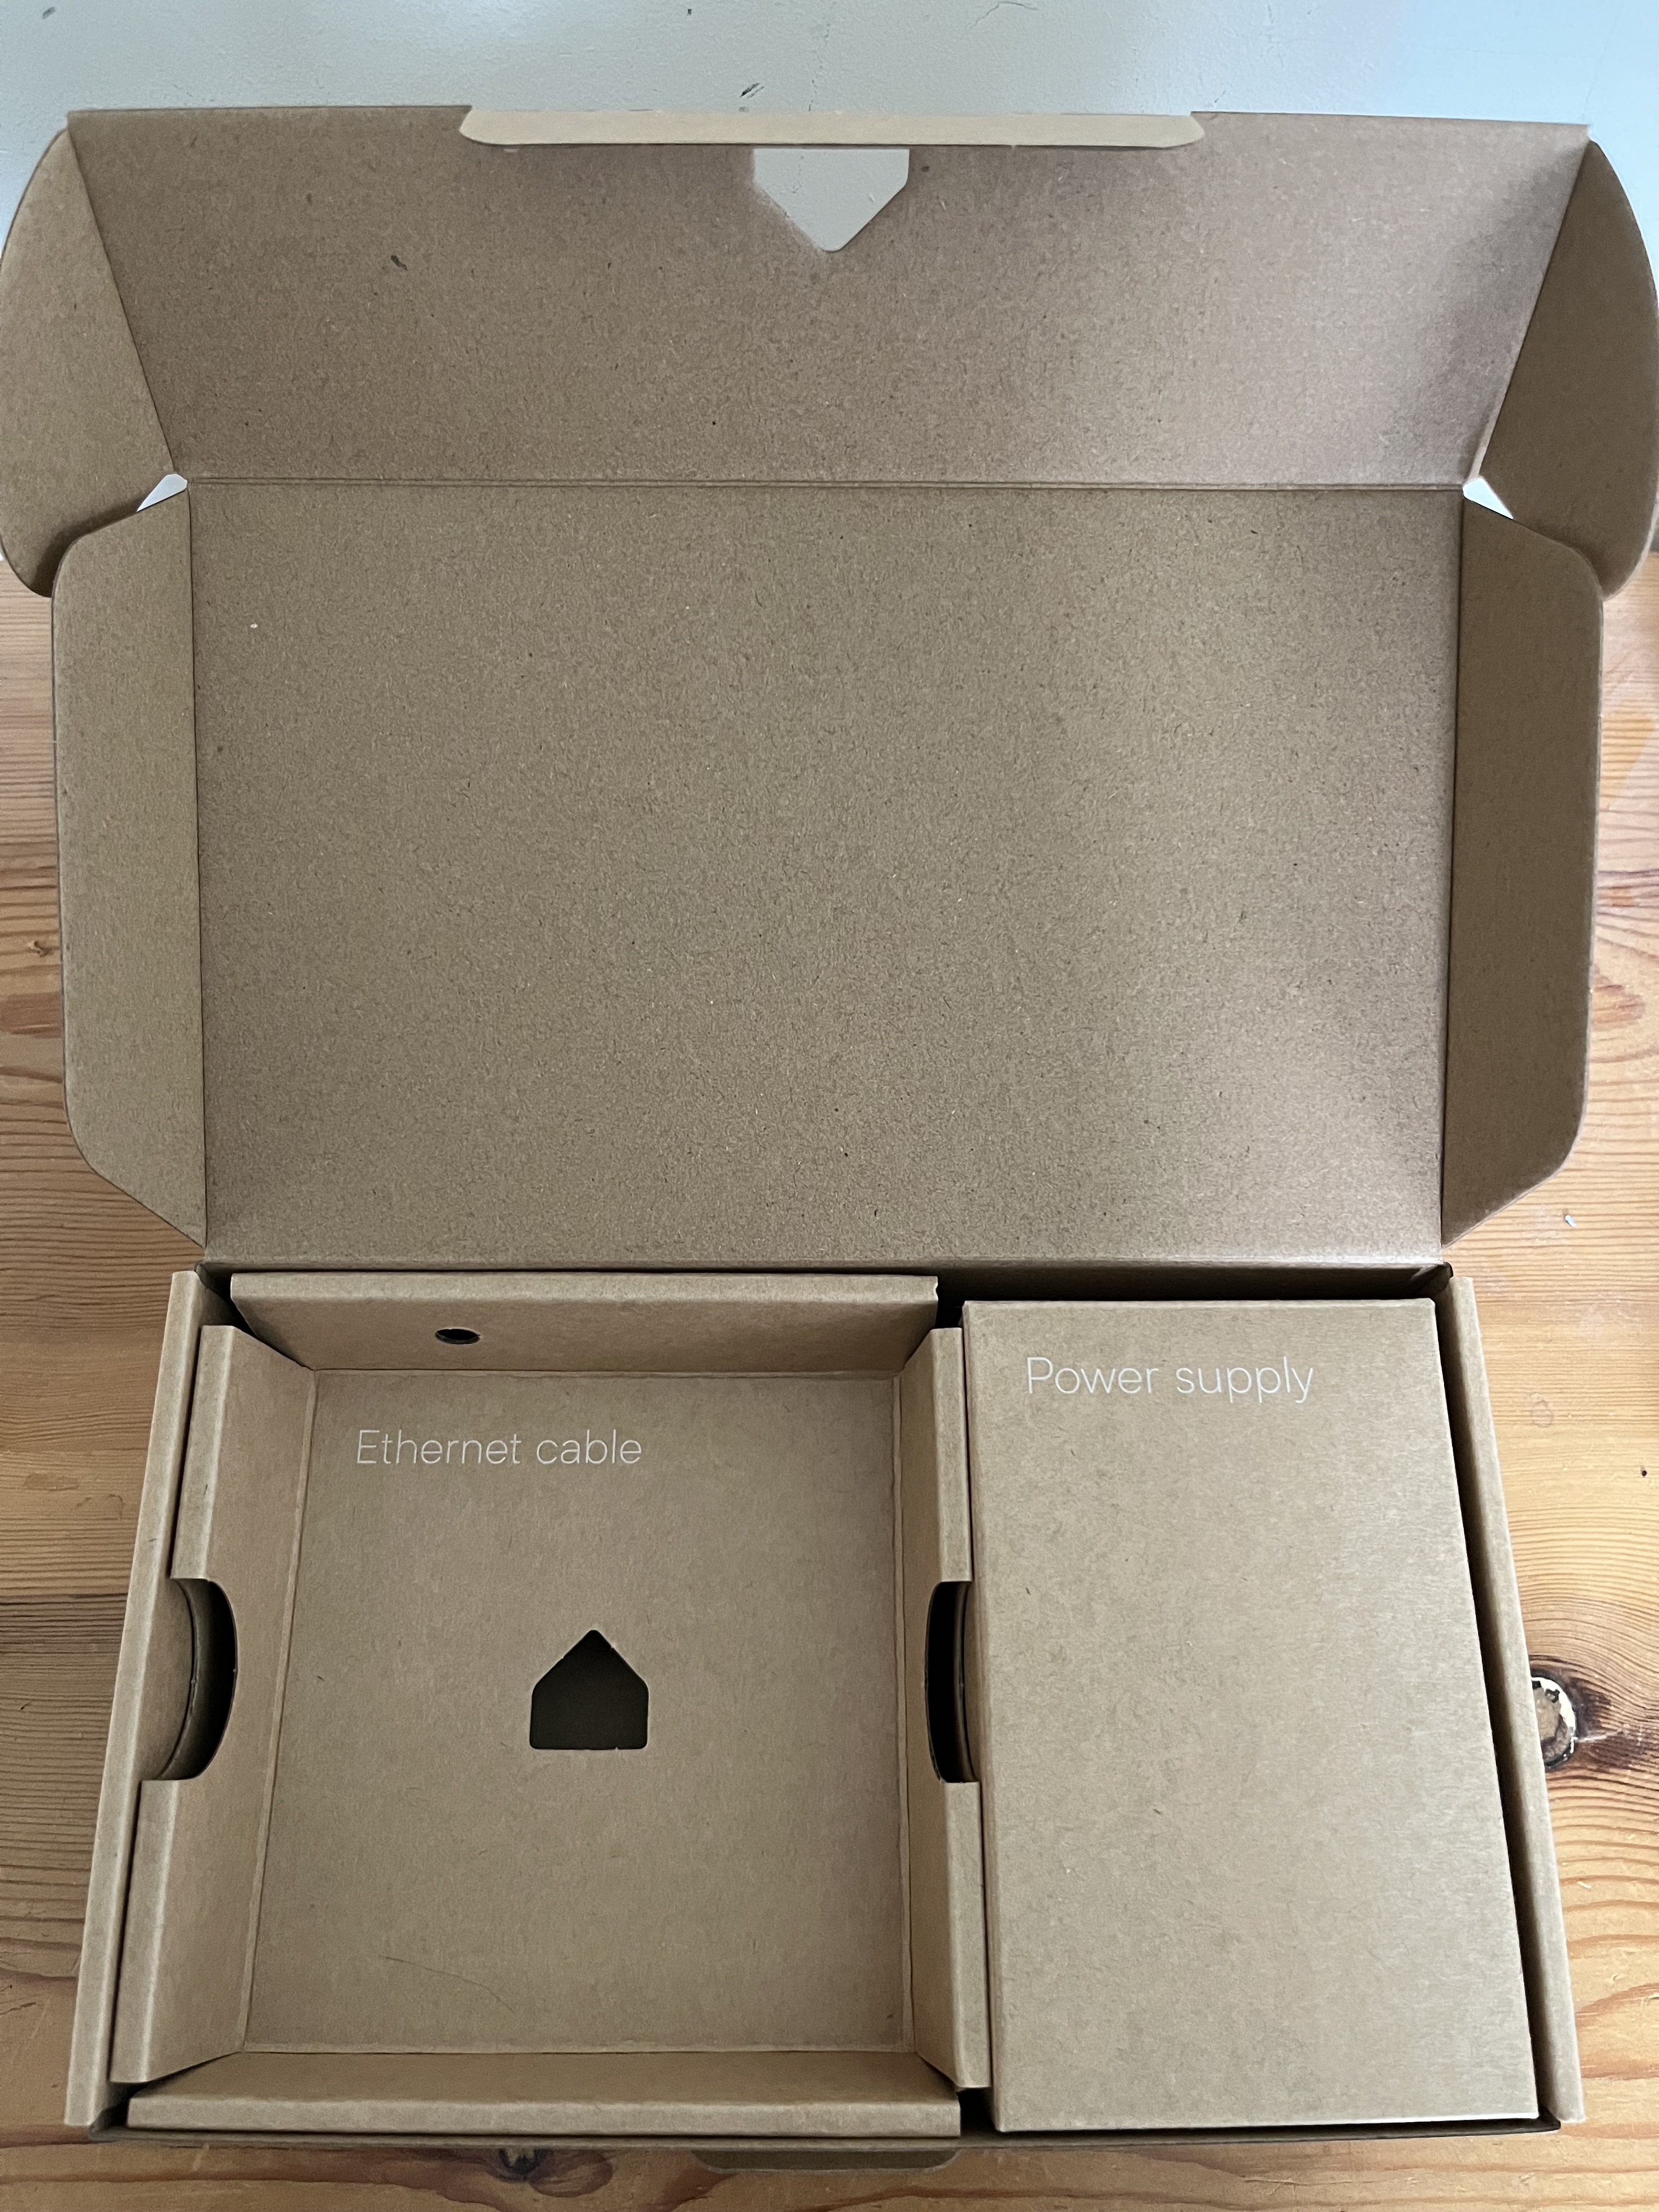
You get the device, a cute little power supply (with adaptors for every country you can think of included), and a short ethernet cable. Plug the ethernet cable into your router (there’s no wifi), plug in the power and then wait while the LEDs dance furiously.
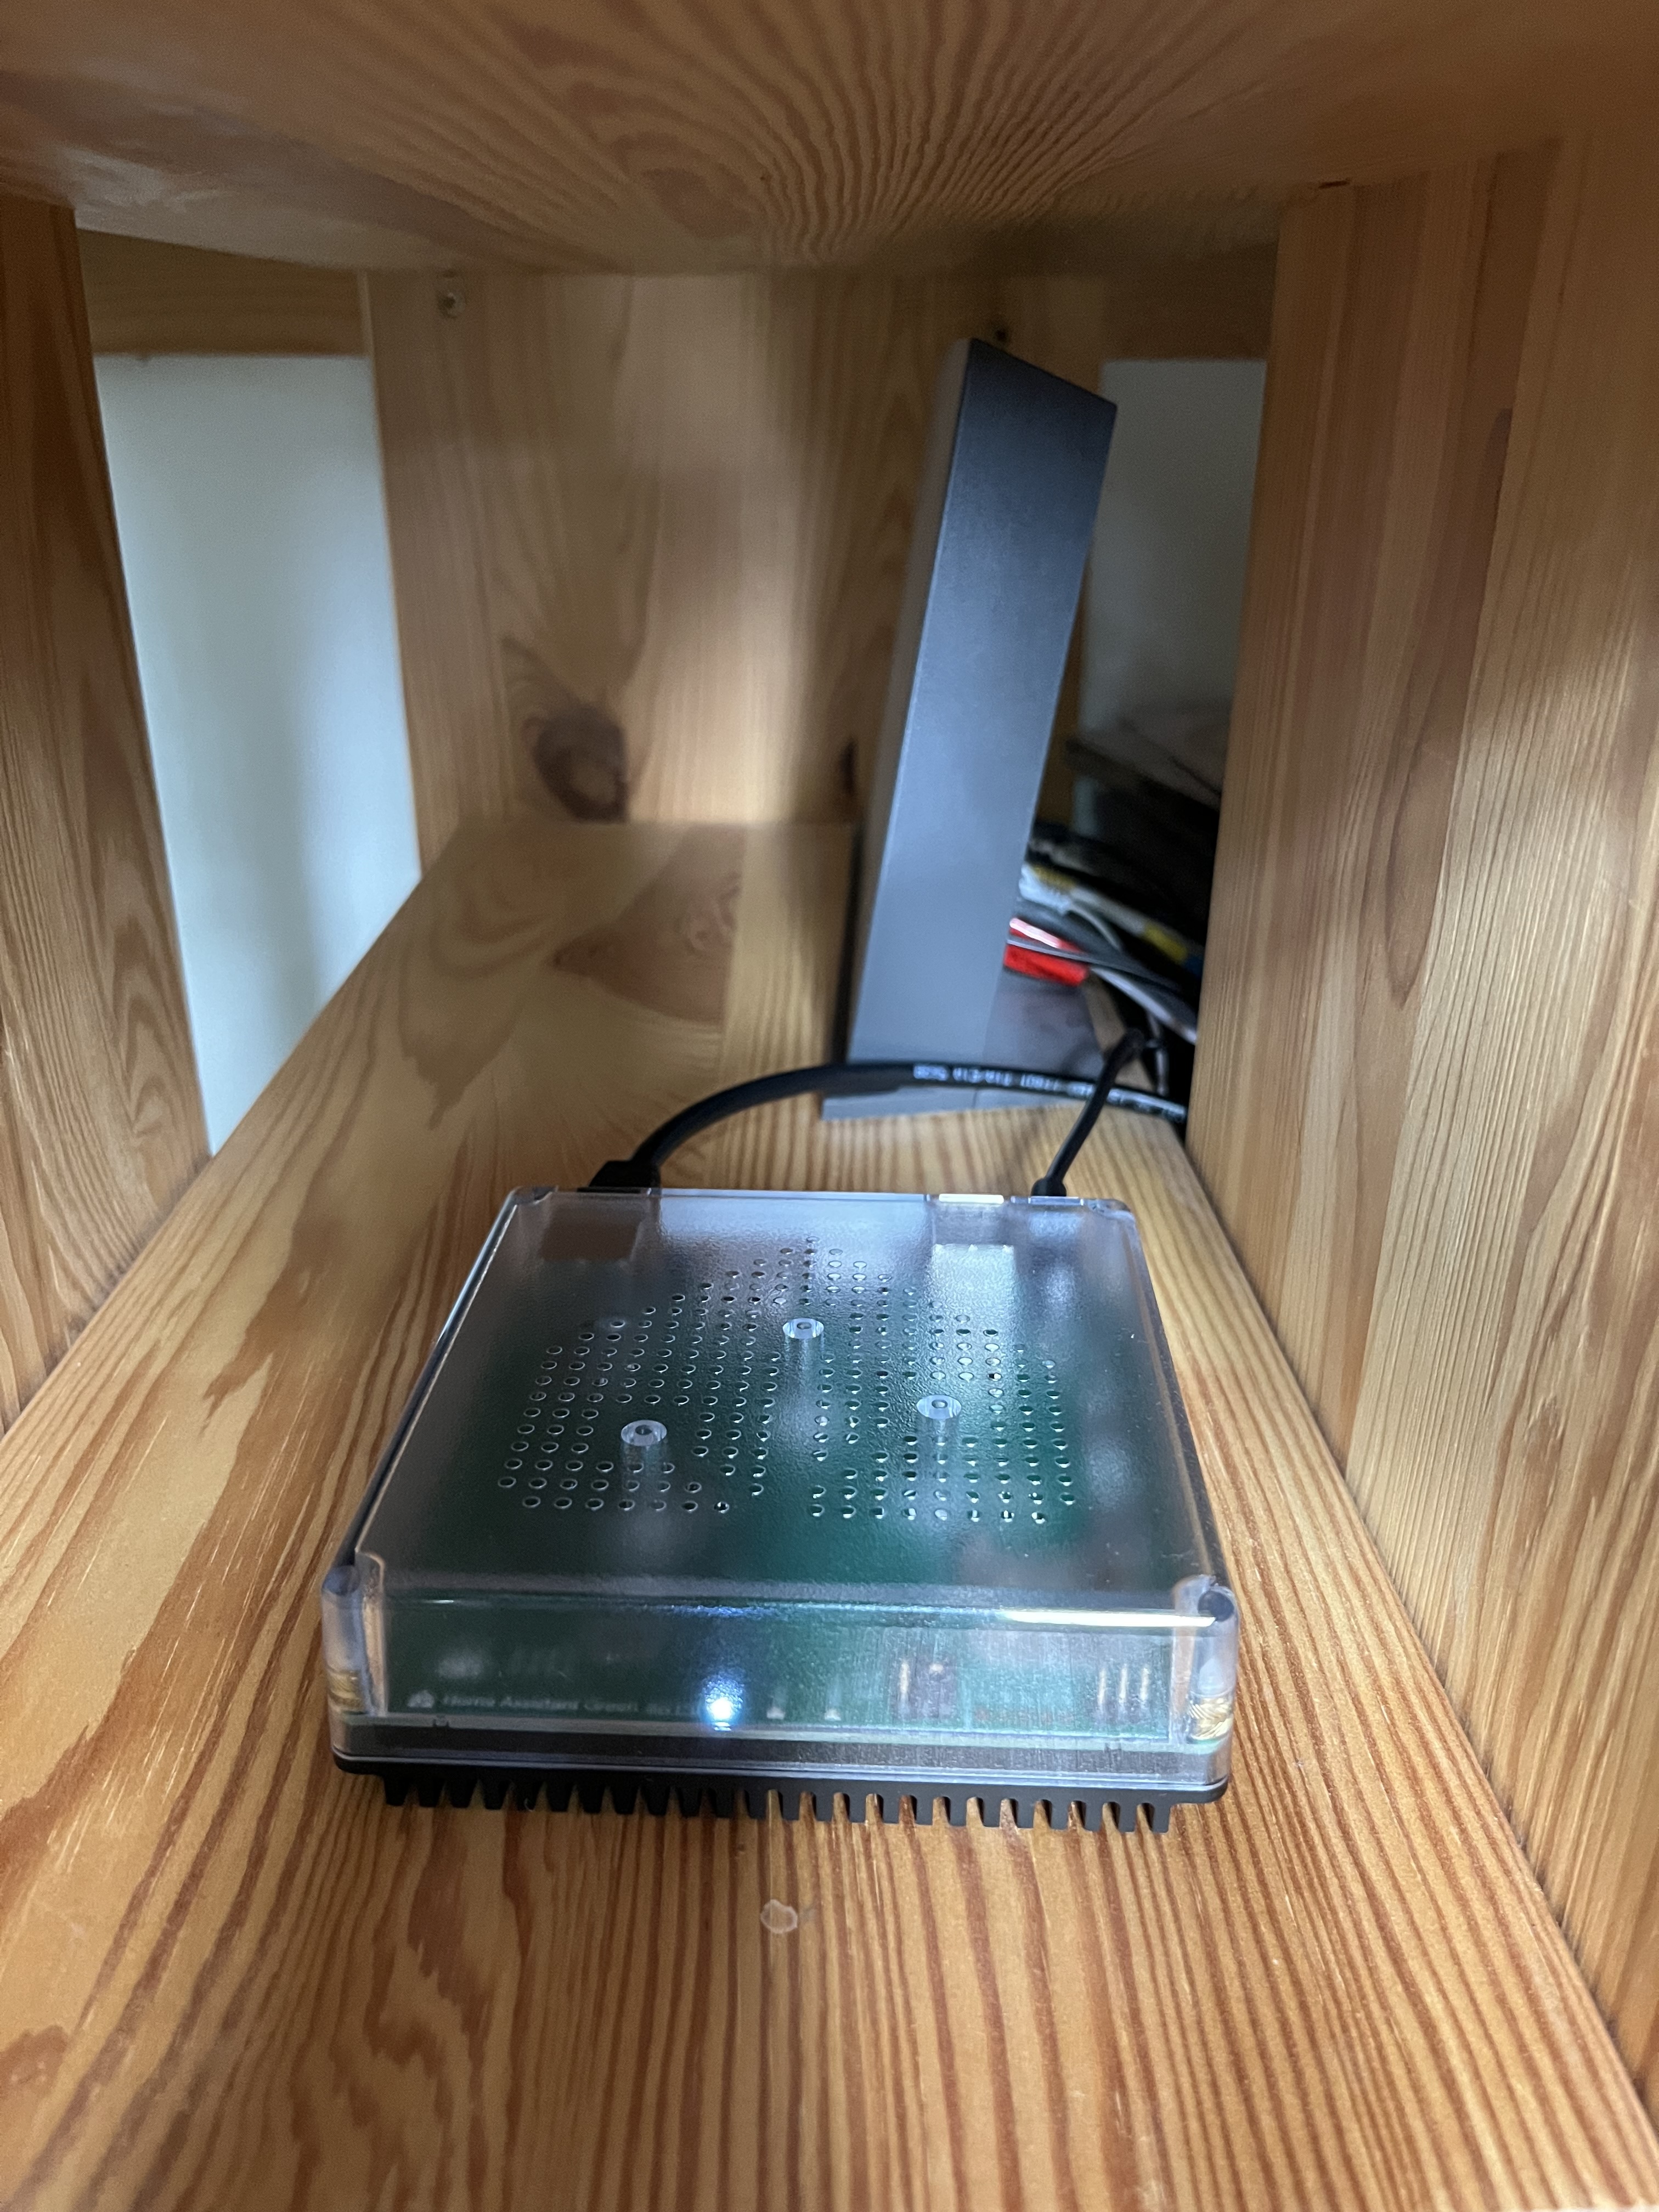
Once it’s calmed down to a gentle throb, it’s ready for you to connect. Here’s mine in situ, beneath my desk, in front of the router.
.local
I was wondering how connecting would work. The device will have an IP address from my router via DHCP. How do I find out what it is?
You use the URL http://homeassistant.local:8123. The .local domain is a special-use domain name that is explicitly not a top-level DNS domain. Most operating systems use it as a trigger for running a mDNS protocol that searches the local network for devices that respond to the name and port.
On my Mac this works flawlessly using Safari. When I tried with Chrome I was prompted to allow Chrome to search the local network, which then failed after I gave permission.
Alternatively, install the HomeAssistant app for iOS or Android and let the app handle it.
HACS
All the integrations I want to use are open source custom integrations. The recommended way to manage these, if you don’t want to fiddle around downloading and configuring files yourself, is to use HACS, the Home Assistant Community Store.
HACS has this weird semi-official status within the Home Assistant ecosystem. The latest release was announced on the official Home Assistant blog, yet there’s no mention of it in the main Home Assistant documentation. The Home Assistant UI allows you to install third party integrations with a single click, but there’s no direct way of installing HACS.
For something intended to make installing custom integrations easier, installing HACS is surprisingly painful. The recommended way is to use the “Get HACS” addon for Home Assistant. However, as HACS is considered to be “advanced”, it doesn’t appear in the list of available addons in the Home Assistant UI. You need to click on a link in your browser which redirects to Home Assistant (remember to use Safari if on a Mac), and provides it with the location of the “Get HACS” GitHub repo. If everything has gone well you’ll see a UI page for the addon with an install button.
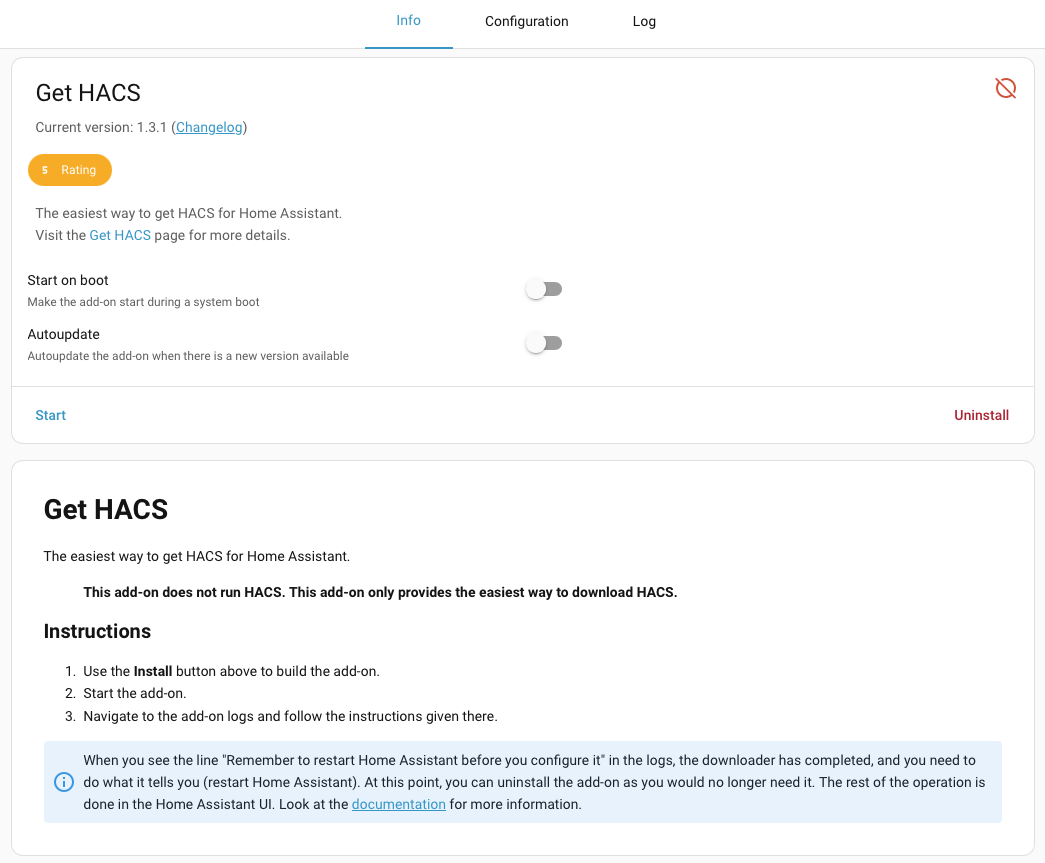
Once installed, you’ll get a start button and some instructions. Press start and switch to the Log tab. Wait for it to finish doing whatever it’s doing.
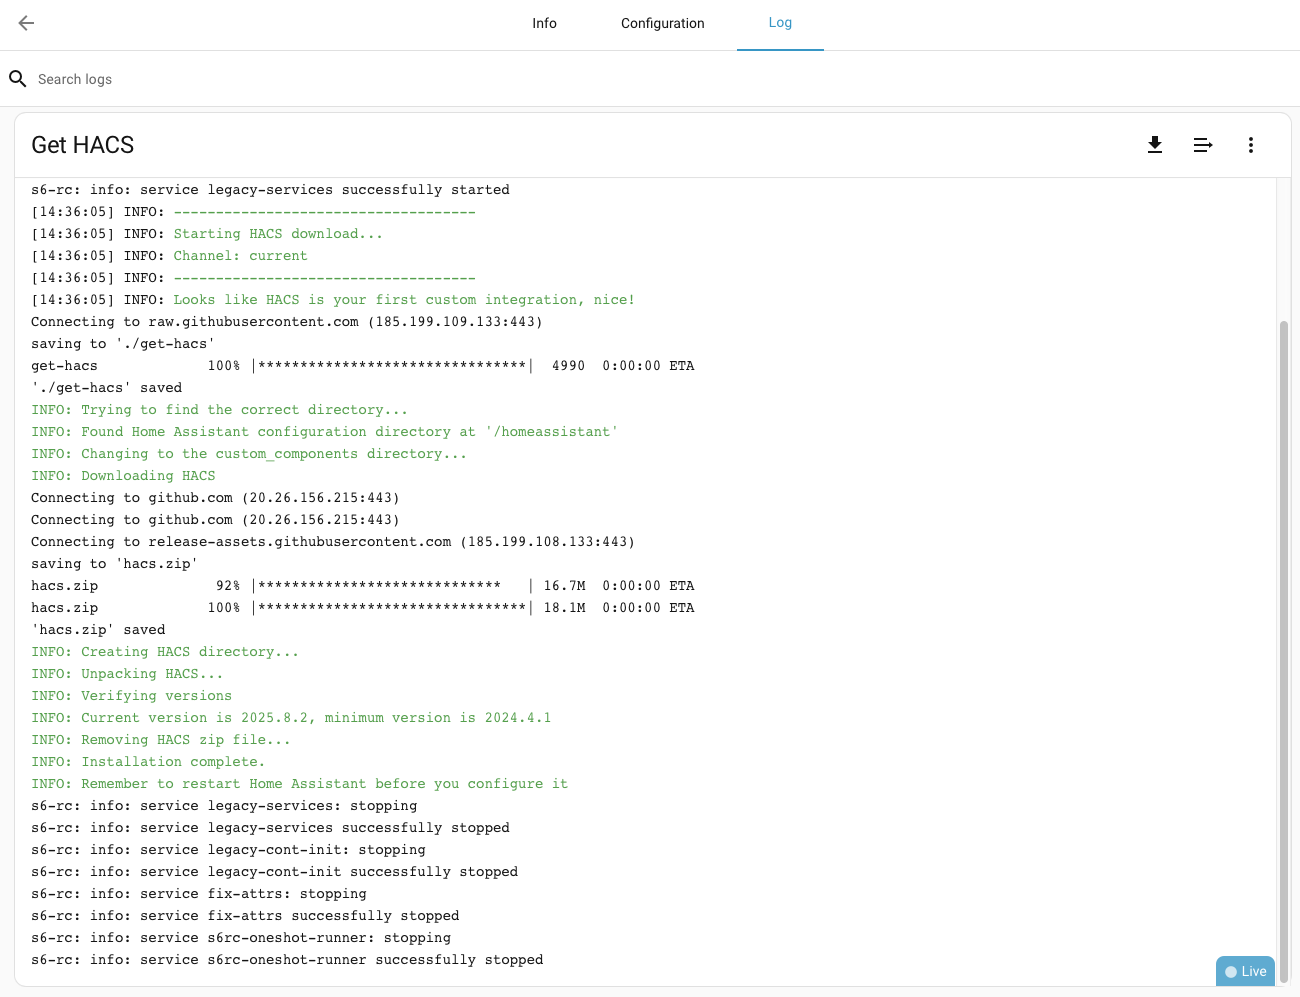
At this point, all that you’ve achieved is to download HACS. You can uninstall the addon, that’s all it does.
Restart Home Assistant. Now you can configure HACS. Go to “Settings -> Devices & services”. This time, HACS will show up in the list and you can add it as an integration. Agree to the four scary checkboxes and press submit.
At it’s heart, HACS is simply a downloader for files stored in GitHub repos. Integration authors register their repos with HACS, which makes them discoverable in the HACS UI. To download the files, you need a GitHub account. You then need to enable GitHub access for your Home Assistant device. There’s much needed, step by step instructions in the HACS documentation.
Finally, you’re done. HACS should appear in Home Assistant’s main navigation toolbar. You can now install the integrations you’re actually interested in.
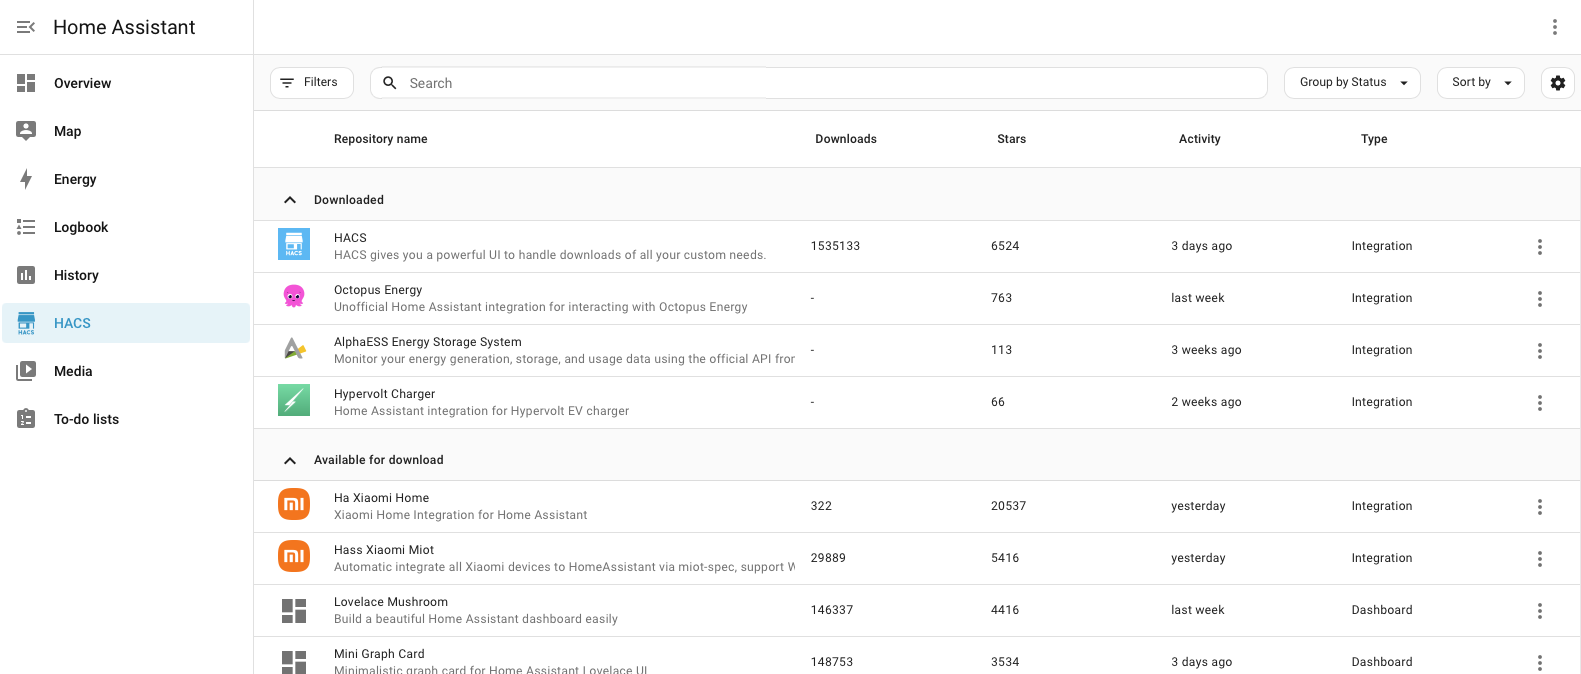
You can browse through the customizations on offer and download the ones you want. You can also provide the GitHub URL for a repo explicitly, if it’s not listed.
All three of the integrations I’m interested in were available in the store. Once you’ve downloaded them all, you have to restart Home Assistant again. The integrations you’ve added should now appear when you search for them in “Settings -> Devices & Services”.
Run through their configuration wizards and you should be good to go.
Overview
Home Assistant includes a default “Overview” dashboard that is populated by integrations as you add them.
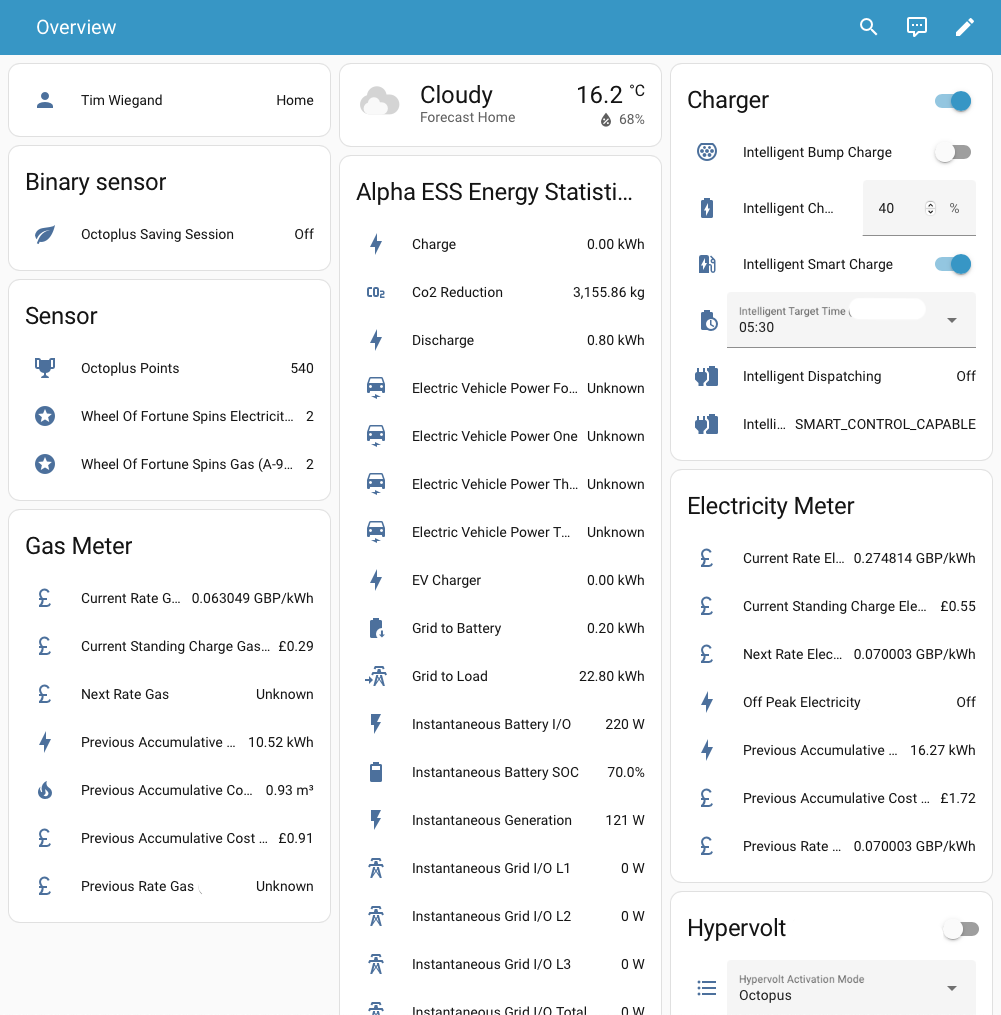
As you might expect, the dashboard looks unorganized and overwhelming. I was surprised to find that it’s often not clear which integration a card belongs to. You’re generally relying on hints from the card content to work out what it relates to.
You can click on any entity to get more information about it.
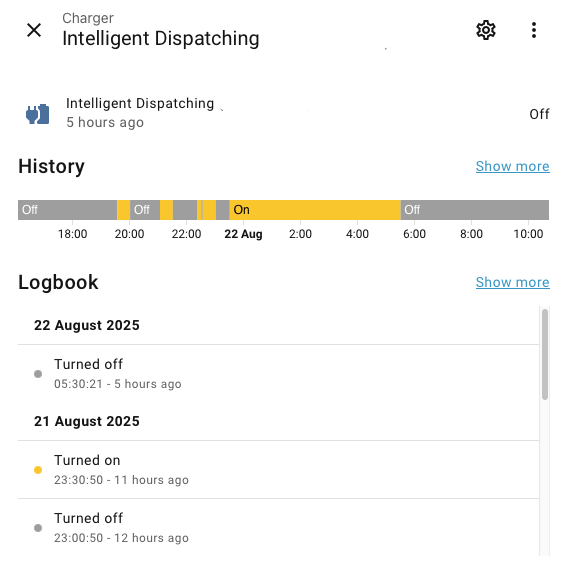
You can see the current state, when it last changed, a visual history of changes, and a detailed log of changes. Click on the hamburger icon and choose “Device Info” to see what device this entity is associated with. From there you can find the integration which owns the device. In my case it’s a “Charger” device created by the “Octopus Energy” integration.
Click on the gear icon to see more properties, including the entity’s id. In this case it’s binary_sensor.octopus_energy_xxxxx_intelligent_dispatching. The first part of the id defines the domain of the entity. In most cases you can think of this as a type. My Intelligent Dispatching entity is a binary sensor which reports the state of something as on or off. In this case, it’s reporting whether Octopus Energy has asked my EV charger to turn on.
Location Tracking
Interestingly, I’m also an entity on the dashboard. If I click for more info, Home Assistant shows me my location and tells me that I’m home.
When I configured my Home Assistant Green, I was asked to provide my address, which is how Home Assistant knows where home is. When I installed the Home Assistant app on my phone, it requested access to location tracking, which is how Home Assistant knows where I am.
This can all be turned off if you don’t want it. In principle, you can use location as part of your automations. For example, to turn lights on when you get home.
Energy
Home Assistant also includes a built-in dashboard for tracking energy use. You configure which entities it should use to determine consumption and costs.
The Octopus Energy integration I’m using has detailed documentation for how to set up Electricity and Gas consumption.
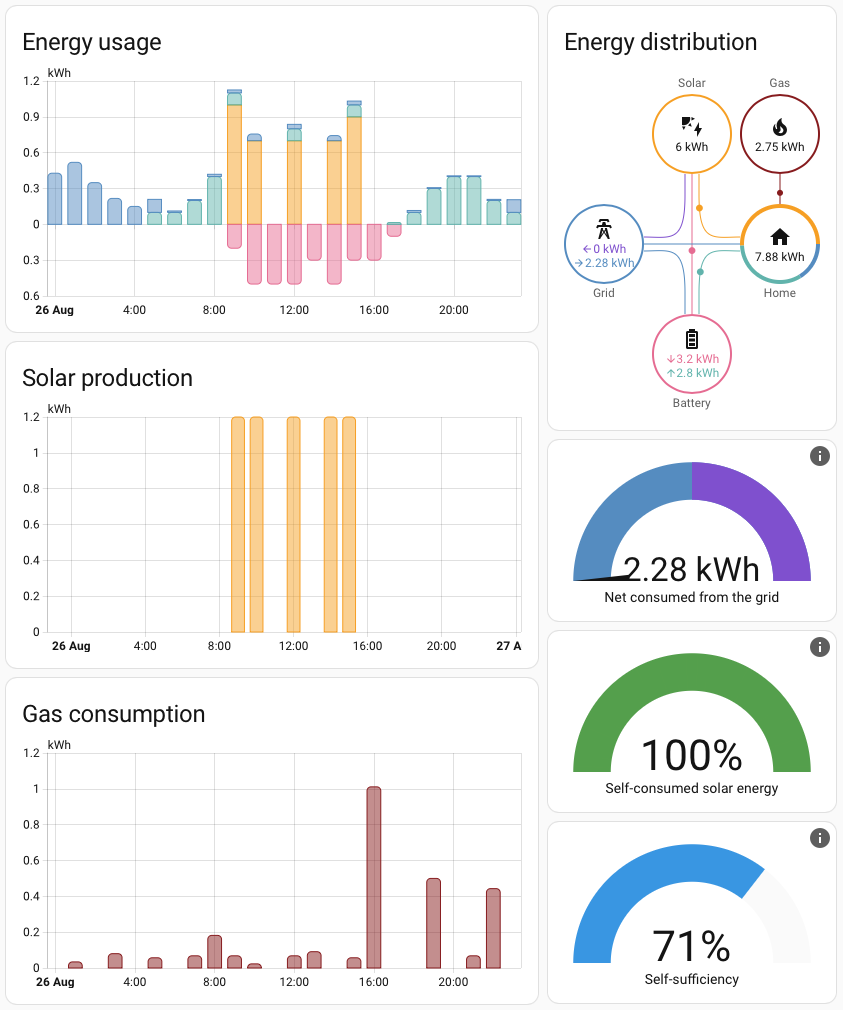
I did my best to pick appropriate stats for Solar Production, Battery Charge, Battery Discharge, and charger usage. One wrinkle is that the dashboard only works with entities that track a total amount (increasing over time, but may reset to 0 periodically). You can’t use live values. Unfortunately, many of the sensors I had to use are very coarse grained. For example, the Alpha ESS totals update every 1.2KWh.
It takes a while to populate the dashboard with data, particularly Electricity/Gas as Octopus only makes data available for the previous day’s usage.
Automations
Finally, the point of the exercise. I want to make sure that my battery doesn’t discharge if Octopus schedules a charging session outside normal off-peak hours.
Automations consist of a trigger, optional conditions and actions. Triggers describe events that should trigger the automation. Events can be caused by entities changing state or built-in events provided by Home Assistant and integrations.
My trigger will be the charger turning on.
Conditions are additional criteria that need to be satisfied for the automation to run. Common conditions could be based on time of day, position of the sun, or states of other entities.
I have the additional condition that Octopus smart control is enabled.
Actions do something. Each entity has a set of actions that it supports. There are also a variety of built-in Home Assistant actions, such as sending a notification to the Home Assistant app. You can see all the available actions in “Developer Tools -> Actions”.
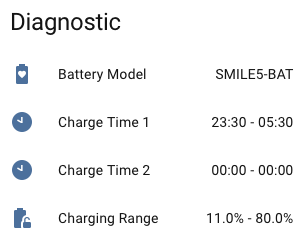
The Alpha ESS battery integration supports two actions that change the charging and discharging settings respectively. I want to override the standard settings when the charger turns on and reset them when the charger turns off. My battery is normally configured to charge during Octopus off-peak hours between 23:30 and 5:30. During this period the battery won’t discharge.
Charging sessions outside off-peak are charged at off-peak rates. I may as well charge the battery (if needed) while also preventing discharge.
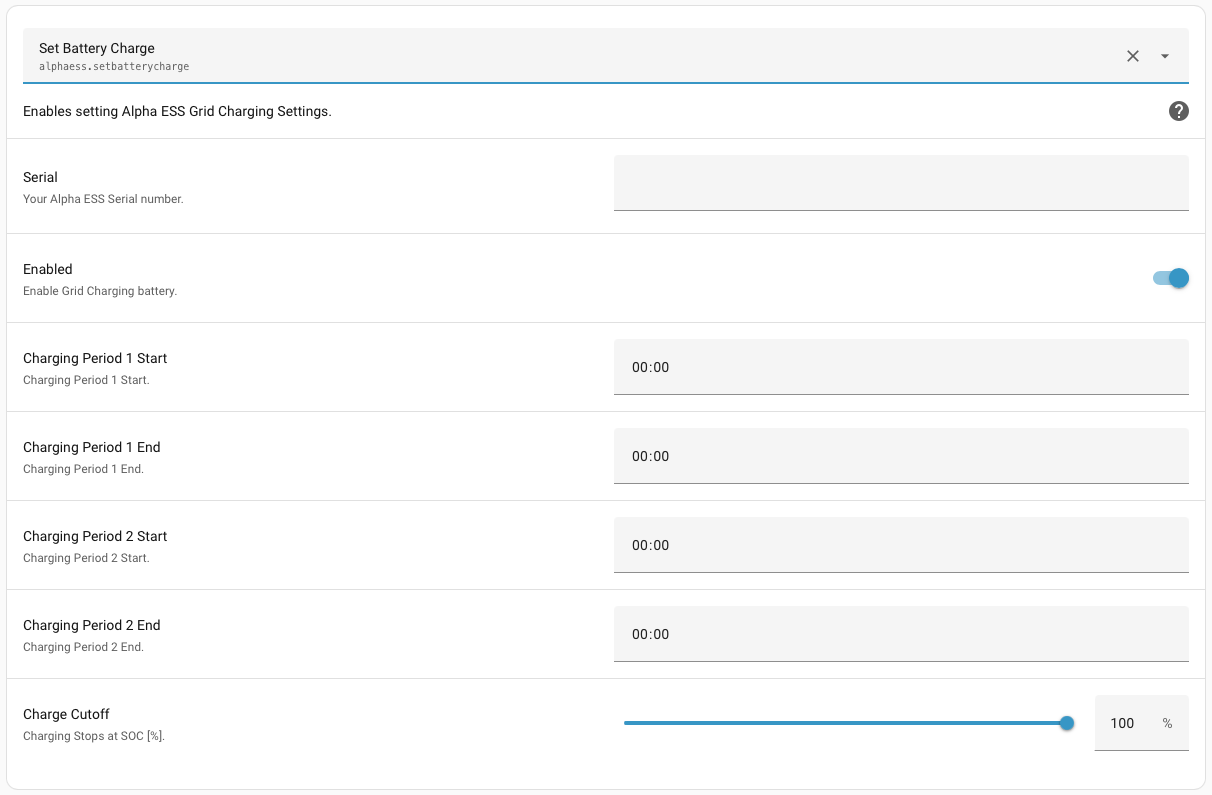
The battery charge action exposes the same parameters as the corresponding Alpha ESS Open API call. You have to set all of them together. Easy, I thought, I can read existing values for things I don’t want to change and pass those in. Unfortunately, there are no entities that correspond 1:1 with each setting. The data is available, but the integration combines and formats them into composite values.
In theory, I can use Home Assistant templating to retrieve those values and extract the pieces I need. In practice, that’s too much effort for my first attempt at automation.
For now I’m going to hard code the values to those I currently use. I’ll figure out a better approach later.
There’s no simple way to force the battery into charge mode. The solution I use is to set the second charging period to peak hours, 5.30 - 23.30.
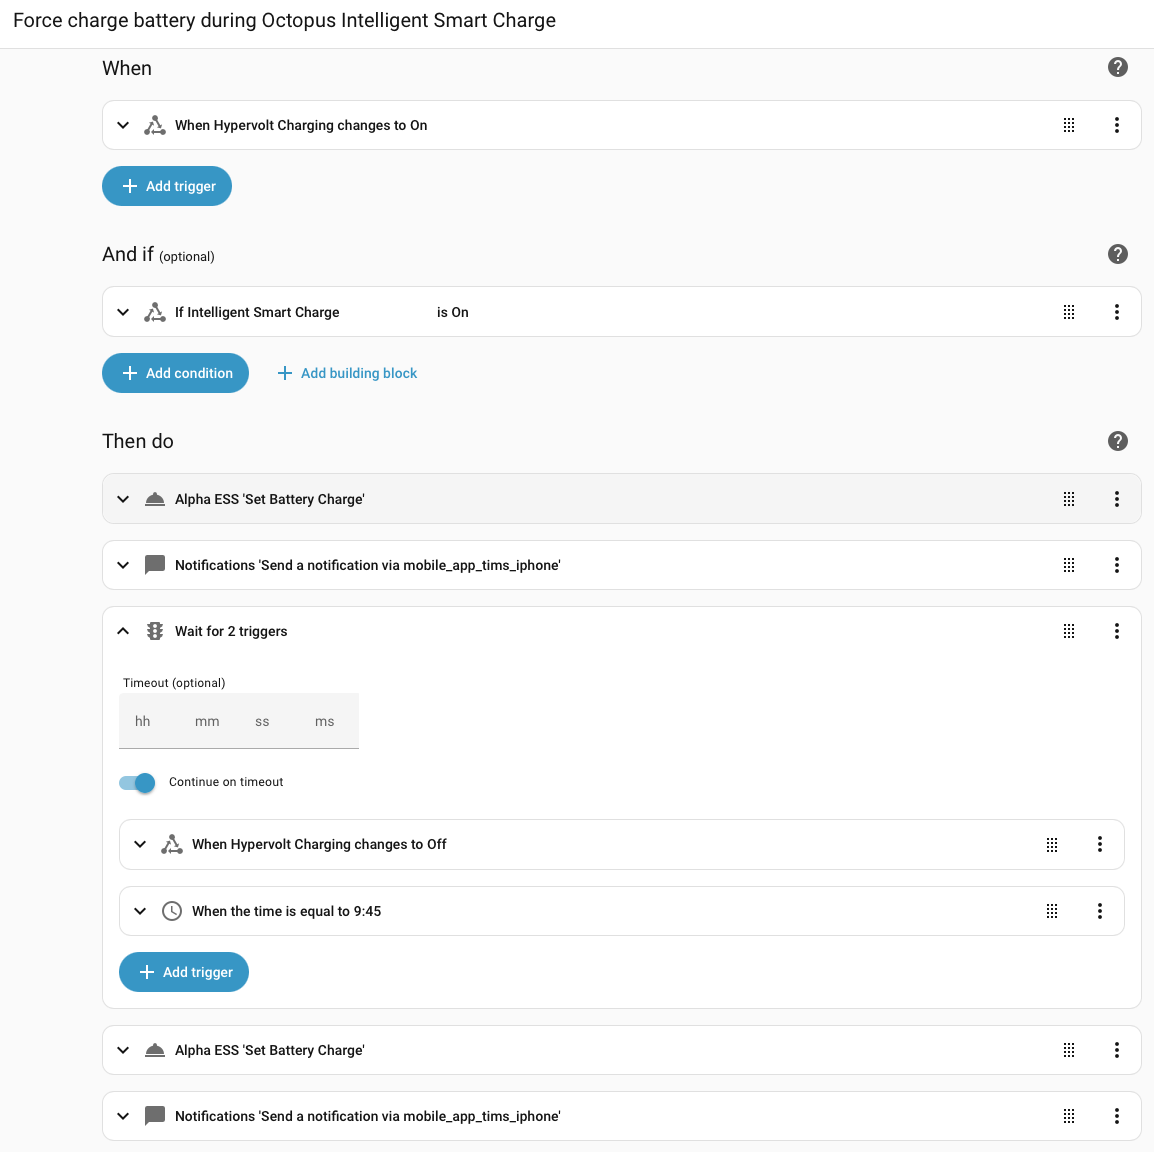
The automation triggers when the charger turns on, if smart charging is enabled. If the conditions are met, five actions are executed one after the other. First, the charging settings are changed to force battery charging and a notification is sent to my phone.
The magic is in the wait for triggers action. We wait until the charger turns off or we reach a time when charging should definitely be over, whichever happens first. Then we reset the second charging period to 0.00 - 0.00 and send another notification that it’s all over.
I don’t have any intuition for how reliable Home Assistant events are, so felt that it was worth putting in the fail safe to stop the automation.
Previous Attempts
I tried a few different approaches initially, but had to abandon them when they proved too complicated or too unreliable.
The first idea was to use the charging schedule that Octopus makes available via it’s API. The problem is that the schedule changes frequently and the off-peak rates only apply outside off-peak hours if your car manages to charge. It was simpler and more reliable to trigger the integration on the car starting to charge.
I originally set up the automation so that it would only apply for charging sessions outside off-peak hours. The problem is that charging sessions don’t fall neatly into peak and off-peak. You can have a session that starts outside off-peak and finishes inside, or starts during off-peak and finishes outside, or starts outside, runs right through the off-peak hours and finishes outside. There were too many special cases to deal with. In the end it was simplest to treat all smart charging sessions the same way.
Finally, I started out trying to do everything using a single charging period. The documentation for the Alpha ESS integration appears to say that the second period can’t be used.
These settings will only use slot 1 for charging and discharging, while you are not able to modify slot 2 from this integration, you are able to view its current settings.
The problem with that is that Alpha ESS requires start and end times to be multiples of 15 minutes and can’t be equal. After waking up to an empty battery one morning, I also discovered that the start and end times need to be at least an hour apart or the charging period is considered to be unused.
In desperation, I tried setting the second charging period and to my surprise it worked. I had a look round the source code and realized that the comment only applied to some GUI buttons that I wasn’t using. The battery charge action does pass both charging periods to the Alpha API.
Conclusion
Well, that was fun. On balance, a positive experience. I solved my problem and already have ideas for other integrations and automations I could set up.