We’ve had our Kia e-Niro EV for five years now. Early on, there were a couple of minor issues with the heater and collision avoidance radar which were sorted out under warranty. We had to replace the 12V battery two years ago. Apart from that, it’s been trouble free.
Trouble Starts
We started having problems on October 25th. Lucy had taken the car up to the Lake District for the OMM event. As she entered the car parking field and paused, waiting for instructions, the boot (trunk for those in the US) sprang open. It took a couple of goes to get it to stay shut.
All seemed normal until she returned to the car a couple of days later, after the event. The 12V battery was dead.
Unless you have an EV, you may not realize that they have two batteries. The big high power lithium-ion battery used to drive the motor and a normal 12V car battery used for the rest of the electrical systems.
There are two reasons for this. First, car electrical systems are designed to work with 12V DC. It’s easier to use standard parts rather than custom stuff that can work with the big battery directly. Second, it’s safer if the 400V high power drive circuits are only powered on when needed. The car runs off the 12V battery until you put it in drive mode. Once in drive mode, it recharges the 12V from the big battery.
Perhaps surprisingly, EVs often have problems with their 12V batteries. The battery doesn’t have much work to do. There’s no starter motor to turn over. Starting the car is just a matter of activating a relay. Manufacturers cut their costs by fitting a more basic, lower capacity 12V battery. There’s also a theory that turning over a starter motor regularly helps keep a 12V battery in good condition.
Our original 12V battery died a couple of years ago. Our experiences then prompted us to fit a battery monitor and buy a cheap jump starter. As there’s no starter motor to turn over, you don’t need much to jump start an EV. A small lithium-ion power bank will do the job.
Lucy opened the car with the mechanical key and jump started it without trouble. It seemed fine after that. I checked the battery monitor when she got home and all looked normal.
Rapid Battery Drain
On November 3rd the 12V started draining rapidly without us noticing. We last used the car on Nov 4th. By the morning of Nov 5th the battery was completely dead. Down to 9v according to the battery monitor history. We next tried to use it on Nov 7th. Jump starting didn’t work.
Normally when you connect the jump starter, the car turns on in standby mode, as it does when unlocking with the key fob. You put your foot on the brake and press the start button to turn on everything else, including the main battery.
This time when we connected the jump starter, the car tried to start up immediately. Without activating the main battery. As if you’d pressed start without your foot on the brake. Almost immediately, the current drain from all the other electrical systems starting up is too much for the jump starter and the car dies again. We tried a few times and couldn’t get it to work.
Once a 12V battery is completely drained, it’s never the same again and is likely to need replacement. We’d had this one for a couple of years, so took the simple way out and booked a mobile battery replacement service for the next day.
Once the battery was replaced, the car seemed fine. All working normally. This time I checked the battery monitor every few hours. All fine until the evening of November 9th when the battery started draining again.
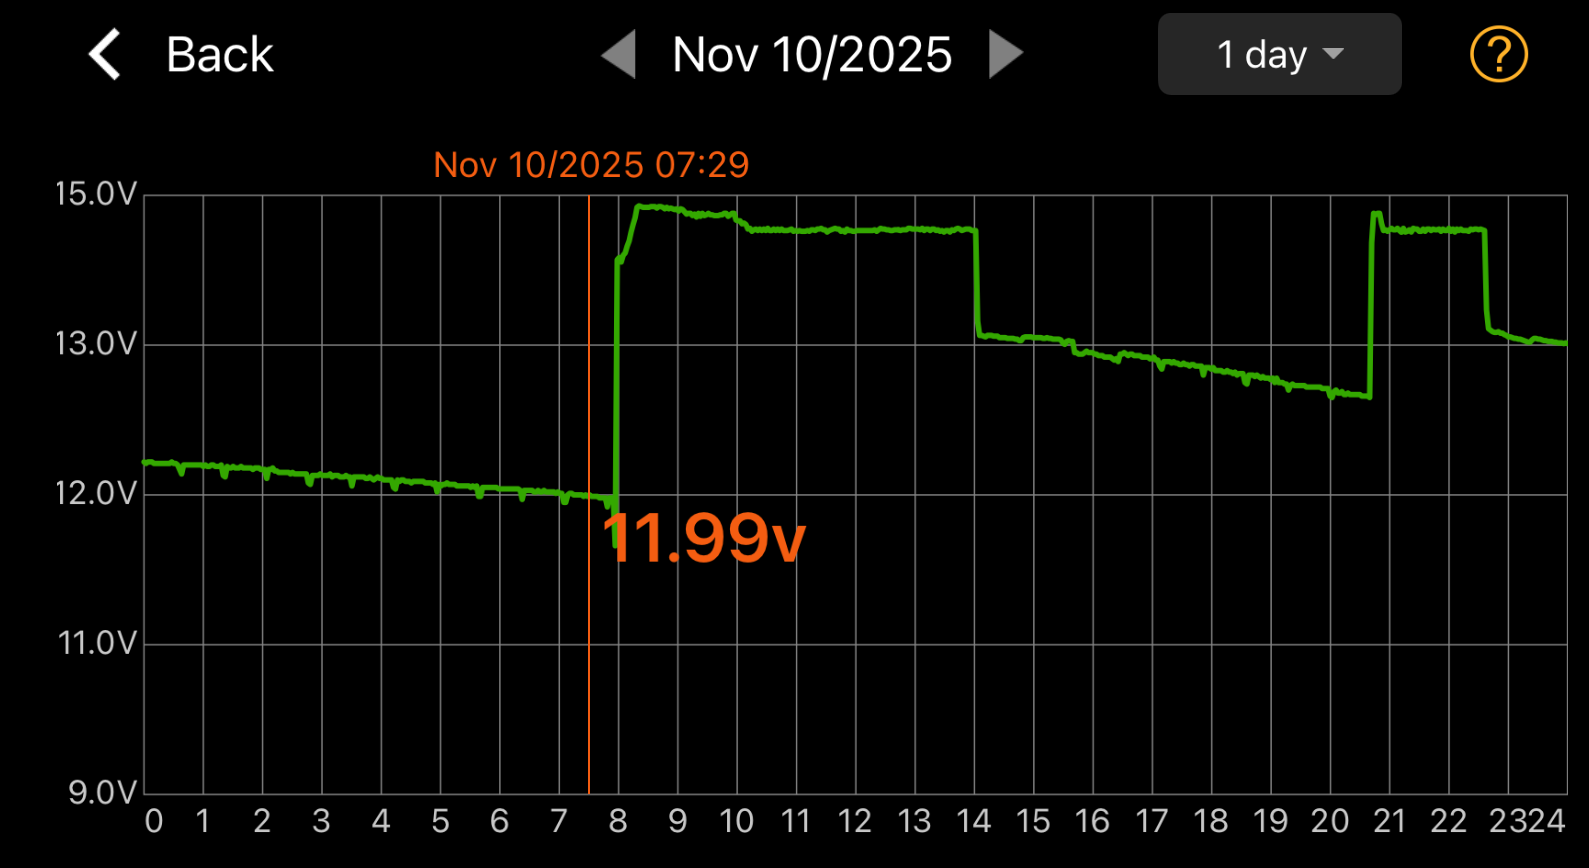
The battery monitor graph looks odd. There’s a steady drain with brief additional drops in voltage every hour or so. The battery gets worryingly low overnight. I had to start the car up twice a day so that the main battery could charge the 12V back up again.
Houston, we’ve got a problem. I’ve heard stories of 12V battery drain caused by the boot latch not closing properly. Which fits with the issues we had with the boot not closing.
We rang our local Kia dealer. They agreed that the car needed to come in. The first slot they had available was, wait for it, on 29th December. Seven weeks of charging the 12V twice a day and worrying whether the car will start if we go on a trip somewhere. To add insult to injury, they would charge us £164 for “diagnostics”, if they didn’t find a cause covered by the warranty.
Lucy rang the local independent garage and they said they could take a look at the boot latch on the 11th. I took the car in and described the problems we’d been having with the 12V battery drain. At which point they refused to take the car.
“We’re mechanics. You need an Auto Electrician”.
It’s the first time I’ve heard that phrase. It turns out modern cars really are computers on wheels. Anything electrical needs a specialist. Apparently, there are lots of local auto electricians who offer a mobile service.
I googled and rang round. The auto electricians that offer a mobile service won’t touch EVs. I found one that would work on EVs, but only if we brought the car to their workshop. The earliest slot they had was on the 18th.
Detective Work
Given the delay and the pain of charging the battery twice a day, I decided to try some detective work. If I could identify the fuse for the boot latch, I could pull it out and see if that stopped the drain. The e-Niro has two fuse boxes. There’s one inside the car on the driver’s side with smaller fuses and one under the bonnet with larger fuses. The fuses I’m after are in the driver’s side fuse box.
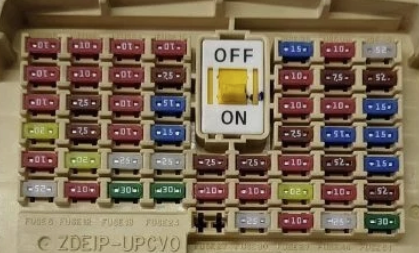
The boot closure is actually two separate modules. There’s the boot latch itself and the release switch. There’s a “tail gate relay” fuse for the relays that power the boot latch lock and release. It’s the fourth fuse down in the third column from the left. The e-Niro comes with a fuse puller which, annoyingly, is stored in the fuse box under the bonnet. I removed the fuse and confirmed that the boot wouldn’t open. I waited a couple of hours. The battery is still draining.
There’s no obvious fuse for the release switch. After some more digging it looks like all the switches connect to a central control module, effectively acting as inputs to the computer running the car. If I pulled the fuse for the control module, nothing would work.
The fuse box has a big switch in the middle. Apparently, it’s used when shipping the car over from Korea. You put the car on the ship, flip the switch to off and lock the car. Once the car goes to sleep, after five minutes or so, pretty much everything electrical is shut down. That includes the door locks. When the ship docks, use the mechanical key to open the car, flip the switch back to on and turn the car on.
Let’s try it and see what happens. I turned the switch off, locked the car and waited for 10 minutes. Tried the door locks. The car opened. Boot release switch works too. Tried starting the car. There’s a message on the dash telling me to turn the fuse switch back on.
Turn if off and on again
We didn’t need the car again until the 15th, so I disconnected the 12V. I was fed up with constant battery monitoring and charging.
Three days later, I reconnected the battery. Everything working as normal, except the clock needs to be reset. We go back to the normal routine of battery monitoring. There’s no drain. I keep monitoring.
The boot that would not stay shut
The 18th rolls around and still no drain. I phone the auto electrician who agrees there’s no point seeing the car if there’s no drain. I keep monitoring and all looks normal until we try to use the car again on the 19th. I put some stuff in the boot, closed it and got in the car. The boot sprang open. Tried again, and again. The boot would not stay shut.
I moved the key fob out of range of the car and shut the boot again. This time it stayed shut. I picked up the key and went back to the car. The boot sprang open again.
Finally, I pulled the boot latch fuse out again. This time the boot stayed shut for good.
Hypothesis
What’s going on? Why didn’t the fuse box switch work?
The fuse box switch is meant to put the car into a deep sleep when it goes to sleep. It didn’t do anything, therefore the car didn’t go to sleep. If the car doesn’t go to sleep, the 12V battery will drain.
Cars not going to sleep when you lock them is a fairly common problem. Often the computer control system gets itself in a funny state. The first thing to try is to disconnect the 12V battery to do a hard reset. The car is a computer so let’s turn if off and on again.
That’s why it started working when I disconnected and reconnected the battery.
Why all this trouble with the boot?
The release switch is dodgy. It sends repeated “button pressed” signals without anyone pressing the switch. The computer gets the boot release switch pressed signal, confirms that the key fob is in range and then sends power to the relay which powers the boot latch open motor.
That’s why the boot stays shut if the key fob is out of range or when the car is driving. It’s not a problem with the boot latch.
Modern cars go to sleep when the computer stops receiving incoming signals. If the boot switch keeps sending signals, the car won’t go to sleep. Eventually, it gets so confused it stops trying.
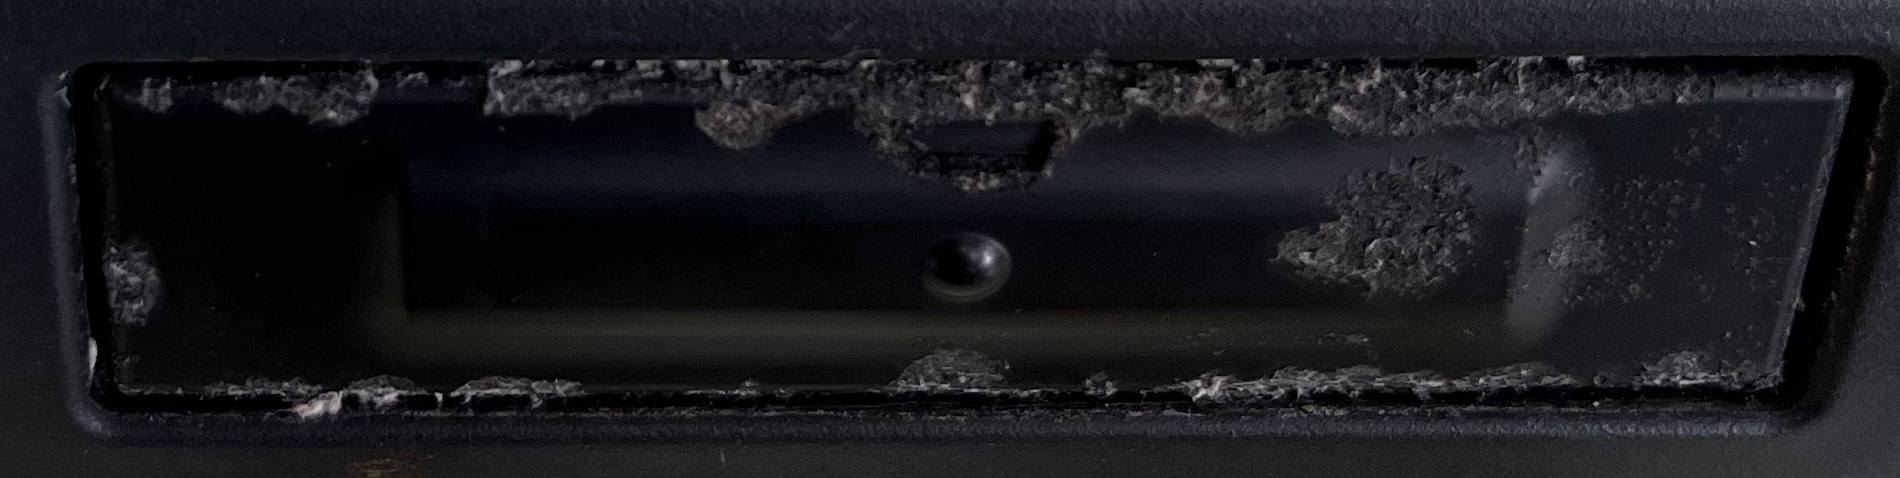
The problems with the switch are intermittent, but clearly getting worse. Looking closely, I can see that the rubber seal over the top of the switch is degrading and perforated. It’s possible that water has got into the mechanism.
Switch Replacement Theory
The easiest fix is to replace the switch with a new one. Both times we’ve had a problem that needed a new part under warranty, the Kia dealer ended up having to order a replacement from Korea. They won’t order a part until they’ve seen the car and they won’t look at the car until 29th December.
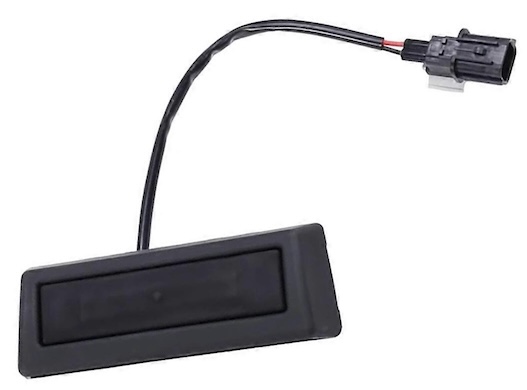
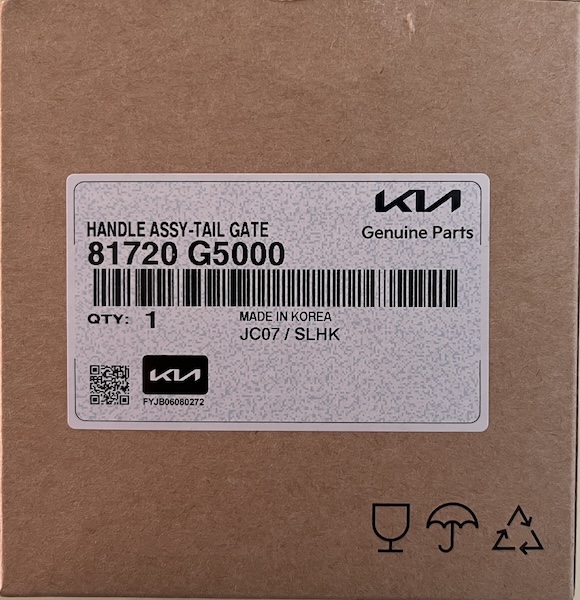
I decided to see if I could buy one myself. Confusingly, the part is called “Rear Boot Release Switch” in the UK and “Tail Gate Handle” in the rest of the world. Best to search for the part number, 81720-G5000.
A quick search throws up lots of sellers. They divide into three categories. First, there’s Ebay sellers who will ship a part direct from China for £15, arriving in a month. Then there’s the Amazon sellers who will ship a part direct from China for £35, arriving in a couple of weeks. Finally, there are UK based sellers who will ship a part for £80+ pounds, presumably from the UK, arriving in a few days.
Assuming we can get the part, can we fit it ourselves or will we need to find a garage to do it?
Naturally, I did my research, and found a YouTube video. I couldn’t find one for a Kia Niro, but a Kia Sportage should be close enough.
Modern cars are not just computers on wheels, they’re modular computers on wheels. Each module is a self-contained assembly with a plug that connects into the car’s wiring harness. The hardest part is removing the plastic trim covering up the internals. Once you’ve done that, unplug the old switch, release the catches that hold it in place and plug a new one in.
Trim Removal
Before ordering a replacement switch I wanted to confirm that (a) we could remove the plastic trim and (b) unplugging the old switch would stop the boot opening itself.
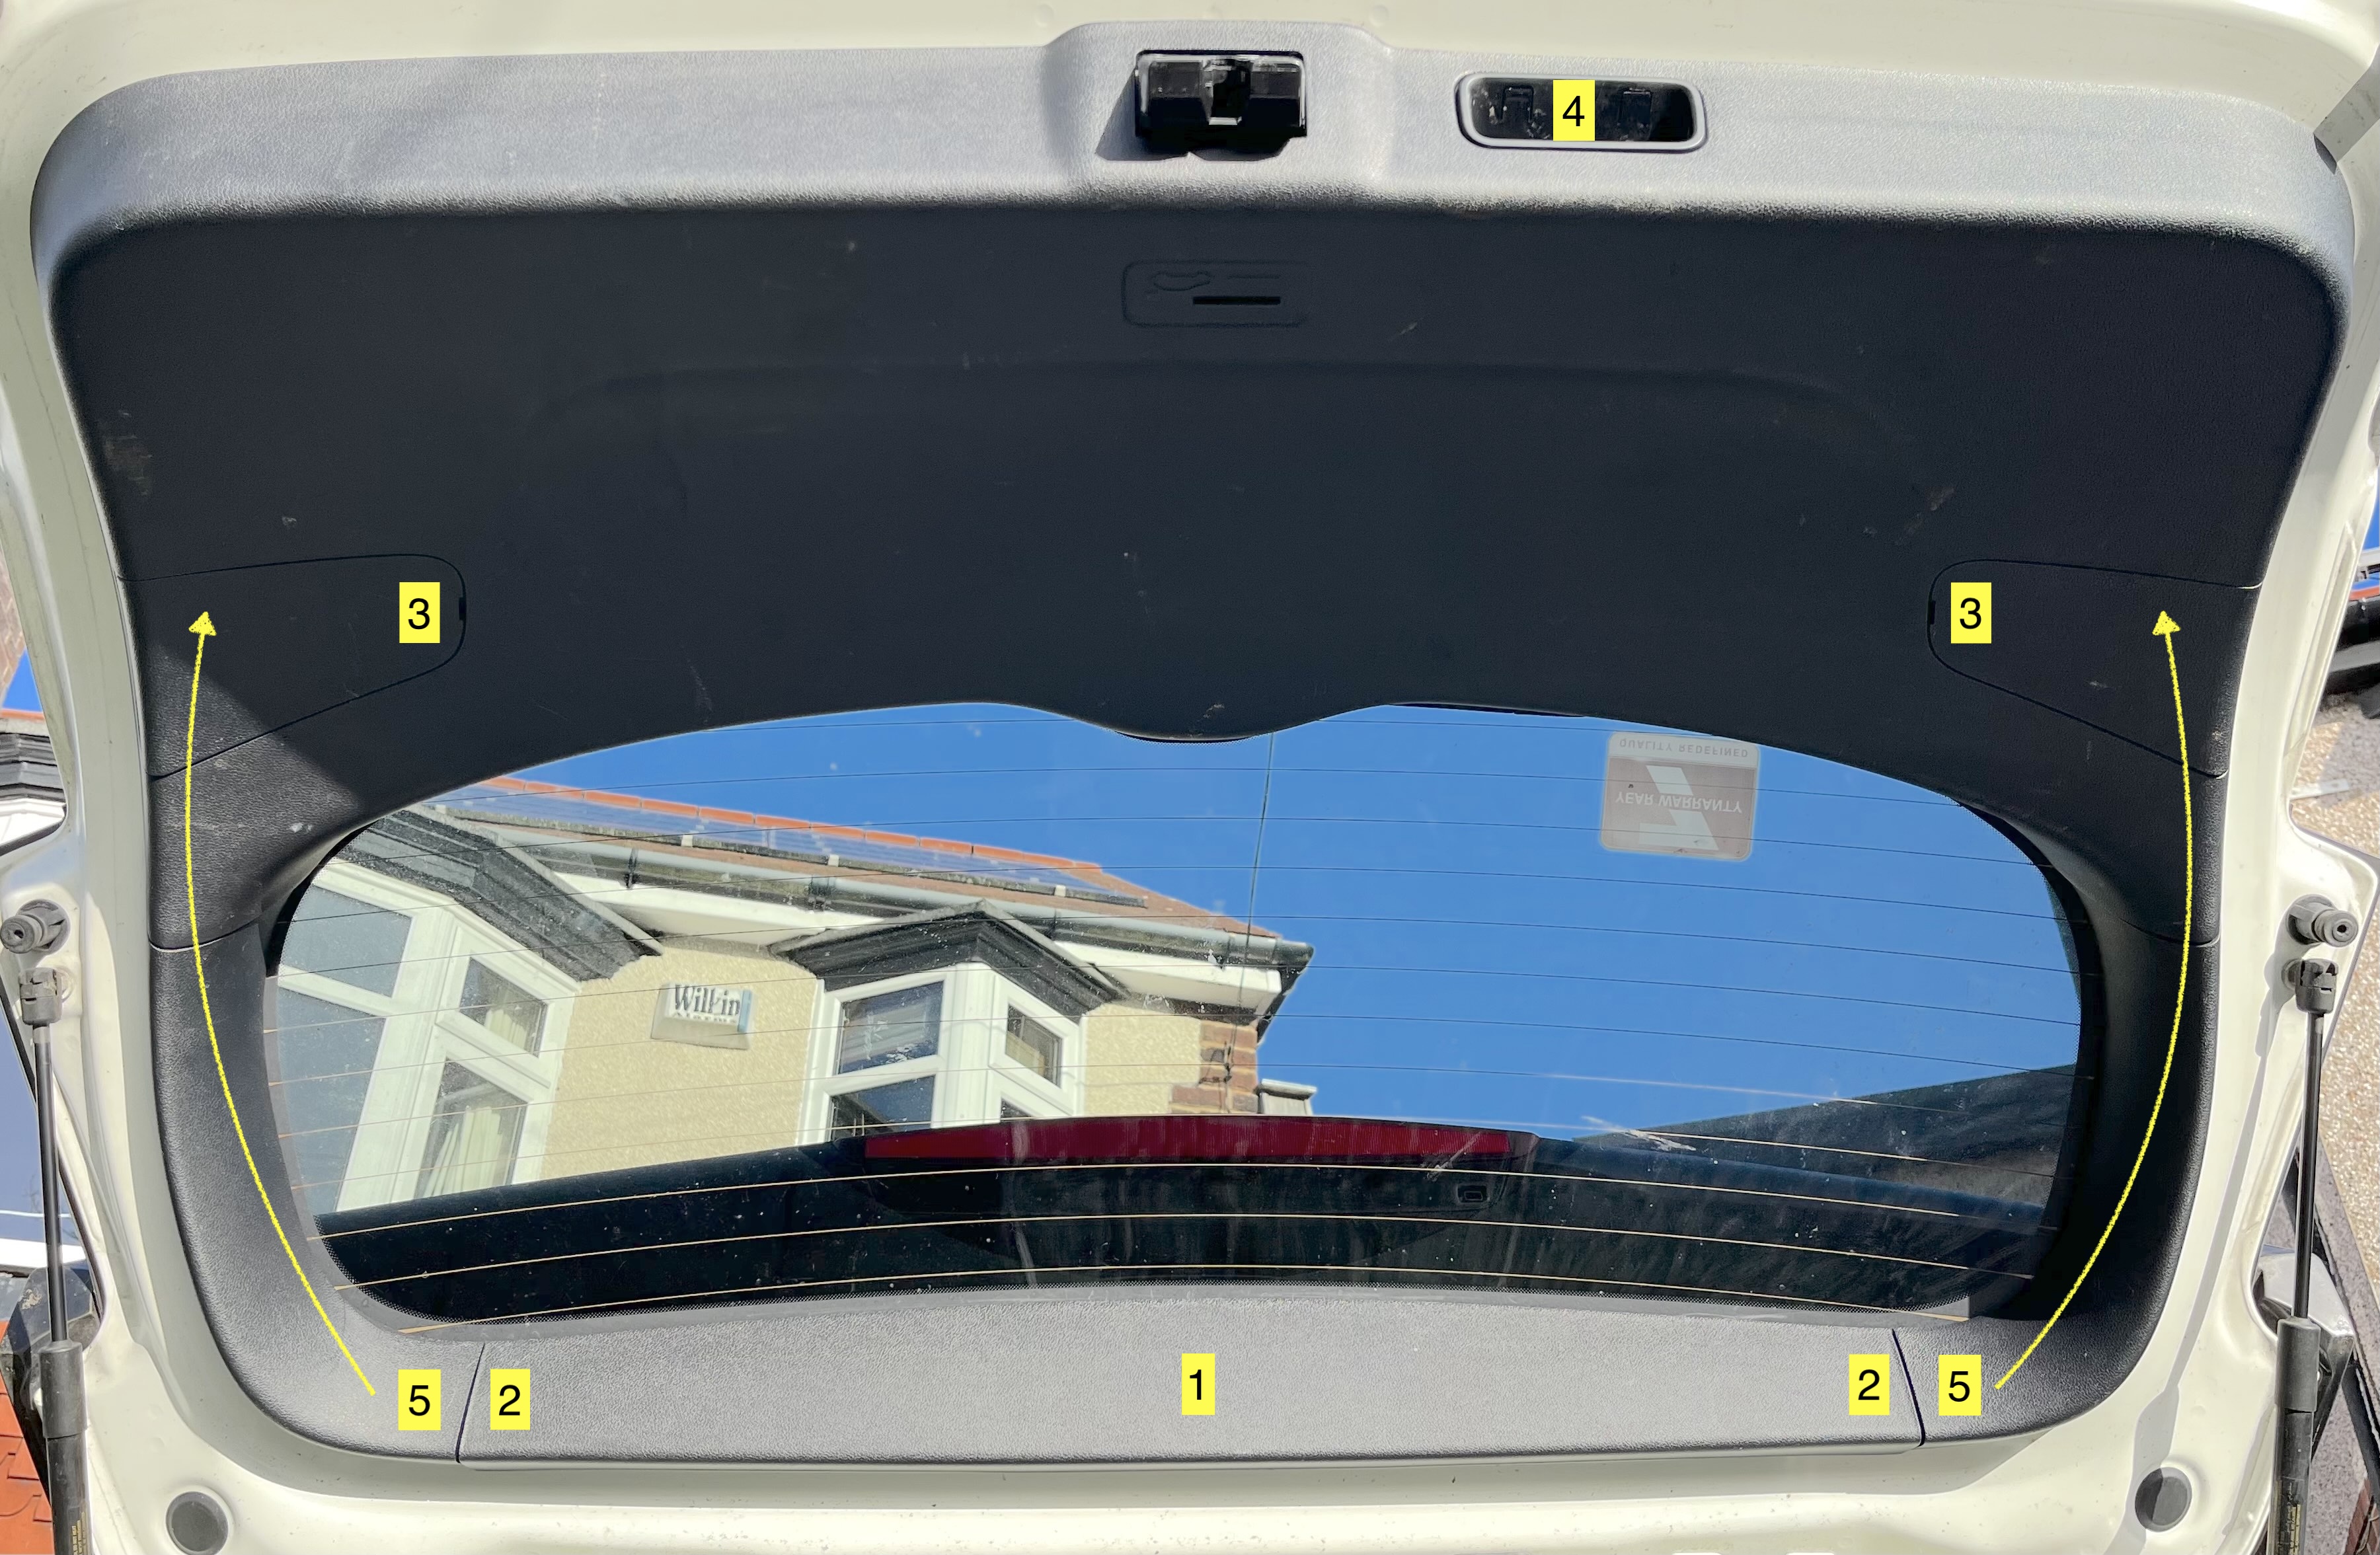
A Niro isn’t the same as a Sportage but the overall approach is similar. First, pull off the piece of trim labeled (1). In theory, use a plastic trim removal tool to lever it off. In practice, I was able to pull if off with my hands. The trim is held in place by plastic poppers which push into holes in the metal boot panel behind. You need to pull them out one by one to free the trim, starting at the edges labeled (2).
Underneath the trim at (2), you’ll find two screws which secure the main trim. Remove the screws and put them somewhere safe. Lever off the two small panels labeled (3). There are gaps where you can insert a removal tool next to the labels.
Remove the hand hold (4). There are two points on the upper surface either side of the label that you need to push in. Everything else is one big piece of trim. Work your way round, freeing the plastic poppers, starting from (5). There are two special green poppers under the two panels (3), which need some extra jiggling.
Eventually the whole thing comes away in your hands, revealing the glory behind. I wish I’d taken some pictures while the trim was off, but at the time we were focused on getting it sorted. There’s a wiring harness from the top corner of the tailgate connecting to all the tailgate modules, including the boot latch and boot release switch. Each module has a plastic connector which you squeeze and pull to unplug.
We unplugged the switch, put the boot latch relay fuse back in, and everything was fine. Boot closed and stayed closed. No battery drain. Of course we were stuck with having to open the boot from the inside using the manual release.
Waiting for a part
I ordered a replacement switch on 20th November from kiapartsdirect.co.uk. I was willing to pay the premium for fast delivery and the promise of a genuine Kia part. Kia Parts Direct is run by Fish Brothers, a Kia dealer in Swindon. Online reviews looked OK so we gave it a try.
An automated email confirmed our order, followed by confirmation on 22nd November that our order had been processed and should be delivered within 2 working days. The part arrived on November 26th, 3 working days later. Good enough.
Switch Removal
Getting the old switch out proved more of a challenge than I’d hoped. From the outside it looks like it should be simple enough.
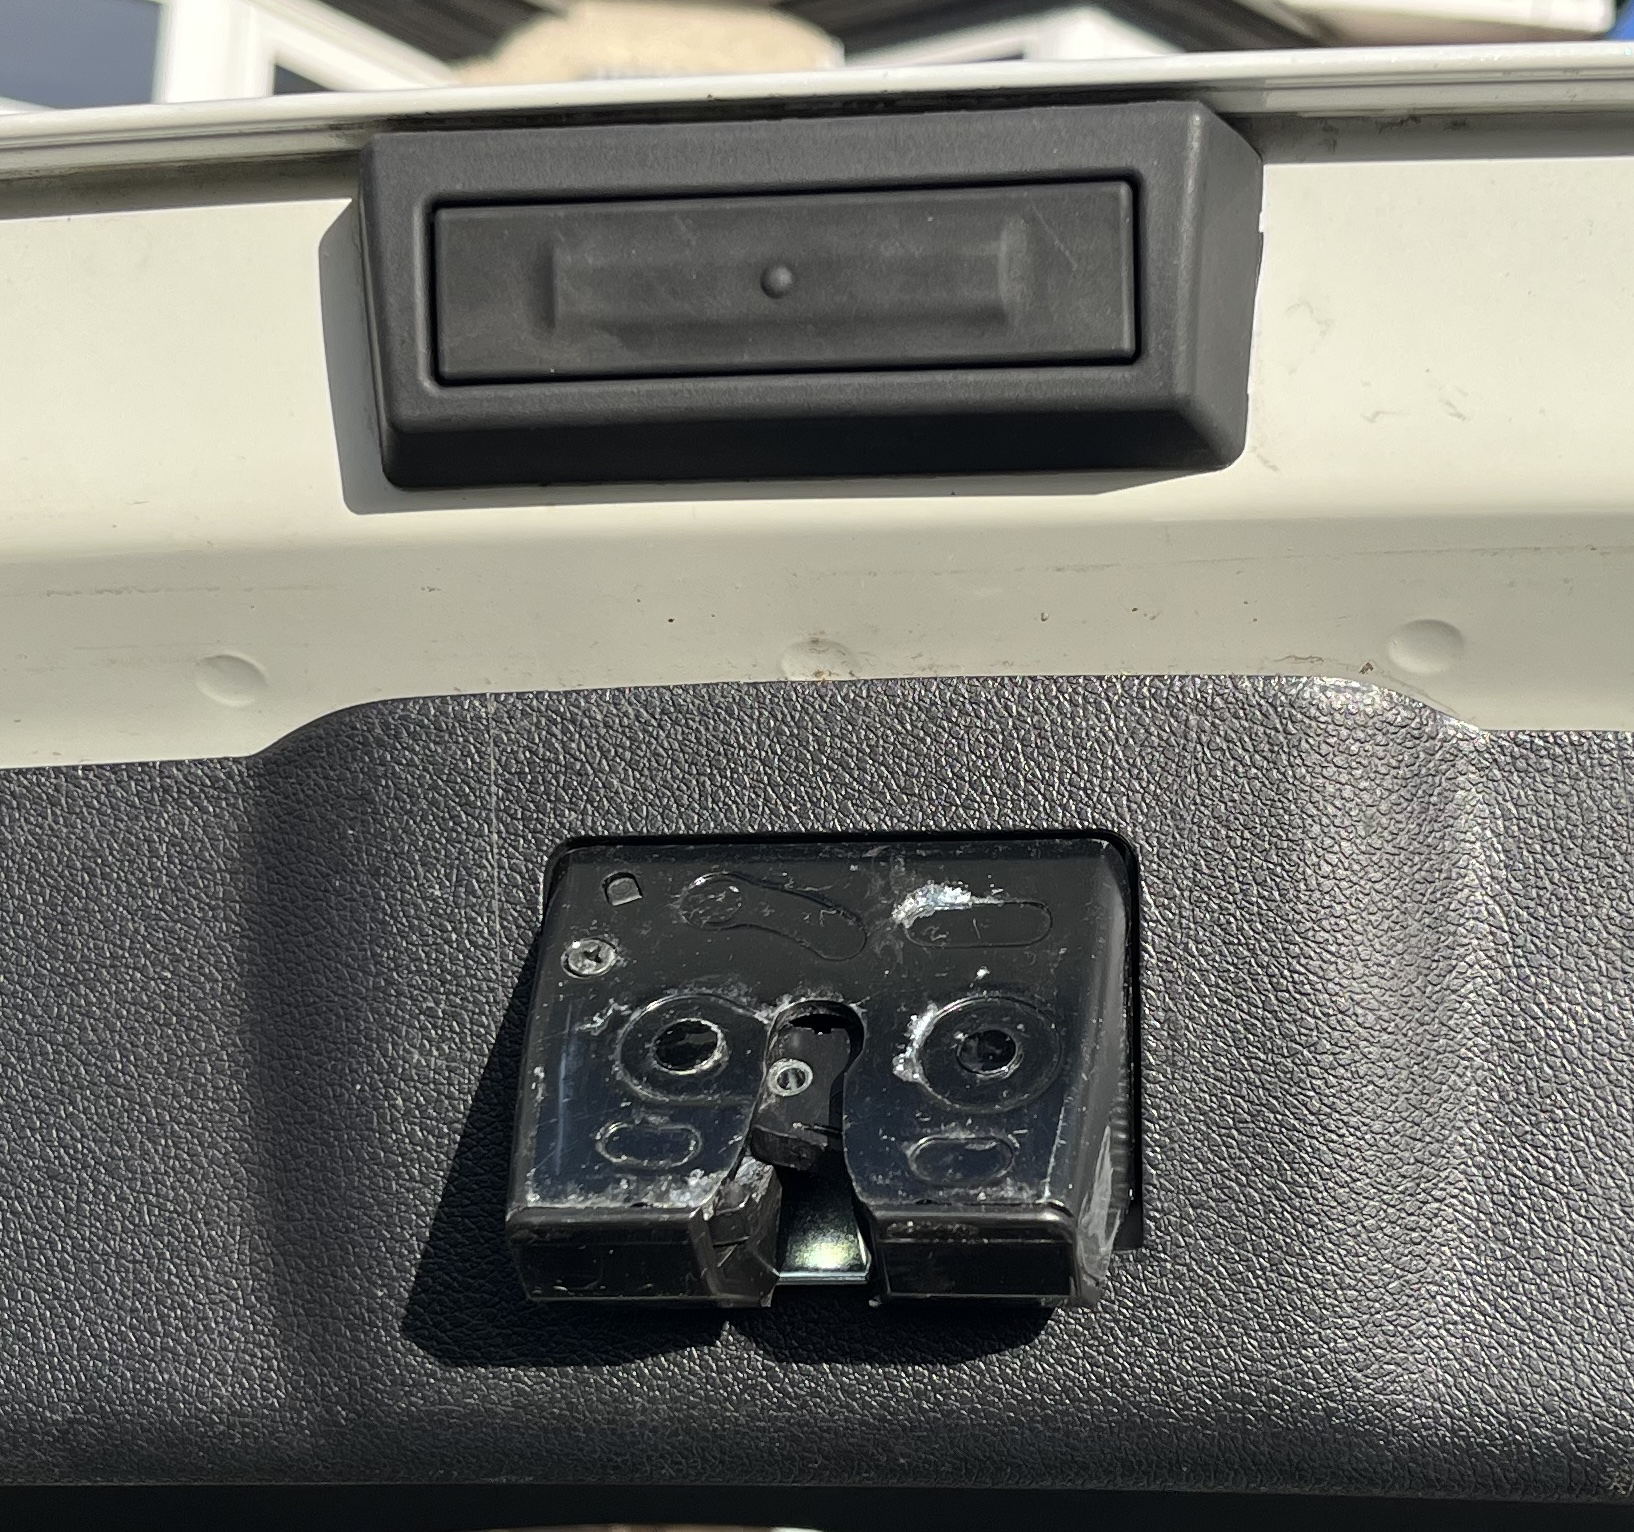
Release whatever holds the switch in place on the inside and it should drop out. The back of the switch slides into a hole in the metal boot panel and is held in place by four metal clips.
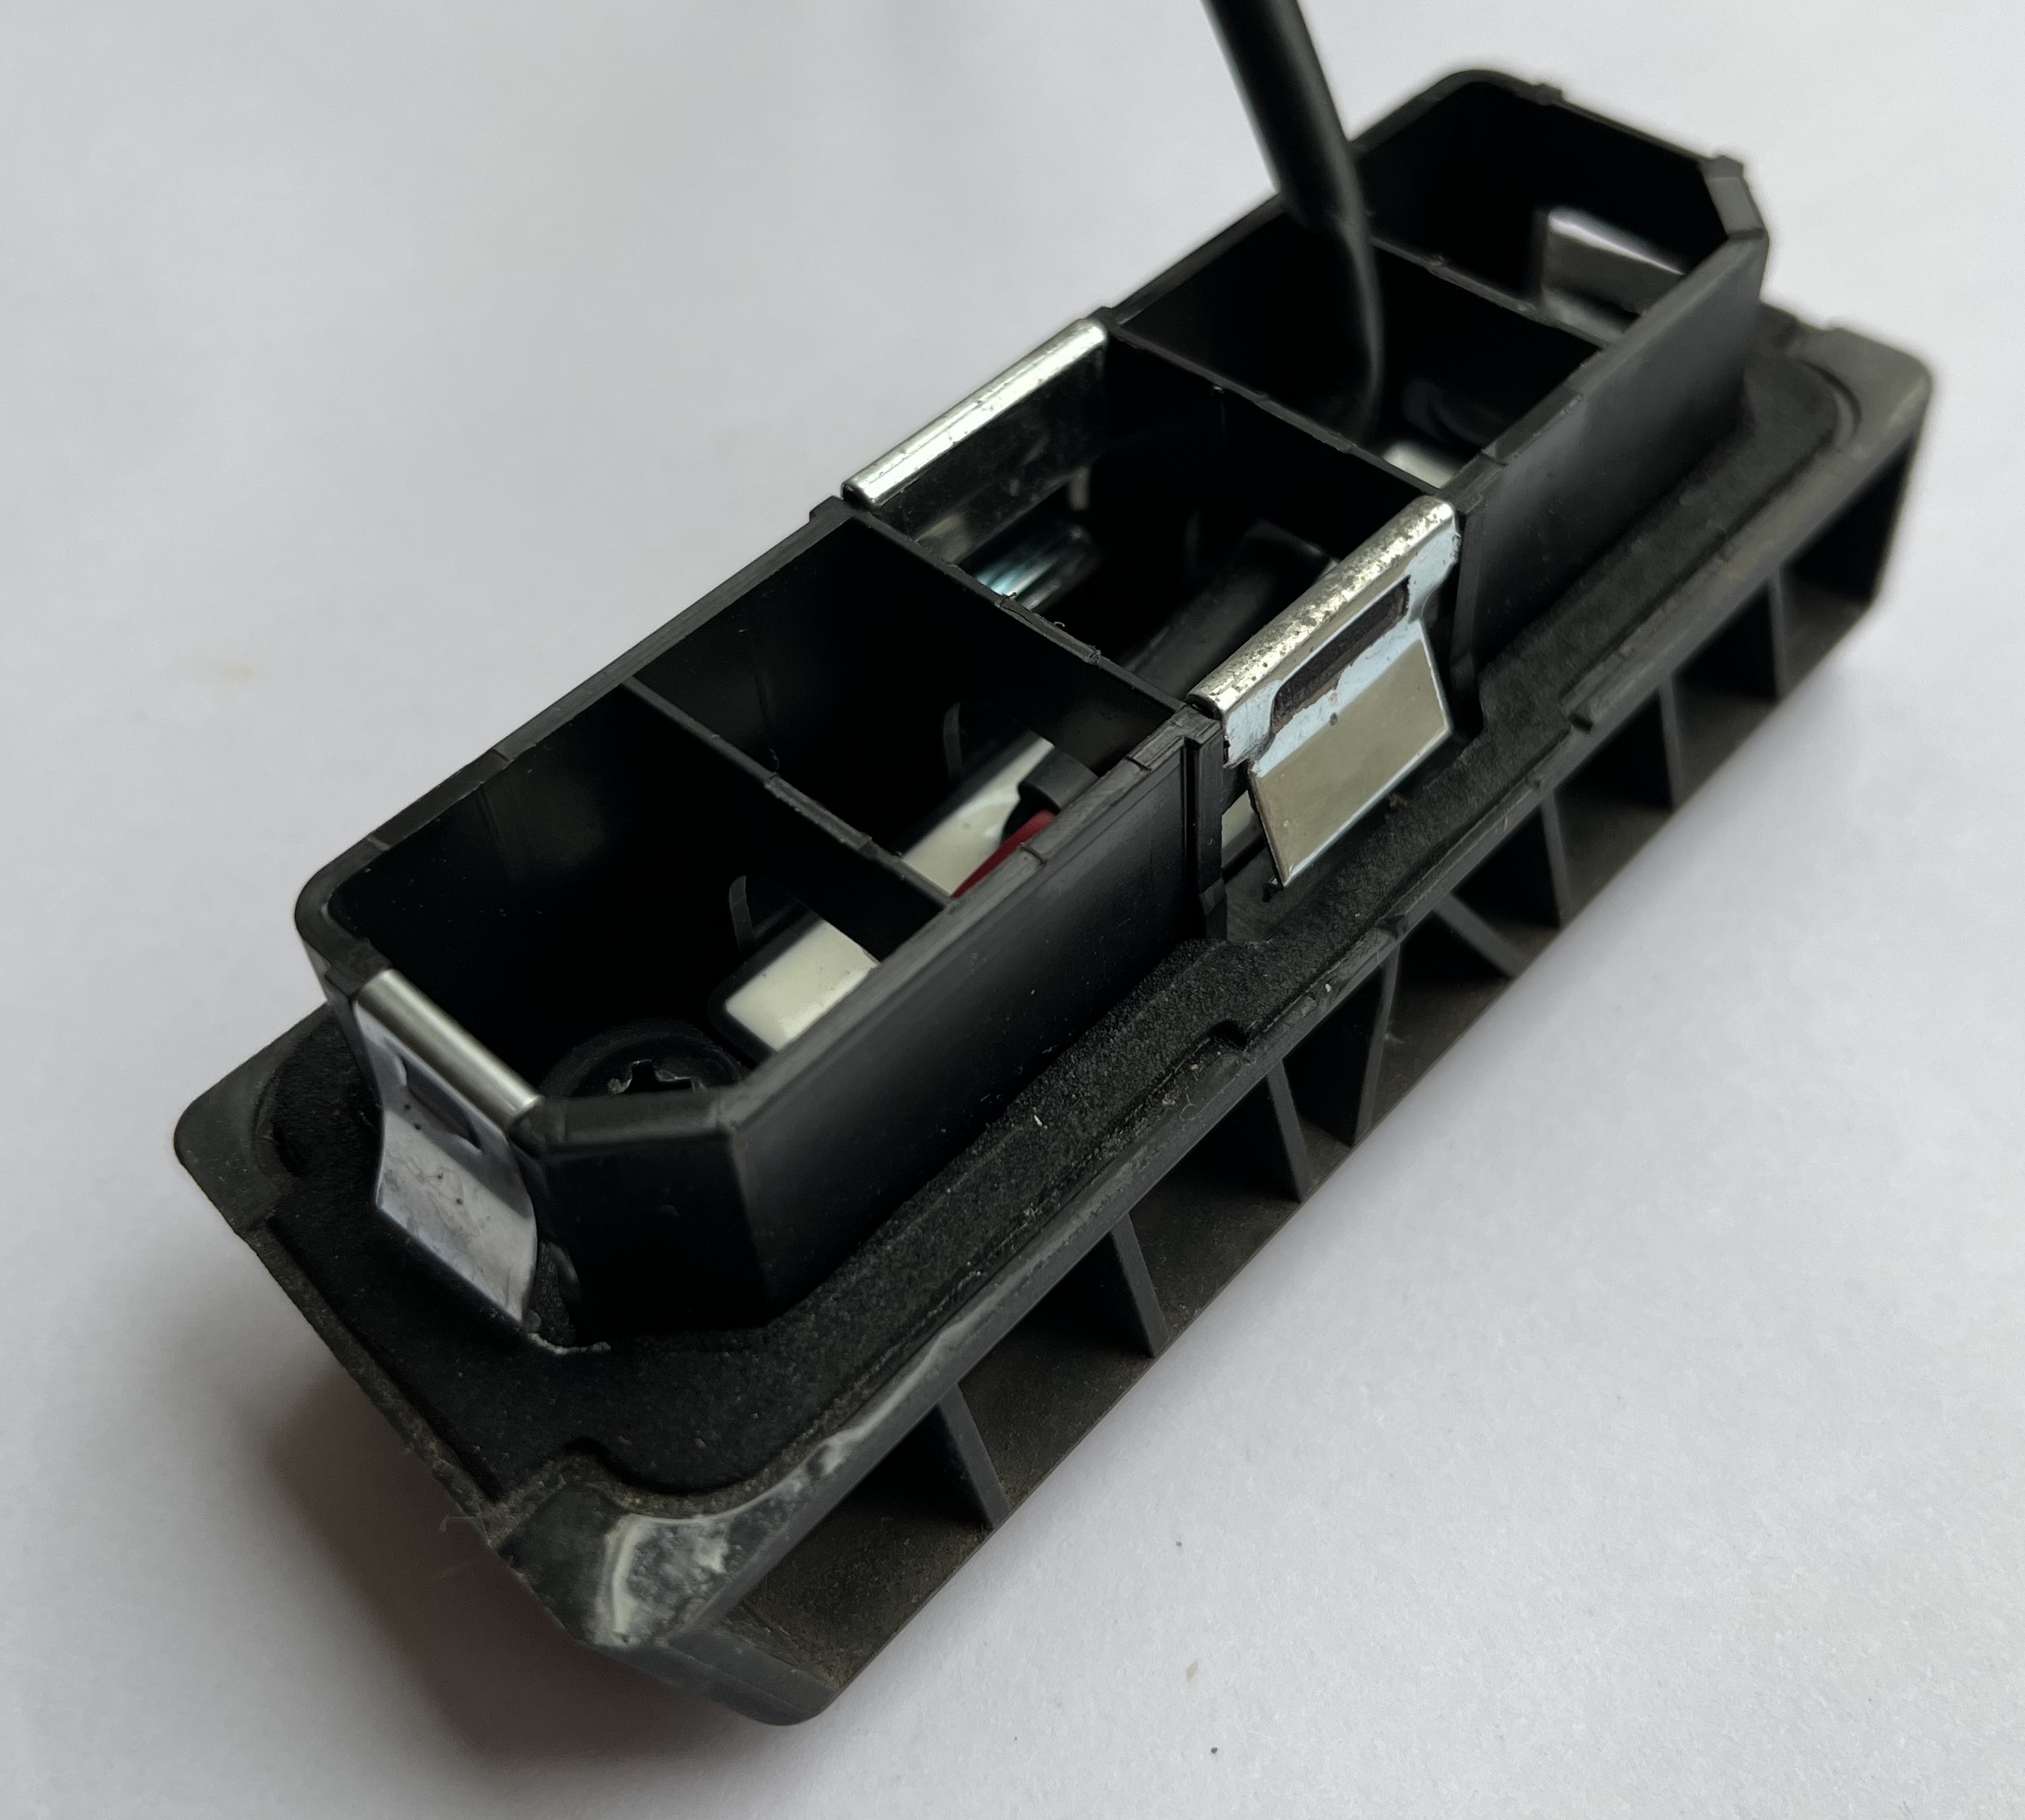
When the switch is slid into place, the metal clips on the sides are squashed, then spring open to brace against the back of the metal boot panel. To get the switch out, I need to push all four clips flush against the switch body and then pop it out.
That would be awkward enough. It becomes impossible because the boot latch mechanism blocks access. Here’s a cross-section diagram that hopefully makes the problem clear.

The boot latch is held in place by three bolts. Removing it should be simple enough. Putting it back requires a torque wrench to tension the bolts correctly. It’s also one more thing to go wrong in unknown territory for us.
Lucy figured out the solution. We don’t need the old switch intact, we just need it out. Before I could stop her, she attacked the outside of the switch with a flat head screwdriver, sliding it between the switch and the metal boot panel, then levering away.
In a triumph for brute force and ignorance, the switch ejected from the back of the car accompanied by load pinging noises. On closer inspection of the new switch, we realized that the metal clips are just pushed onto the plastic body of the switch. Pull hard enough and the clips spring off.
Result
The rest of the procedure was undramatic. We found as many of the old clips as we could. Pushed in the new switch with a satisfying click as the clips sprung into place. Plugged in the connector and plastic popper that pins the wire to the boot panel.
I checked that the boot closed and that the switch opens it again. Repeated a few times. No issues with the boot springing open. We pushed the plastic trim back into place, remembering to put the two screws back.
I monitored the battery over the next week. No issues at all. Switch and 12V battery both behaving themselves.
Who needs a garage?