Last time, we touched briefly on how to extract electricity meter readings from the Home Assistant Octopus Energy integration. I think it’s worth doing a deeper dive.
There’s nothing like looking at a real world integration to better understand the strengths and weaknesses of the Home Assistant data model.
Electricity Meter
The integration exposes separate devices for each energy meter (electricity and gas in my case). Each device has a set of sensors which can be logically divided into two groups. The first group relates to the previous day’s consumption of energy. There are separate sensors for the energy consumed, the cost of the energy consumed and the applicable rates during the day.
The second group relates to the current state of the tariff you’re on. There are sensors for the standing charge each day, off-peak times, and per-unit rates.
The Home Assistant data model for all entities includes a current state which is a simple, understandable, scalar value. This is the headline value that you see in the UI for each entity, the value that you see graphed over time in history views and that is aggregated in statistics views.
Each entity also has a collection of attributes. These can be anything the integration wants to add. Typical examples include additional values related to the state and metadata for the entity.
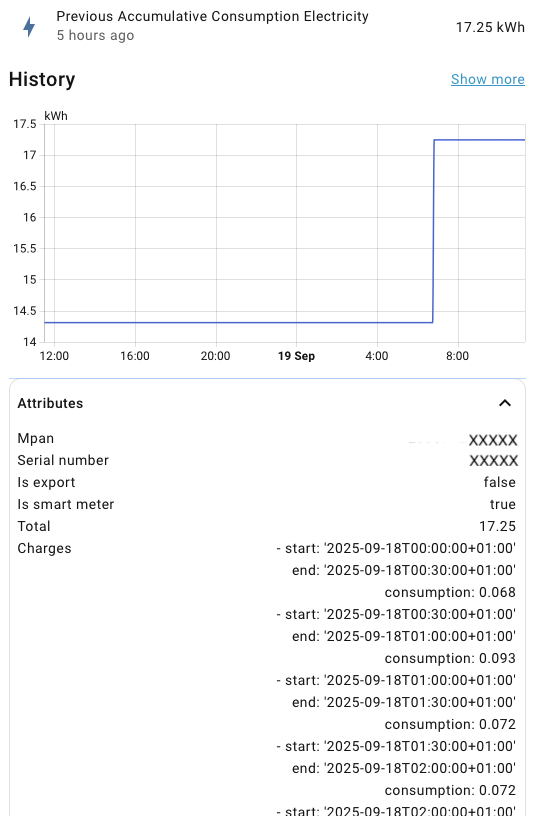
As we saw last time, the Octopus Energy integration adds a huge collection of attributes to its sensors. Why is that?
Mapping Sensors to API Calls
How do integrations like Octopus Energy work? They retrieve data by making API calls to external services over the internet. Typically, an API call will return a package of data, such as all the meter readings for one day. The integration needs to decide how to expose that data as entities in Home Assistant.
It’s not practical to expose every item of data as a separate sensor. It would be overwhelming for the end user, use a lot of Home Assistant resources and create a lot of work for the integration author.
Most integrations pick a small selection of things that are most likely to be useful as state that changes over time. You may also end up with multiple sensors driven by data from the same API call, like previous consumption, costs and rates.
What do you do with all the data that you didn’t expose as state? You could make a decision and discard everything that isn’t relevant. However, anything could be relevant for somebody.
Attributes are stored as a big blob of structured data (think JSON or YAML). It’s easy to add whatever you want, so most integration authors dump whatever data is left into attributes. Unfortunately, attributes are harder for the Home Assistant end user to work with.
There are many automation triggers, conditions and actions that only work with state. The same is true for dashboard cards. Even worse, there’s nothing in Home Assistant core that lets you access historical attributes.
For many use cases, you have to create template sensors which expose the attributes you’re interested in as state. This is a common pattern in Home Assistant. They say that all problems in computer science can be solved by adding an extra level of indirection. Similarly, all problems in Home Assistant can be solved by adding a template sensor.
Repairs
The Home Assistant Repairs system informs you about issues in your Home Assistant instance that should be fixed to keep it healthy. Third party integrations can add their own notices to the repairs system.
A notification badge appears on the “Settings” item in the navigation pane when there are updates or repairs available. A couple of days after installing the Octopus Energy integration I first saw this.

I guess I should stop procrastinating and do something about it.
Live Data
The Home Assistant data model encourages integrations to expose their most important data as entities with state that represents the current moment in time. The data is presented “as live”. Always up to date, tracking changes as they happen in the real world.
How does an integration like Octopus Energy do that? It calls an external service over the internet to get the current state. Then it does it again, over and over, as fast as it can.
You can imagine how much stress this can put on the external service if there are thousands of Home Assistant instances, all doing the same thing. Octopus Energy estimate that about 95% of their API traffic comes from the Home Assistant Octopus Energy integration. Which, to be clear, is maintained by a third party, not Octopus Energy.
Service providers protect themselves by enforcing rate limits for repeated API calls from the same caller and by working with integration authors to reduce their impact. The Octopus Integration carefully manages the rate at which data is refreshed to mitigate the impact on the Octopus API service.
Intelligent Dispatch
The Octopus Energy integration creates a “Charger” device if you’re on a smart charging tariff, like Octopus Intelligent Go. The device includes intelligent_dispatching and intelligent_state sensors, which are both driven by results from the same API call.
Intelligent Dispatching is a binary sensor whose state determines whether you’re in a planned smart charge period or within the standard off-peak period. Intelligent State is an enumeration of values that specify the current state of the smart provider. There are three states that you’ll see once everything is setup and working correctly.
SMART_CONTROL_NOT_AVAILABLE- Car not plugged in or not at homeSMART_CONTROL_CAPABLE- Car plugged in and ready but no smart charging schedule determinedSMART_CONTROL_IN_PROGRESS- Charging periods are scheduled or in progress
These are sensors that you want to be refreshed frequently while the car is plugged in and completely irrelevant the rest of the time. The underlying API has a rate limit that prevents it being called more than once a minute and at most 20 times in an hour. By default, the integration calls it continuously every 3 minutes.
The repair notice is inviting you to be a good citizen. If you have another integration that tells you when the car is plugged in, you can turn off the automatic refresh and write your own automation to refresh when needed.
Blueprint
There’s a Blueprint provided which does one refresh 30 seconds after the car is plugged in, then at the normal 3 minute refresh intervals while the car continues to be plugged in.
There’s an install link in the documentation which is meant to redirect into Home Assistant. It didn’t work for me. Instead, I copied the source link (a GitHub URL), went to “Settings -> Automations -> Blueprints”, pressed “Import Blueprint” and pasted the link. Once the Blueprint has imported, you can open it and configure it.
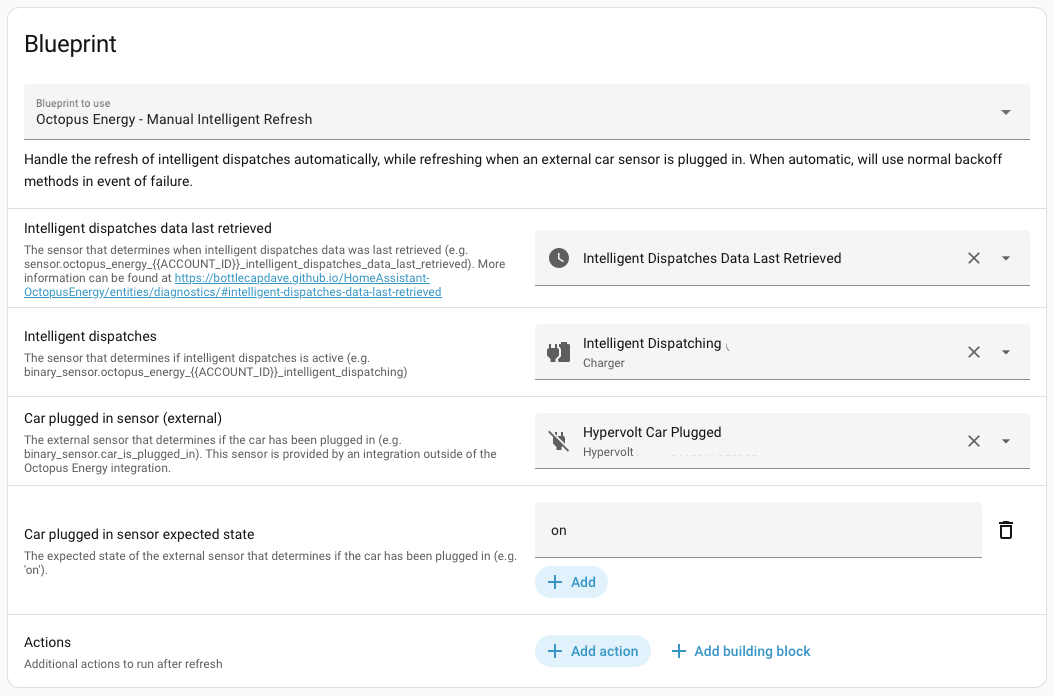
A Blueprint is a pre-packaged parameterized automation. Provide the required details and a new automation is created using the Blueprint. Editing a Blueprint automation returns you to the configuration editor. You can also update to the latest version if the source Blueprint changes.
I decided to start with the Blueprint and tweak it if needed. The first hurdle is that there’s no “Intelligent Dispatches Data Last Retrieved” entity. The documentation says it’s disabled by default.
Enabling it was harder than I thought. If you go to the Octopus Energy integration page in Home Assistant, it’s not listed with the other Charger entities, or any other device on the page. You need to choose “Entities” from the top hamburger menu and scroll to the bottom of the list. You can then click on the disabled icon to enable it.
Next, I had a look at the source code. The dispatch sensor state is refreshed while the car continues to be plugged in. As soon as it’s unplugged, there are no refreshes, which means the sensors are left in their active state. I did a quick test and confirmed that the Intelligent State never goes back to SMART_CONTROL_NOT_AVAILABLE after unplugging the car.
The Blueprint allows 30 seconds for a smart schedule to become available before calling the Octopus API. It’s never that quick for me. Which meant I had to wait another 3 minutes before the next scheduled refresh came round.
If you need to edit the generated automation, you can “Take Control” (from the hamburger menu) to convert it into a normal automation.
Taking Control
I want to use my 20 requests an hour budget more wisely. When the car is first plugged in, I refresh as often as possible until I get an initial charging schedule. After that, I fall back to refreshing every 5 minutes, as well as in response to significant events reported by the charger.
The Hypervolt charger integration communicates with its backend using a WebSocket API. This allows the external Hypervolt service to push changes to Home Assistant when they happen, rather than having Home Assistant poll the service. This includes a simplified version of the charging schedule. If there’s any change in the Hypervolt schedule, the full schedule is normally available immediately via the Octopus API.
The regular refreshes at 5 minute intervals are aligned with the hour. That’s just how the Home Assistant Time pattern trigger works. That’s convenient for us, as Octopus uses half-hour charging periods in its schedule. We effectively check for any schedule changes 15, 10, 5 and 0 minutes before the next charging period starts.
The downside of time pattern’s natural alignment is that all Home Assistant instances end up synchronizing their calls to the external service. It’s not just a problem of thousands of Home Assistant instances calling the backend over a period of time. The incoming calls all arrive at the same time. The blueprint addresses this by adding jitter, a random delay before invoking the refresh. This is another example of being a good citizen, reducing the likelihood of everyone’s calls being made at the same time.
I also refresh when the charger starts and stops charging. I kept the code from the Blueprint that ensures that these ad hoc refreshes don’t happen more often than every 3 minutes.
When the car is finally unplugged, I delay for a minute before refreshing and hopefully picking up the final state. The regular 5 minute refreshes also continue while the intelligent state is still one of the active values.
triggers:
  - trigger: state
    id: car_plugged_in
    entity_id:
      - binary_sensor.hypervolt_car_plugged
    to: "on"
  - trigger: state
    entity_id:
      - binary_sensor.hypervolt_car_plugged
    to: "off"
    for:
      minutes: 1
  - trigger: state
    entity_id:
      - time.hypervolt_schedule_session_1_start_time
    to: null
  - trigger: state
    entity_id:
      - switch.hypervolt_charging
    to: null
  - trigger: time_pattern
    minutes: /5
That makes for a long list of triggers. All of them apart from car_plugged_in are handled the same way.
conditions:
  - condition: or
    conditions:
      - condition: state
        entity_id: binary_sensor.hypervolt_car_plugged
        state: "on"
      - condition: state
        entity_id: sensor.octopus_energy_XXXXX_intelligent_state
        state: SMART_CONTROL_IN_PROGRESS
      - condition: state
        entity_id: sensor.octopus_energy_XXXXX_intelligent_state
        state: SMART_CONTROL_CAPABLE
The automation runs as long as the car is plugged in or the smart charging state is active.
actions:
  - choose:
      - conditions:
          - condition: template
            alias: Trigger is car plugged in
            value_template: "{{ trigger.id == 'car_plugged_in' }}"
        sequence:
          - delay:
              seconds: 60
          - action: octopus_energy.refresh_intelligent_dispatches
            target:
              entity_id: binary_sensor.octopus_energy_XXXXX_intelligent_dispatching
          - repeat:
              while:
                - condition: template
                  alias: Planned Dispatches not available (5 tries)
                  value_template: >-
                    {{ state_attr(intelligent_dispatches_sensor,
                    'planned_dispatches') | count == 0 and repeat.index < 5 }}
              sequence:
                - delay:
                    seconds: 60
                - action: octopus_energy.refresh_intelligent_dispatches
                  target:
                    entity_id: >-
                      binary_sensor.octopus_energy_XXXXX_intelligent_dispatching
      - conditions:
          - condition: template
            alias: Next refresh is due
            value_template: >-
              {{ state_attr(intelligent_dispatches_data_last_retrieved_sensor,
              'next_refresh') | as_datetime | as_local < now() }}
        sequence:
          - delay:
              milliseconds: "{{ millisecond_jitter }}"
          - action: octopus_energy.refresh_intelligent_dispatches
            target:
              entity_id: binary_sensor.octopus_energy_XXXXX_intelligent_dispatching
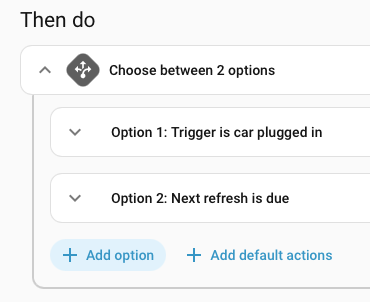
There are two different cases handled by a choose action. If the trigger was the car being plugged in, we run our loop of refreshing until we get an initial schedule (up to 5 tries). There’s no jitter in this case because plugging in the car isn’t aligned with anything.
In all other cases we do a single refresh, after a delay for jitter, if it’s been long enough since the last refresh.
I add a descriptive alias to each template condition. This acts as a descriptive comment when reading the YAML and gets picked up by the visual editor, making it easy to understand what’s going on.
Dashboard
Of course, I had to build a car charging dashboard which shows me the relevant data from Octopus and the Hypervolt Charger. Note the big “Refresh” button which shows how long it’s been since the underlying data was refreshed. Pressing it triggers a manual refresh.

I wish this was a more common pattern in Home Assistant. Previously, I wasn’t sure whether a state was actually staying at the same value for a long time, or whether something had got stuck behind the scenes.
I found the Markdown card to be the simplest and most flexible way to display complex data encoded as attributes. I can configure the card with a content template that formats the data as Markdown. You need to be careful of where template evaluation inserts newlines as they’re significant in Markdown. You sometimes need extra annotations in command blocks (+ or - at the start or end) to override the defaults.
{% set dispatches = state_attr('binary_sensor.octopus_energy_XXXXX_intelligent_dispatching', 'completed_dispatches') %}
{% if dispatches is defined and dispatches|count > 0 %}
** Completed Dispatches** on {{ dispatches[0].start.strftime('%d %B') }}
{% endif %}
{% for dispatch in dispatches -%}
* {{ dispatch.start.strftime('%H:%M') }} - {{ dispatch.end.strftime('%H:%M') }}: {{ dispatch.charge_in_kwh | abs }} kWh
{% endfor %}
I use conditions to hide cards that don’t have anything relevant to show. Unfortunately, I can’t hide the Markdown cards when there’s no schedule because Home Assistant doesn’t support conditions on attributes.
The screenshot was taken after unplugging the car. The planned dispatches card is blank because the schedule has completed. For now, I can’t be bothered to create a dedicated “are there planned dispatches” template sensor. Leaving the card blank if there’s no schedule is fine.
Conveniently, the attributes include a list of completed periods with the energy supplied during each. Completed periods are rounded to the nearest half hour, regardless of how long charging was active during the period. The off-peak rate applies to the complete half hour. You can see a subset of the actual schedule (weirdly in UTC) supplied by the Hypervolt integration.
Next Time
I want to dive deeper. Next up is getting a better understanding of the Home Assistant concurrency model. Then using that to make my automations more reliable and resilient.