The Hypervolt EV charger integration is an important dependency for the automations and dashboards that I’m running on Home Assistant. Now that I’m a few weeks in, I’ve noticed some edge cases where things are just not right.
Today’s theme is resilience.
Home Assistant provides a high level abstraction over a fundamentally messy and unreliable reality. It’s not surprising that the provided abstraction is often leaky. Sometimes, you have to go the extra mile to plug the holes.
Hypervolt Integration Gets Stuck
The Hypervolt integration is unusual in that sensors are updated every few seconds rather than minutes. No, we’re not running a DDOS attack against Hypervolt’s servers. Hypervolt has a web socket based API. Updates are pushed to Home Assistant rather than the integration having to poll a REST API.
Which is great, unless the updates stop coming. Once it happened to me too, I became incentivised to try and do something about it.
Redundant Grid I/O Sensor
I have two CT clamps monitoring grid power import and export. One came with my Alpha ESS home battery installation, the other with the Hypervolt EV charger. The clamps are accessible as sensors via two separate Home Assistant integrations.
The Alpha ESS values are updated every minute by polling a REST API. The Hypervolt values update every 3 seconds or so, via the web socket API. I use the Hypervolt values for my dashboards and automations because of the higher resolution. Which is no use if it intermittently stops working.
Why not use both of them? All problems in Home Assistant can be solved by adding a template sensor. In this case, I can create a template sensor that reports the value of the most recently updated CT clamp sensor. If Hypervolt gets stuck, we’ll still get updates every minute from the Alpha ESS sensor.
The functionality I wanted to use isn’t available in the Visual Editor. I want to define triggers and attributes in my template. Unfortunately, unlike Automations and Dashboards, there’s no YAML mode integrated with the template editor UI. You have to drop down a level of abstraction and edit Home Assistant configuration files directly.
File Editors
To do that, you’ll need to install a file editor addon. There are two common choices.

File Editor is a simple web based text editor built using the Ace embeddable editor. It includes code highlighting for YAML. It’s maintained by the Home Assistant team and was built to be Home Assistant’s config file editor.
Studio Code Server is a full Visual Studio Code environment. You get a web frontend integrated into the Home Assistant UI with a backend (the server part) running in a separate process on your Home Assistant instance. Home Assistant, MDI icon and YAML extensions are pre-installed.
I’m an existing Visual Studio Code user so felt right at home with Studio Code Server. I was worried about the load it would add to my little Home Assistant Green but it runs OK. I only have 4GB of memory, which is the documented minimum for Studio Code Server. In practice, while editing configuration files, the addon uses 46% of the available memory with the System Monitor showing 30% is still free. CPU usage doesn’t get over 20%.
Configuration File
Configuration lives in configuration.yaml, in the config directory. In principle, it’s structured as one big YAML file. In practice, to keep things manageable, large chunks are extracted into separate files and included into the main configuration using the !include directive.
# Loads default set of integrations. Do not remove.
default_config:

# Load frontend themes from the themes folder
frontend:
  themes: !include_dir_merge_named themes

automation: !include automations.yaml
script: !include scripts.yaml
scene: !include scenes.yaml
This is the default configuration.yaml on my system. You may be wondering where the rest of it is. Where are the template sensors I previously created with the visual editor?
As Home Assistant adds more visual editors, much of the configuration has been moved out of configuration.yaml into the hidden .storage directory. That makes it painful if you start working on a template sensor with the visual editor and then later find you need a YAML only feature.
We could add our template sensor to the end of configuration.yaml. However, I want to maintain some separation between the default config and my own, so I’m splitting out the template sensor definitions into a separate file. Templates go under the template top level key, so I added a templates.yaml file.
template: !include templates.yaml
If I end up defining a lot of template sensors, I can split them out into separate files and include them into templates.yaml.
Template Sensor Definition
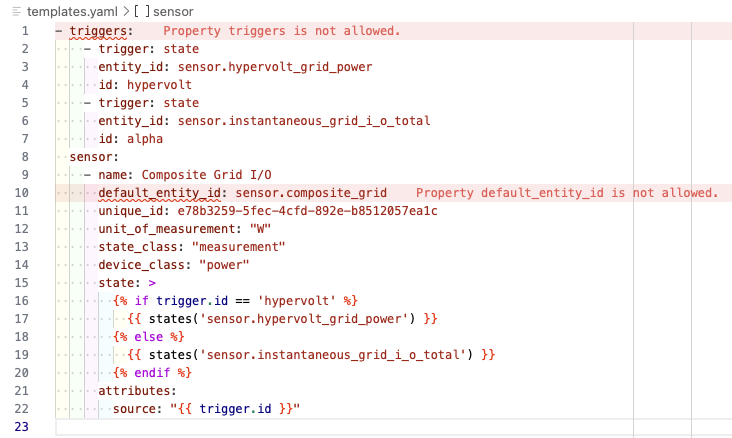
Rather than using a state based template and having to compare last_updated properties to decide which source to use, I use explicit triggers on the source entities and just return the value of whichever entity triggered the update. I add a source attribute so you can see whether the value came from hypervolt or alpha.
- triggers:
    - trigger: state
      entity_id: sensor.hypervolt_grid_power
      id: hypervolt
    - trigger: state
      entity_id: sensor.instantaneous_grid_i_o_total
      id: alpha
  sensor:
    - name: Composite Grid I/O
      default_entity_id: sensor.composite_grid
      unique_id: e78b3259-5fec-4cfd-892e-b8512057ea1c
      unit_of_measurement: "W"
      state_class: "measurement"
      device_class: "power"
      state: >
        {% if trigger.id == 'hypervolt' %}
          {{ states('sensor.hypervolt_grid_power') }}
        {% else %}
          {{ states('sensor.instantaneous_grid_i_o_total') }}
        {% endif %}
      attributes:
        source: "{{ trigger.id }}"
It looks simple enough, but ended up being a really painful development experience. Studio Code Server provides syntax checking for conformance with the Home Assistant schema. It mostly works great and let me fix errors immediately. The problem is that there are also false positives. Maybe the schema bundled with the addon is out of date?
It took me ages to work out that my YAML was actually fine. Obviously, there’s no live preview of the output value as you get with the Visual Editor. To make changes take effect you have to save the file, go to “Developer Tools -> YAML” and click on “Template Entries” to reload the config. Then see if you can find the sensor that the template should have created.
If not, and you’re really lucky, you might get a notification from Home Assistant with an error message extracted from the logs. More likely, you’ll be stuck making random simplifying changes until you work out which bit is wrong.
Once the sensor was actually created, I needed to work out why it wasn’t working properly. It always returned the value from the Alpha ESS sensor.
The problem was that I’d used double quotes around hypervolt in the if condition. The Jinja documentation says that string literals can use double or single quotes. However, in this circumstance, it didn’t work until I changed to single quotes.
Using the Composite Grid I/O sensor
I was worried that swapping to the new sensor would be painful and that I might lose the statistics I’d built up based on the old sensor. It turned out to be a trivial change.
My dashboards are driven from utility meters based on an integral sensor that in turn uses the Hypervolt sensor. All I needed to do was change the input for the integral sensor. All my existing statistics continued to be valid.
One of the benefits of layers of indirection.
Automating Hypervolt restart
Other people have created automations that detect when the Hypervolt sensor is stuck and restart the integration. The attribute on the Composite Grid I/O sensor gives us an easy way to determine if the Hypervolt integration is stuck.
alias: Hypervolt Grid  Power Stuck
description: ""
triggers:
  - trigger: state
    entity_id:
      - sensor.composite_grid
    attribute: source
    to: alpha
    for:
      hours: 0
      minutes: 5
      seconds: 0
If the source attribute changes to “alpha” and remains that way for 5 minutes, the Hypervolt must be stuck. For now, the automation just notifies me. I want to unstick it manually before trying to automate the procedure.
When I first noticed the Hypervolt getting stuck, I tried a bunch of different things. I reloaded the integration, I refreshed the Hypervolt app, I ran the network troubleshooter tool in the app (which said everything was fine), I turned on the kettle so there would be a spike of power imported from the grid. A few minutes after doing all that in a frenzy of activity, it started working again.
I want to be more scientific when it next happens and try and identify the steps needed to restart it reliably.
Since adding the automation I’ve been notified five times. On the first notification I tried disabling and reenabling the integration. Then waited 10 minutes. Nothing happened.
I tried the Hypervolt app and this time the troubleshooter reported no connectivity to the device. In the end I resorted to rebooting it by turning it off and on at the circuit breaker. It was OK again after that.
The other four times it was stuck for 20-60 minutes or so, then sorted itself out before I could react to the alert.
I was still in monitoring mode when the latest version of the Hypervolt integration was released. It now detects when nothing has been received for 5 minutes and restarts the web socket connection. Unfortunately, it made no difference the next time the integration got stuck. A couple of days later there was another new version which restarts the entire integration.
I’m beginning to wonder if we’re all indulging in cargo cult behavior. Maybe the Hypervolt backend eventually comes back to life and we just assume that the last thing we did must have fixed it.
I have a good fallback during outages, so for now I’ll just keep monitoring.
Charging Spikes
The car charging dashboard I created last time shows a couple of half-hour charging periods that supplied very little power, a combined 0.03 kWh. What’s going on there?
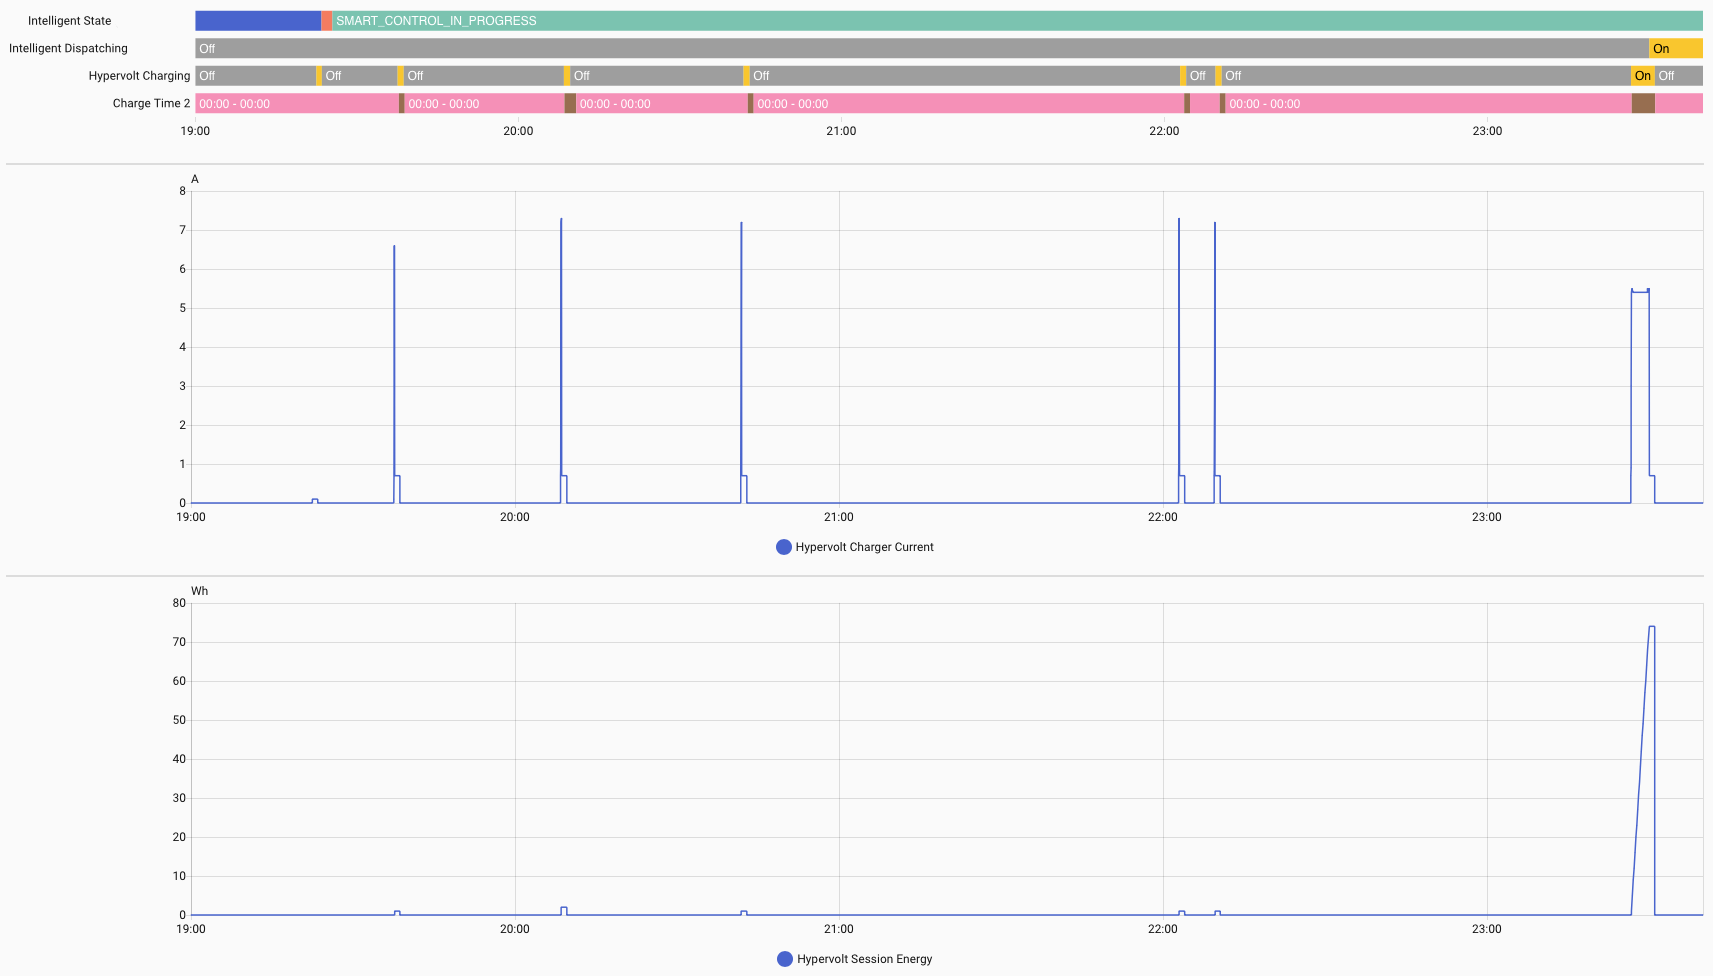
The only thing happening during that hour is the spike on the right of the history graph. The charger turned on for about 5 minutes, with a current of 5A (rather than the usual 30A) and according to the Hypervolt delivered about 70Wh of energy. The spike is right at the end of the 23.00 - 23.30 period, just spilling over into 23.30 - 24.00.
I’ve seen this a few times when smart charging. Sometimes the Octopus scheduler decides to fill up it’s quota for a period with a few minutes of trickle charging. Not a problem. In fact, good for me, because I should be charged off-peak prices for that entire hour.
Less good are the spikes to the left. These are even more transient. Each lasting about a minute, mostly below 1A with a few seconds spiking to 7A. Negligible power consumed. These spikes aren’t included in the Octopus completed dispatches, so are presumably charged at peak rates. I don’t know whether these are Octopus testing whether the car is prepared to charge, or some glitch of the charger.
Given that virtually no power is consumed, it wouldn’t matter, except each spike triggers an automation that starts charging my home battery. That draws a sustained 20A. Even worse, the API that the Alpha-ESS battery integration uses is rate limited to once a minute. The integration waits where needed to ensure there is at least a minute between calls. Which means that even if the spike was only a few seconds long, the battery would charge for at least a minute.
I crafted a more resilient automation trigger that ignores the transient spikes. The new trigger uses the Hypervolt session energy sensor. I wait until at least 10Wh of power have been delivered. This takes a few seconds when the car is charging normally, while never reaching that threshold for the transient spikes.
triggers:
  - trigger: numeric_state
    entity_id:
      - sensor.hypervolt_session_energy
    above: 10
conditions:
  - condition: state
    entity_id: switch.octopus_energy_XXXXX_intelligent_smart_charge
    state: "on"
  - condition: state
    entity_id: switch.hypervolt_charging
    state: "on"
The automation completes and resets the battery configuration back to normal off-peak charging when the hypervolt_charging sensor goes back to off. I added a condition to make sure that the automation only runs if it’s on (in case there’s some glitch where session energy changes while charging is off).
Backups
The Home Assistant instance is a single point of failure. It would be remiss of me to talk about resilience without pointing that out.
Make sure you have backups enabled. It’s really easy to setup on-device backups. Only a little more effort to get them uploaded to the cloud host of your choice.
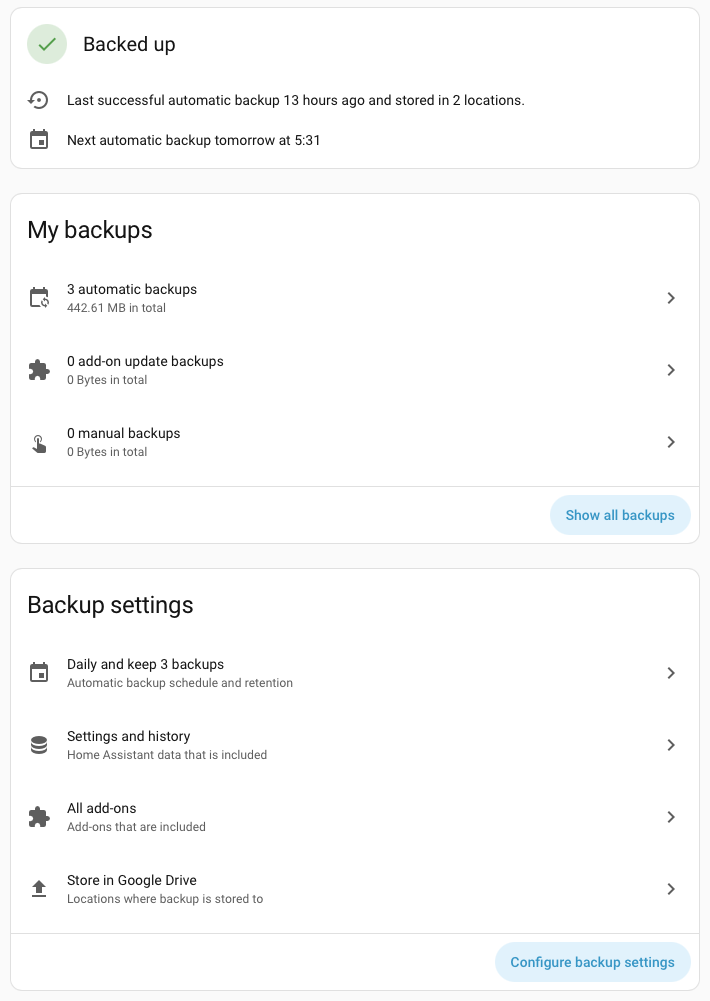
I used Google Drive. There was a complex sequence of choreography required to authorize Home Assistant to upload files to a dedicated folder in Google Drive. The documentation does a great job of walking you through it.