Like many houses in the UK, we rely on a gas combi boiler for heating and hot water. I know that continuing to burn gas is not sustainable in the long term. However, I couldn’t see the point in switching while the grid is still burning gas to generate electricity.
Two things changed my mind. First, heat pumps are becoming increasingly efficient. Once you get above 350% efficient (i.e. a SCOP of 3.5), a gas power station generating electricity that powers a heat pump uses less gas than burning it yourself. It’s cheaper too. Secondly, over the last year, only 30% of the UK’s power came from fossil fuels.
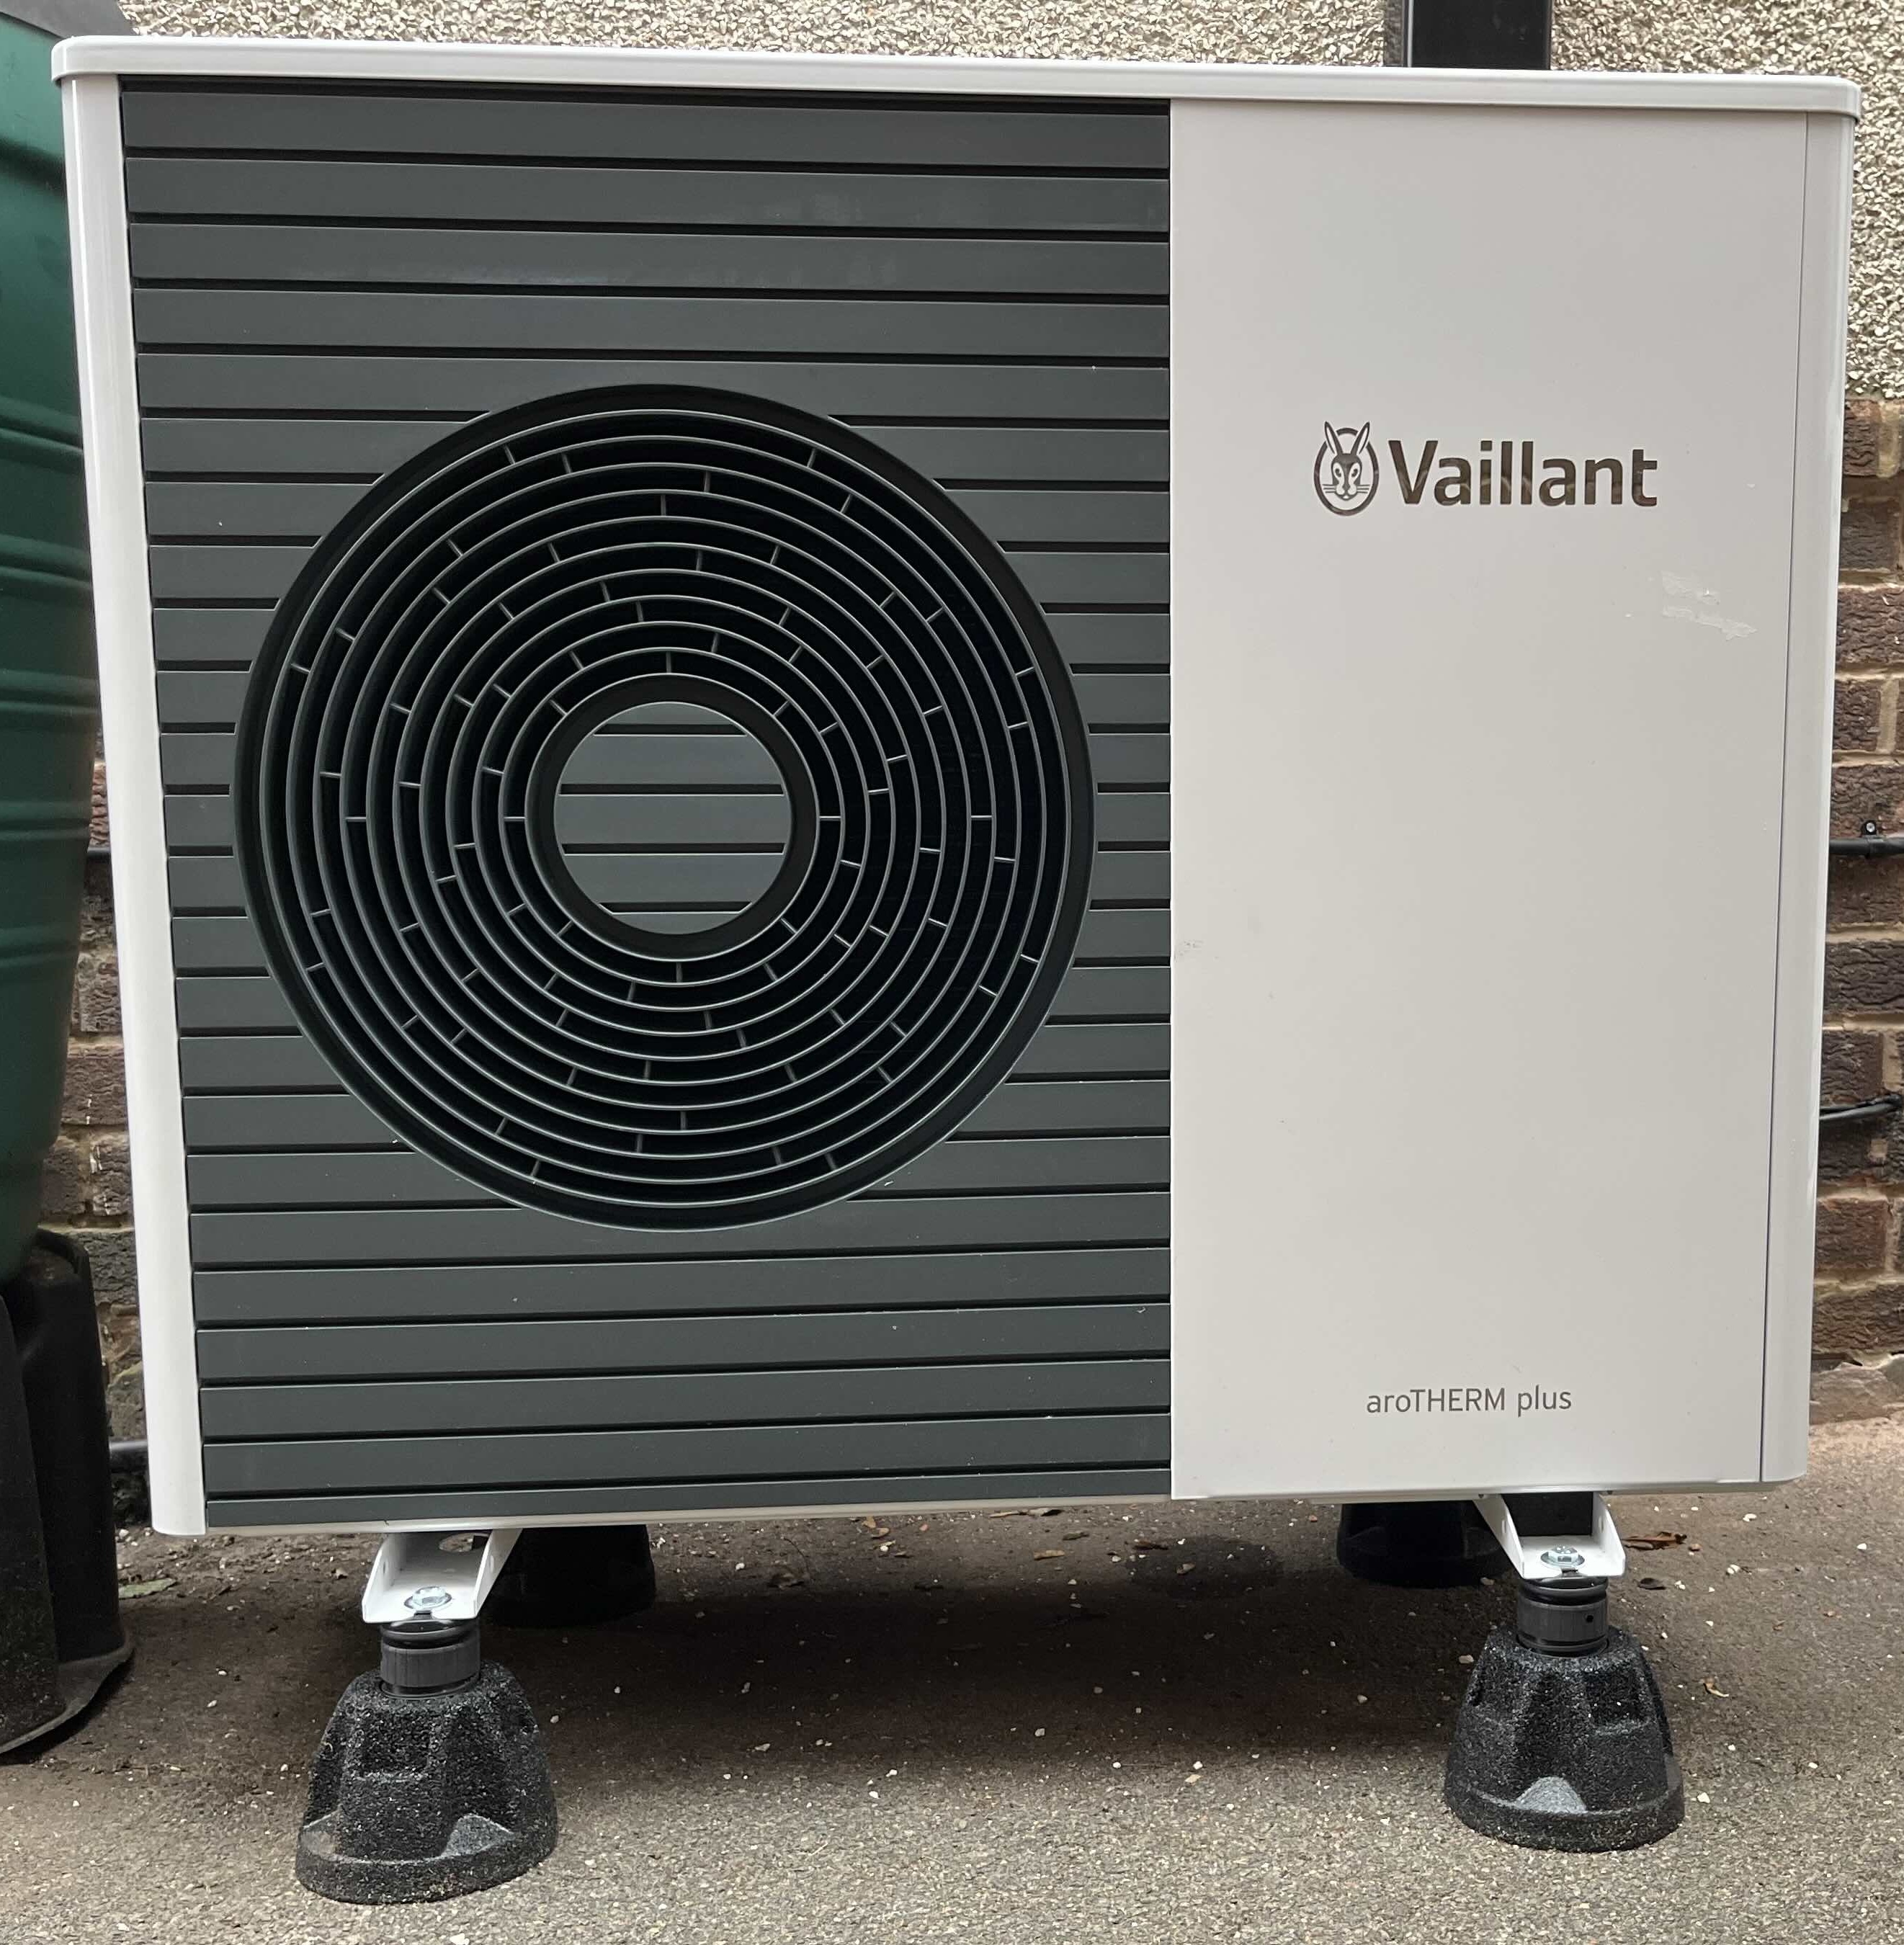
We’re now the proud owners of a Vaillant aroTHEM plus air source heat pump. Getting here was an interesting journey.
Heat Geek
Our system was installed through Heat Geek. Heat Geek are an interesting company. They started out as a one-man band, focused on training heating engineers to design and install efficient heat pump systems. I’ve enjoyed watching Adam’s YouTube videos over the years.
More recently, Heat Geek have had additional investment and built a platform for managing the installation process. You apply online, get an automated initial estimate and then get matched up with a local Heat Geek trained heating engineer.
The next step is a paid design consultation.
Design Consultation
I submitted my Heat Geek application over the Christmas holidays and got a reply at the beginning of January 2025. We were matched with Blakemore Plumbing and Heating, a local Sheffield company. The earliest appointment we could get for a design consultation was in March.
The process took a couple of hours. Damon walked through the house with me, room by room. He used a Heat Geek app on a tablet to capture all the details. The app has an automated scanning feature which worked in half the rooms. The rest were done manually, but it was still a quick process.
The idea is to determine the heat loss for each room. The heating system is designed to generate enough heat to cover the loss at any time of the year. Damon needed to know the size of each room, which walls are external, location of external doors and windows, location and size of radiators, and the levels of insulation for windows, doors, floors, walls and roof.
Our house is a 1929 semi-detached. It has cavity wall insulation. The ground floor has suspended wooden floors with no insulation. The attic was converted into another bedroom with insulation compliant with 2008 building regulations. It’s a typical, middle of the road, UK house.
The end result is an estimated heat loss of 6kW at -3°C outside. Heat loss scales linearly with the temperature difference between inside and outside. We keep the indoor temperature at 17°C, so that’s equivalent to 300W heat loss per degree difference between indoor and outdoor temperature.
With our existing radiators, a heat pump would need a flow temperature of 55°C to cover a presumed worst case heat loss of 6kW. I pushed for a more efficient design. Replacing 6 radiators with double or triple width versions occupying the same footprint would bring the design temperature down to 45°C.
That seemed like a reasonable compromise to me.
Formal Proposal
A fully priced, formal proposal appeared on the Heat Geek portal a couple of days later. The headline overview was for a Vaillant aroTHEM plus 7kW with 6 new radiators and a guaranteed 380% minimum efficiency.
Of course, the proposal included a domestic hot water system. That’s a whole story in itself. For now, I’m going to focus on the heat pump. I’ll cover the mystery hot water system another time.
The detailed proposal included the heat loss and radiators for each room, together with a list of all the kit to be installed. As well as the heat pump and it’s application interface control box, there was a Vaillant sensoCOMFORT system control and a myConnect internet gateway.
It was difficult to understand where each piece would be installed and what it was for. I had to do some digging. The sensoCOMFORT replaces the room thermostat that controls our old boiler. You can set target temperatures, schedules for when the heating is on, etc.
The sensoCOMFORT is available as a wired or wireless package. The quote was for wireless. We’d had problems over the years with our old boiler controls running out of batteries at the most inconvenient moments. I asked if we could use the hardwired version instead. Apparently the choice is all or nothing. If you go wired, you also need a comms wire between the sensoCOMFORT and the heat pump application interface, with another comms wire to the outdoor temperature sensor.
The wireless version of the outdoor sensor is solar powered, no need for batteries. According to Damon the sensoCOMFORT batteries last for ages. He has some systems that have run for years on the original batteries. I agreed to go with the wireless version.
I wasn’t sure that I needed an internet gateway either. Do I really need to control the heating on my phone while I’m away? However, the gateway is also used by Heat Geek to remotely monitor the system to ensure performance meets their guarantee. I agreed to keep that too.
Once the proposal is accepted, Heat Geek take a deposit and apply for the UK government heat pump grant, as well as DNO approval to connect a heat pump to the grid.
EPC Certificate
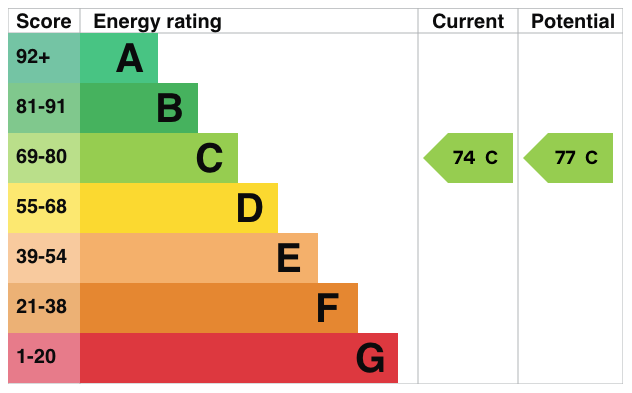
The UK government heat pump grant requires you to have a valid EPC certificate for your home. The only other time you need one is when you sell a house, so that the buyer understands what kind of energy performance they’re letting themselves in for. We’ve lived here since before the EPC scheme was introduced, so have never needed one.
As far as I can tell, it doesn’t matter what energy performance rating you get, you just need the piece of (digital) paper. I booked an assessor using one of the many online platforms and waited for my appointment.
The system is bonkers. The assessor does a simplified version of the Heat Geek survey but can only count things they can see themselves. You can’t see what’s inside cavity walls or the roof without ripping them open, so they count as uninsulated.
I get my EPC certificate with a D rating and recommendations to install cavity wall insulation, roof insulation, and solar panels. All of which I already have. Apparently, most people don’t care how inaccurate EPCs are because no one pays any attention to them anyway.
I was annoyed enough to dig out old plans, receipts and building regulations approvals, and ask the assessor to have another go. This time I get a C with just suspended floor insulation and solar water heating called out as recommended improvements. Which would increase my score from 74 to 77. I’ll pass.
Install Date
Installation was scheduled to take a week, for most of which we’d be without heating or hot water. Damon offered us a choice of dates. There was a week in June where the team would be working two jobs, so Damon would only be available some of the time. Alternatively, if we waited until the last week in September, they would be able to work full time on our install.
I was in no hurry, so went with the last week in September. The cold weather should just be starting, which makes it a better time for seeing whether everything is working properly.
DNO Approval
A few days after accepting the proposal, I got emails from Ofgem and our DNO, Northern Powergrid, asking for confirmation that Heat Geek were authorized to apply on our behalf. Over the following weeks I was occasionally copied in on emails sent to Heat Geek. I assumed everything was progressing. The fancy Heat Geek web portal confirmed that “Heat Geek Upgrades” were responsible for DNO approval.
In July I was copied on an email about a potential main fuse upgrade. We already have a 100A fuse so I assumed this was just a box ticking exercise. I emailed Heat Geek (using the same address as Northern Powergrid’s email was sent to) to confirm that I was expecting them to handle whatever was needed.
I hadn’t heard anything by the end of August and started getting worried. I followed up, copying in all the Heat Geek contact addresses I had. Apparently, the email address they’d used on their application to Northern Powergrid was one they “mainly use for applications and don’t actively monitor for responses”. Which makes no sense to me. Why would you make an application and ignore the responses?
Also, I was the one who had to arrange for a site visit from Northern Powergrid. Luckily, Northern Powergrid couldn’t have been more helpful and scheduled a visit a few days later. They confirmed I did indeed have a 100A fuse. Then replaced it with an 80A one. Apparently, they don’t like people having 100A fuses as they can take too long to trip.
Installation
Everything apart from the heat pump needs to fit in the airing cupboard where our old gas boiler lives. The Sunday before installation week we removed everything from the cupboard.
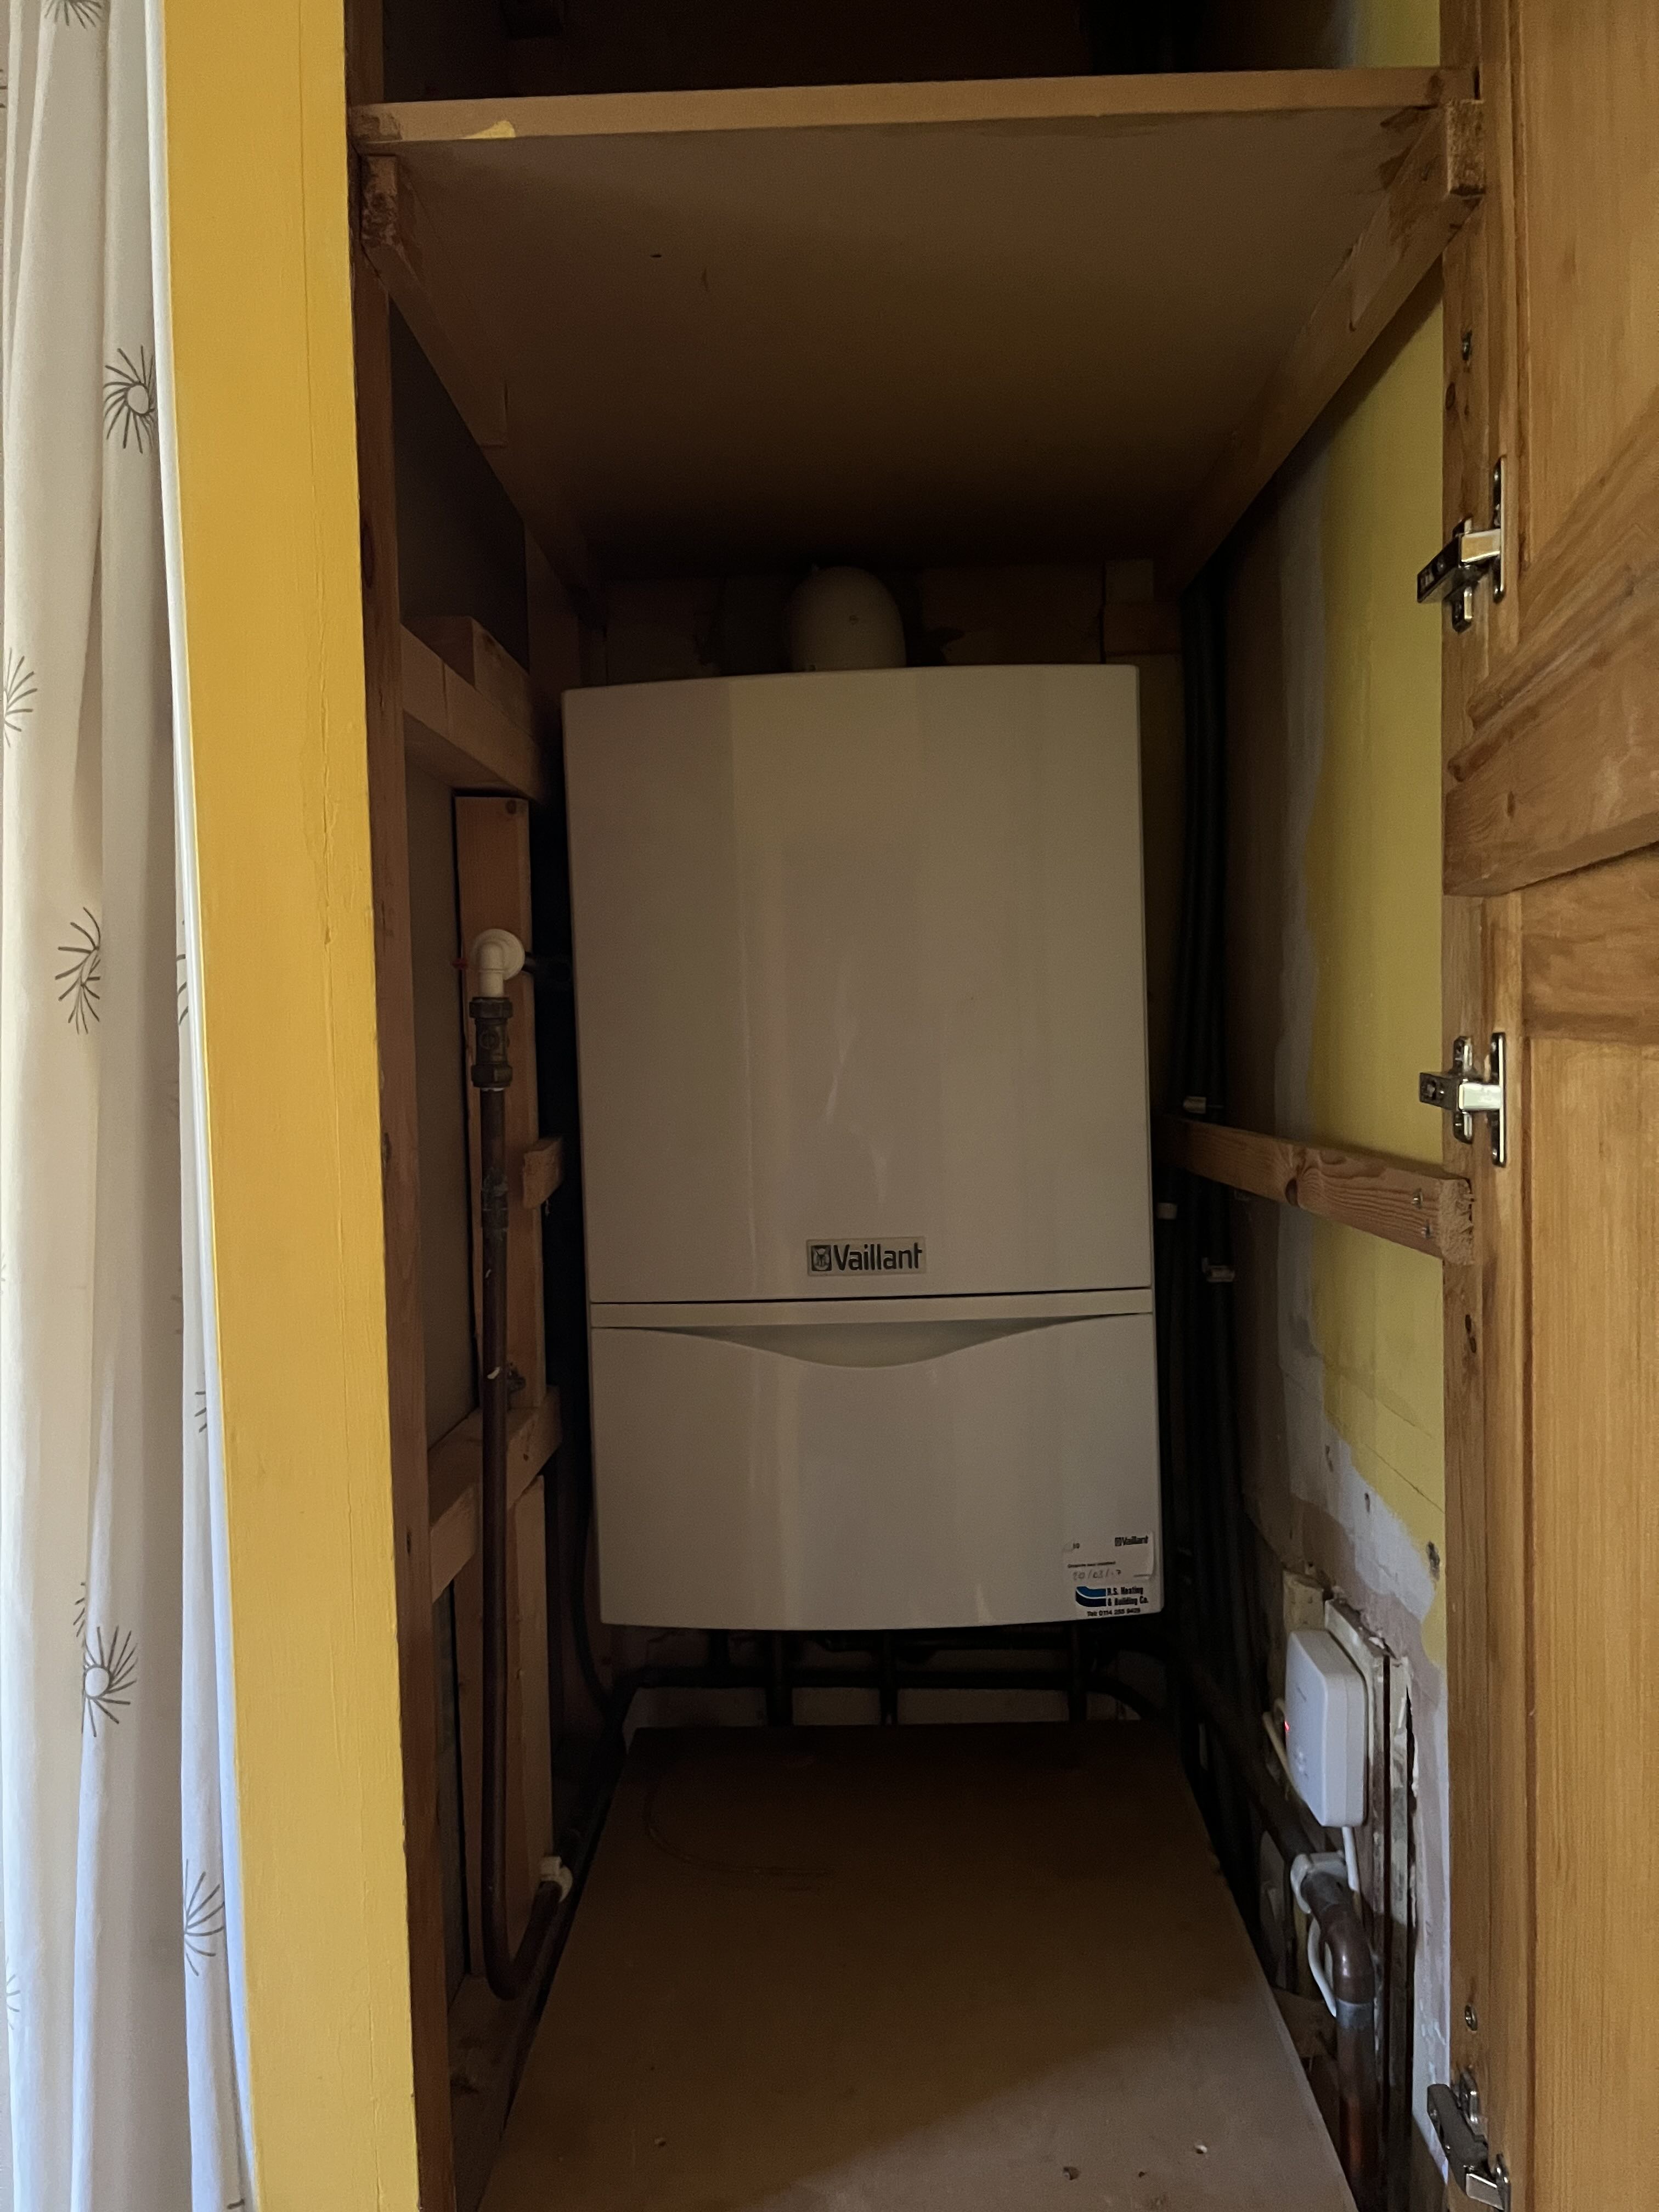
The shelves are also removable so there’s more space available above and below the boiler. There’s still a notable lack of width. All the spare space is currently used for storage, so we’d like to retain as much of it as possible.
First thing Monday morning I got a text from Damon saying that the team would be with me as planned, but that he had been called away to another job. The two man team arrived in a van each, bringing the mystery hot water system with them. They were followed through the day by deliveries of materials, including the heat pump and new radiators. One radiator was missing, one arrived damaged and was promptly returned.
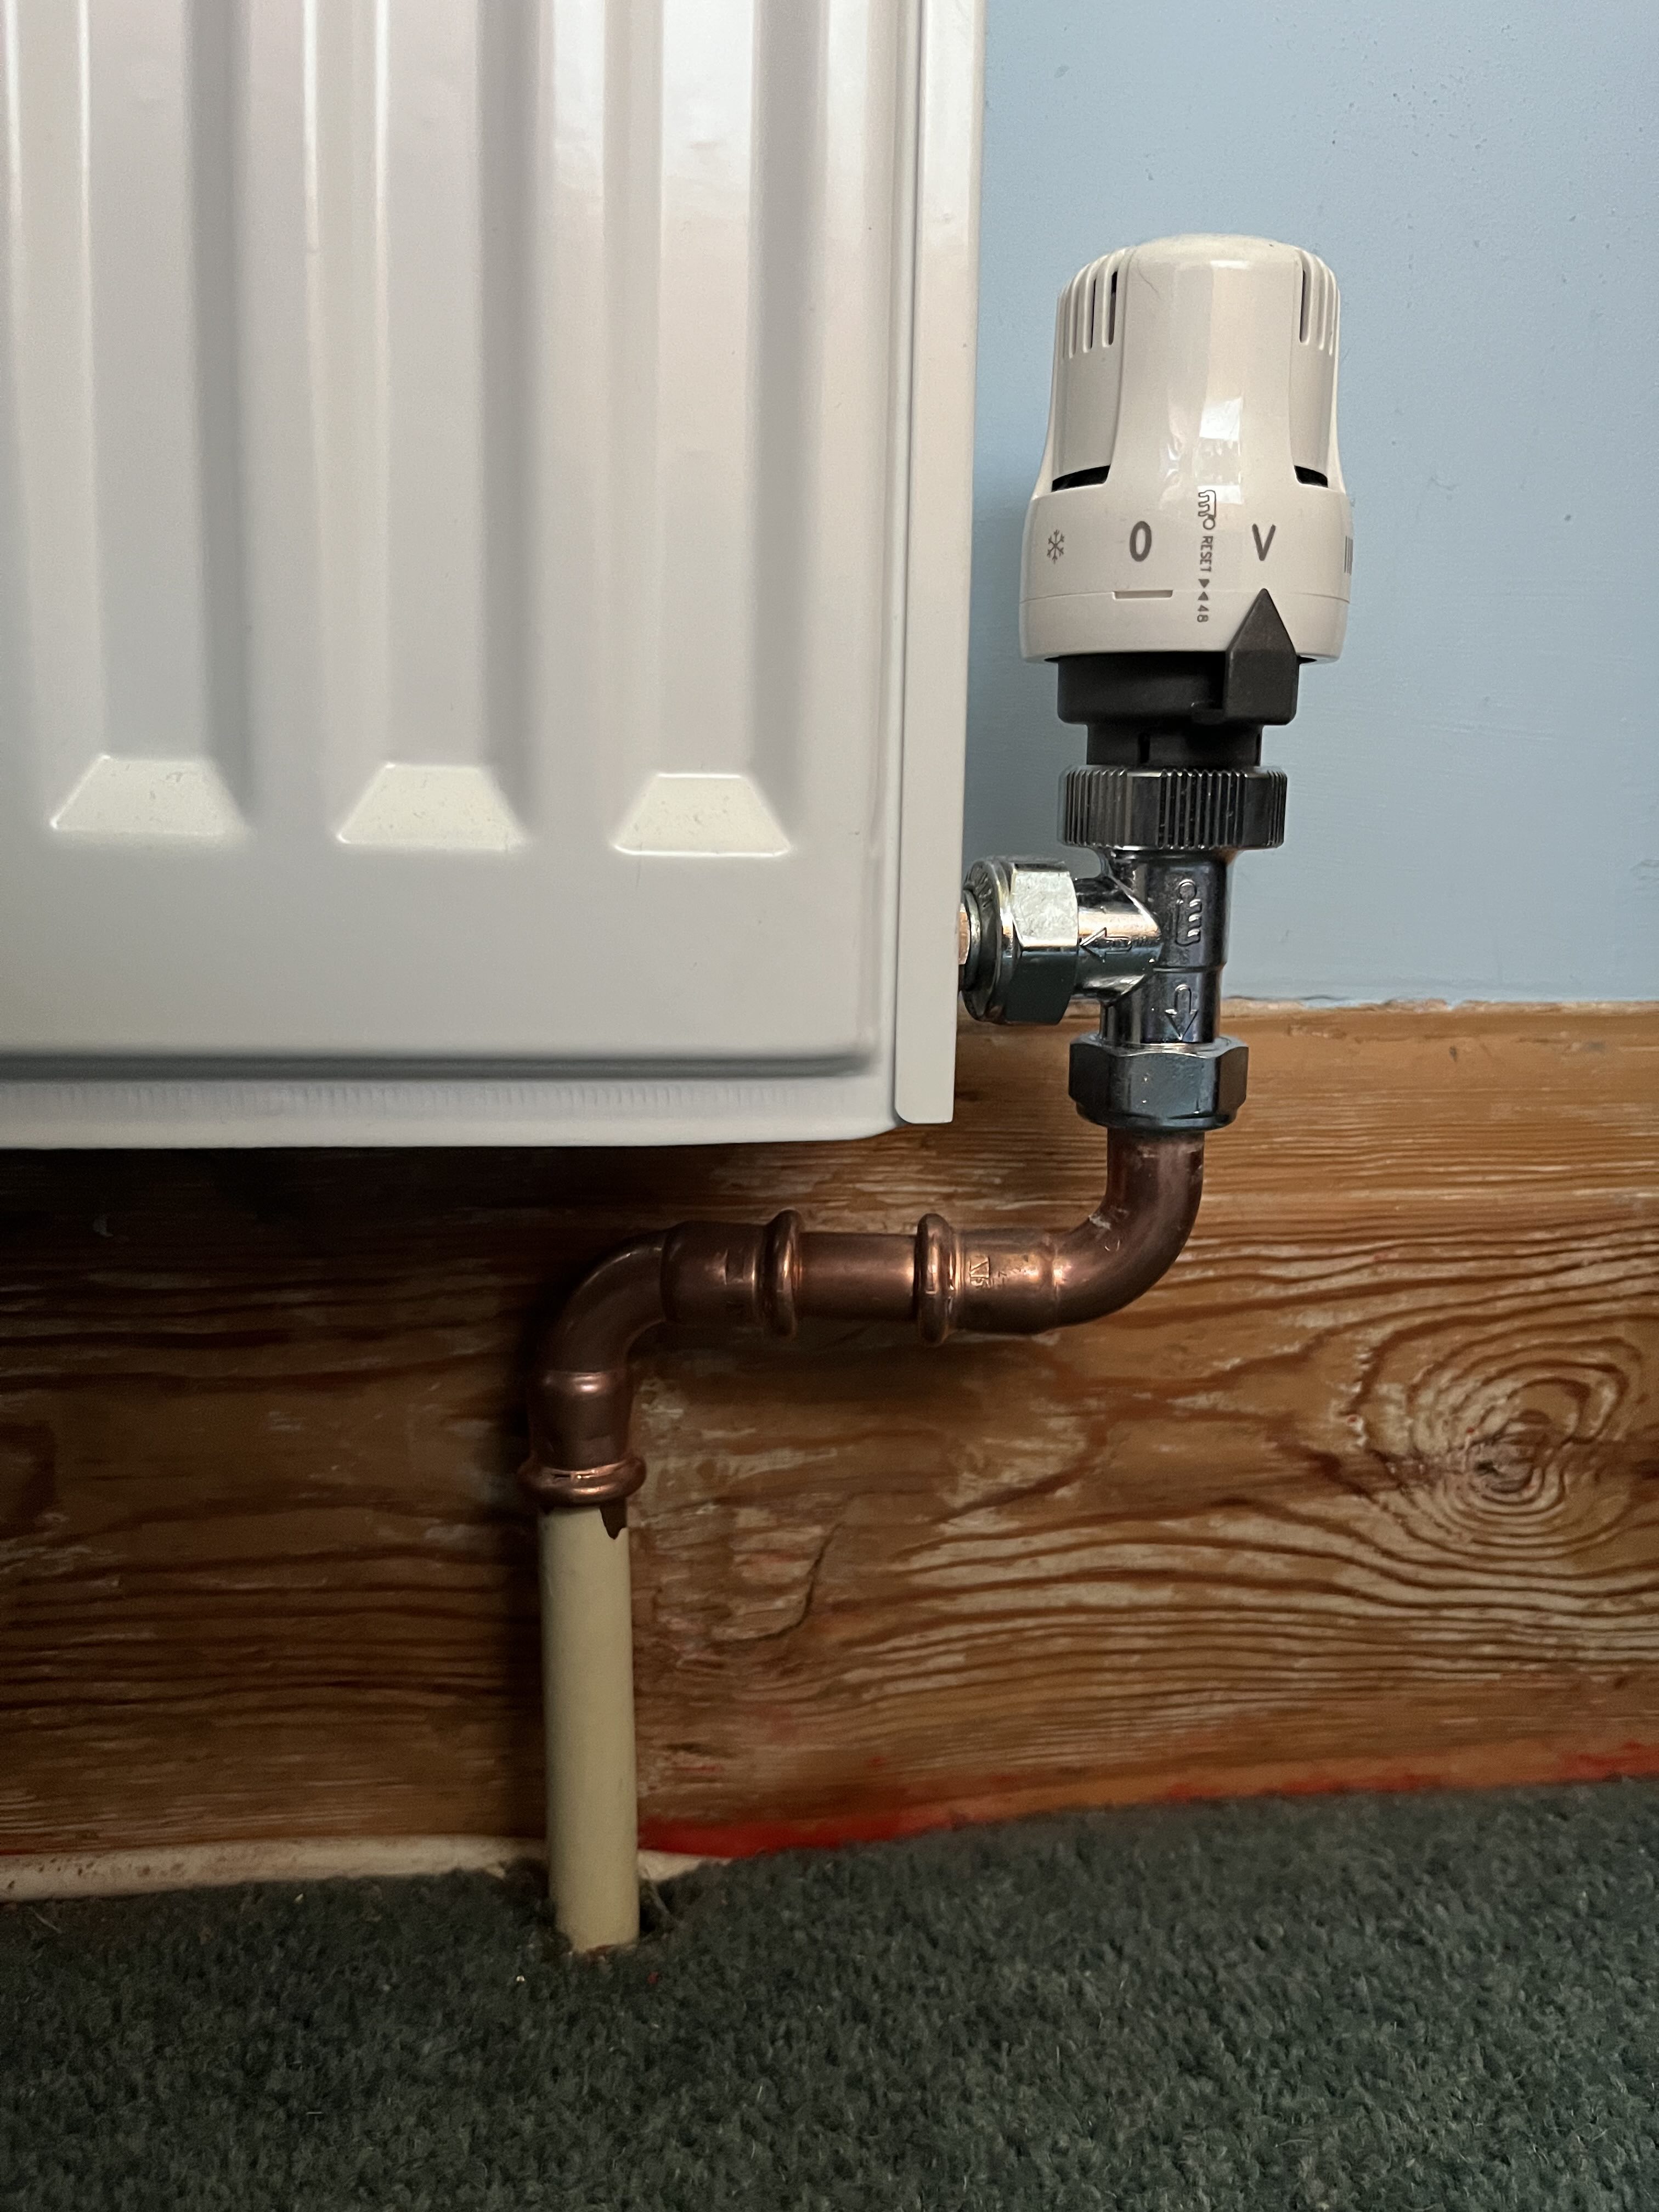
The four available radiators were installed and the system refilled so that we’d have heating and hot water for another day. Most radiators were straightforward swaps reusing the existing plumbing. In a couple of cases the old radiator used imperial measurements and the closest new metric equivalent wasn’t an exact match. The team offered to lift floor boards and adjust piping out of sight. I was happy to avoid that. Having a little more copper pipework on show doesn’t bother me at all.
The boiler was removed first thing on Tuesday. The heat pump was put into position, using adjustable legs to level it on the slightly sloping tarmac.
We decided to put the heat pump at the side of the house. This is the furthest distance from occupied rooms (both ours and our neighbours). It’s also the closest practical position to the boiler cupboard in the upstairs bathroom. There’s convenient access to the electricity supply and a drain. They used a discrete pipe to the drain for the condensate, rather than needing to dig out a gravel soak away.
Work started on the external piping from the heat pump to the boiler cupboard. There was also an electrician on site, installing a dedicated consumer unit for the heat pump and then starting work on the electrics in the boiler cupboard.
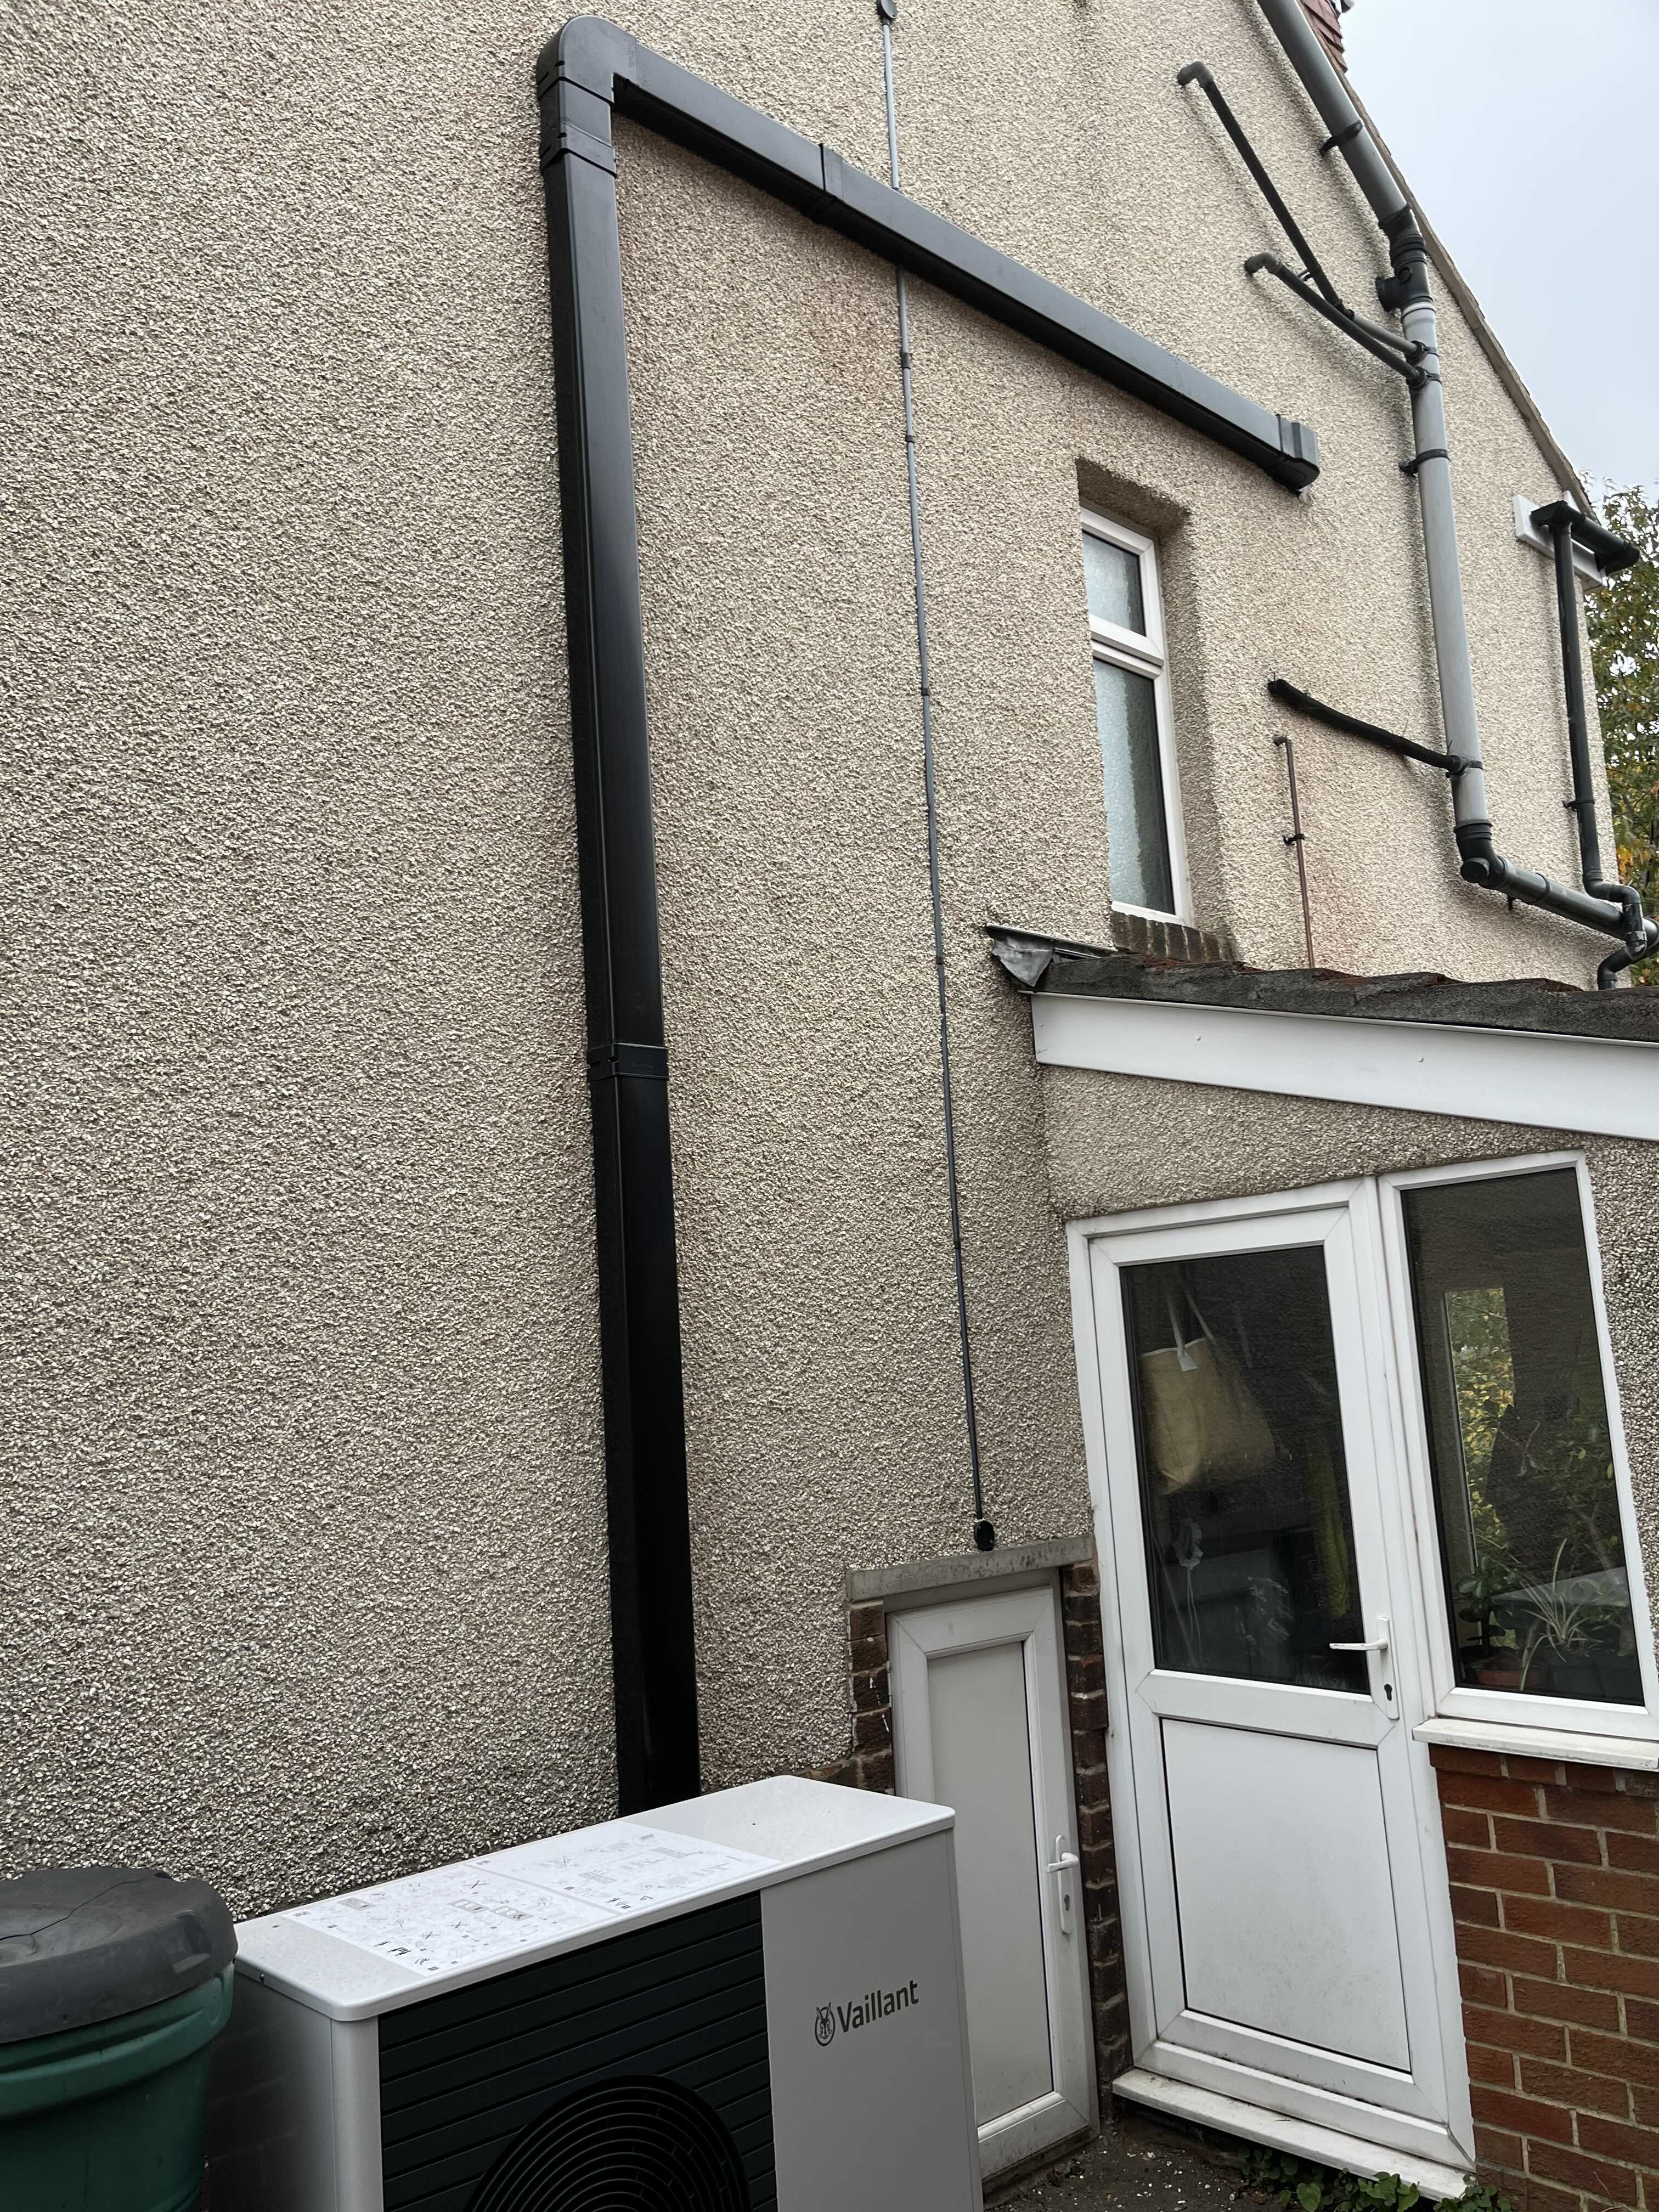
I was pleasantly surprised by how neat the external pipework looked. Insulated flow and return pipes together with comms cables were packed into a trunking system. It’s better looking than some of the existing pipework on the side of the house.
Wednesday saw most of the external work finished and good progress with the plumbing in the boiler cupboard. There was much swearing while wrestling with the mystery hot water system. It didn’t make it into the cupboard today.
The last two radiators were delivered and installed on Thursday. The electrician was on site again, finishing the install in the boiler cupboard. Some of the small electrical devices need to be protected with a 5A fuse. They chose this ingenious solution.
The extension lead is fitted with a 5A fused plug. They only had a 2-way extension to hand, so had to improvise by adding an extension block. They will be back to put a more permanent solution in place.
The rest of the day was spent plumbing in the mystery hot water system. Everything was done by midday. They filled the system and found a leaky connection. They adjusted things and tried again. And again. Repeatedly, until giving up at 7pm.
Damon arrived at 7am on Friday to try applying his magic touch. He had it working by 8am, then rushed off to another job. The rest of the team worked hard to finish everything off, insulate all the exposed pipework and tidy up as storm Amy hit. Damon was back at 3pm to hand the working system over.
It’s a pretty standard setup for a high efficiency heat pump install. The heating is on throughout the day using weather compensation (difference between target indoor temperature and measured outdoor temperature) to determine the heat output required. This is done using the “heat curve” setting.
A heat curve maps between the temperature difference and the required flow temperature for water in the heating circuit. The exact curve to use depends on your heat loss. Vaillant supports a family of heat curves identified by a numeric parameter. We’re using a 0.7 heat curve, based on the estimated heat loss from our design consultation. Over time we may need to nudge it up or down depending on how close the estimate is to the actual heat loss. In most cases, it’s an overestimate, so I’m prepared to nudge it down if we get too hot.
The controls are configured to use “inactive” mode, where the heat pump is controlled purely by the heat curve. The measured indoor temperature is ignored.
Damon left the paper manuals with me at the end of the week. PDF manuals, a commissioning report, MCS certificate, building regulations certificate and electrical installation certificate appeared on the Heat Geek portal a couple of days after the install was completed.
Plumbing
Let’s take stock of what we’ve got on the plumbing side.

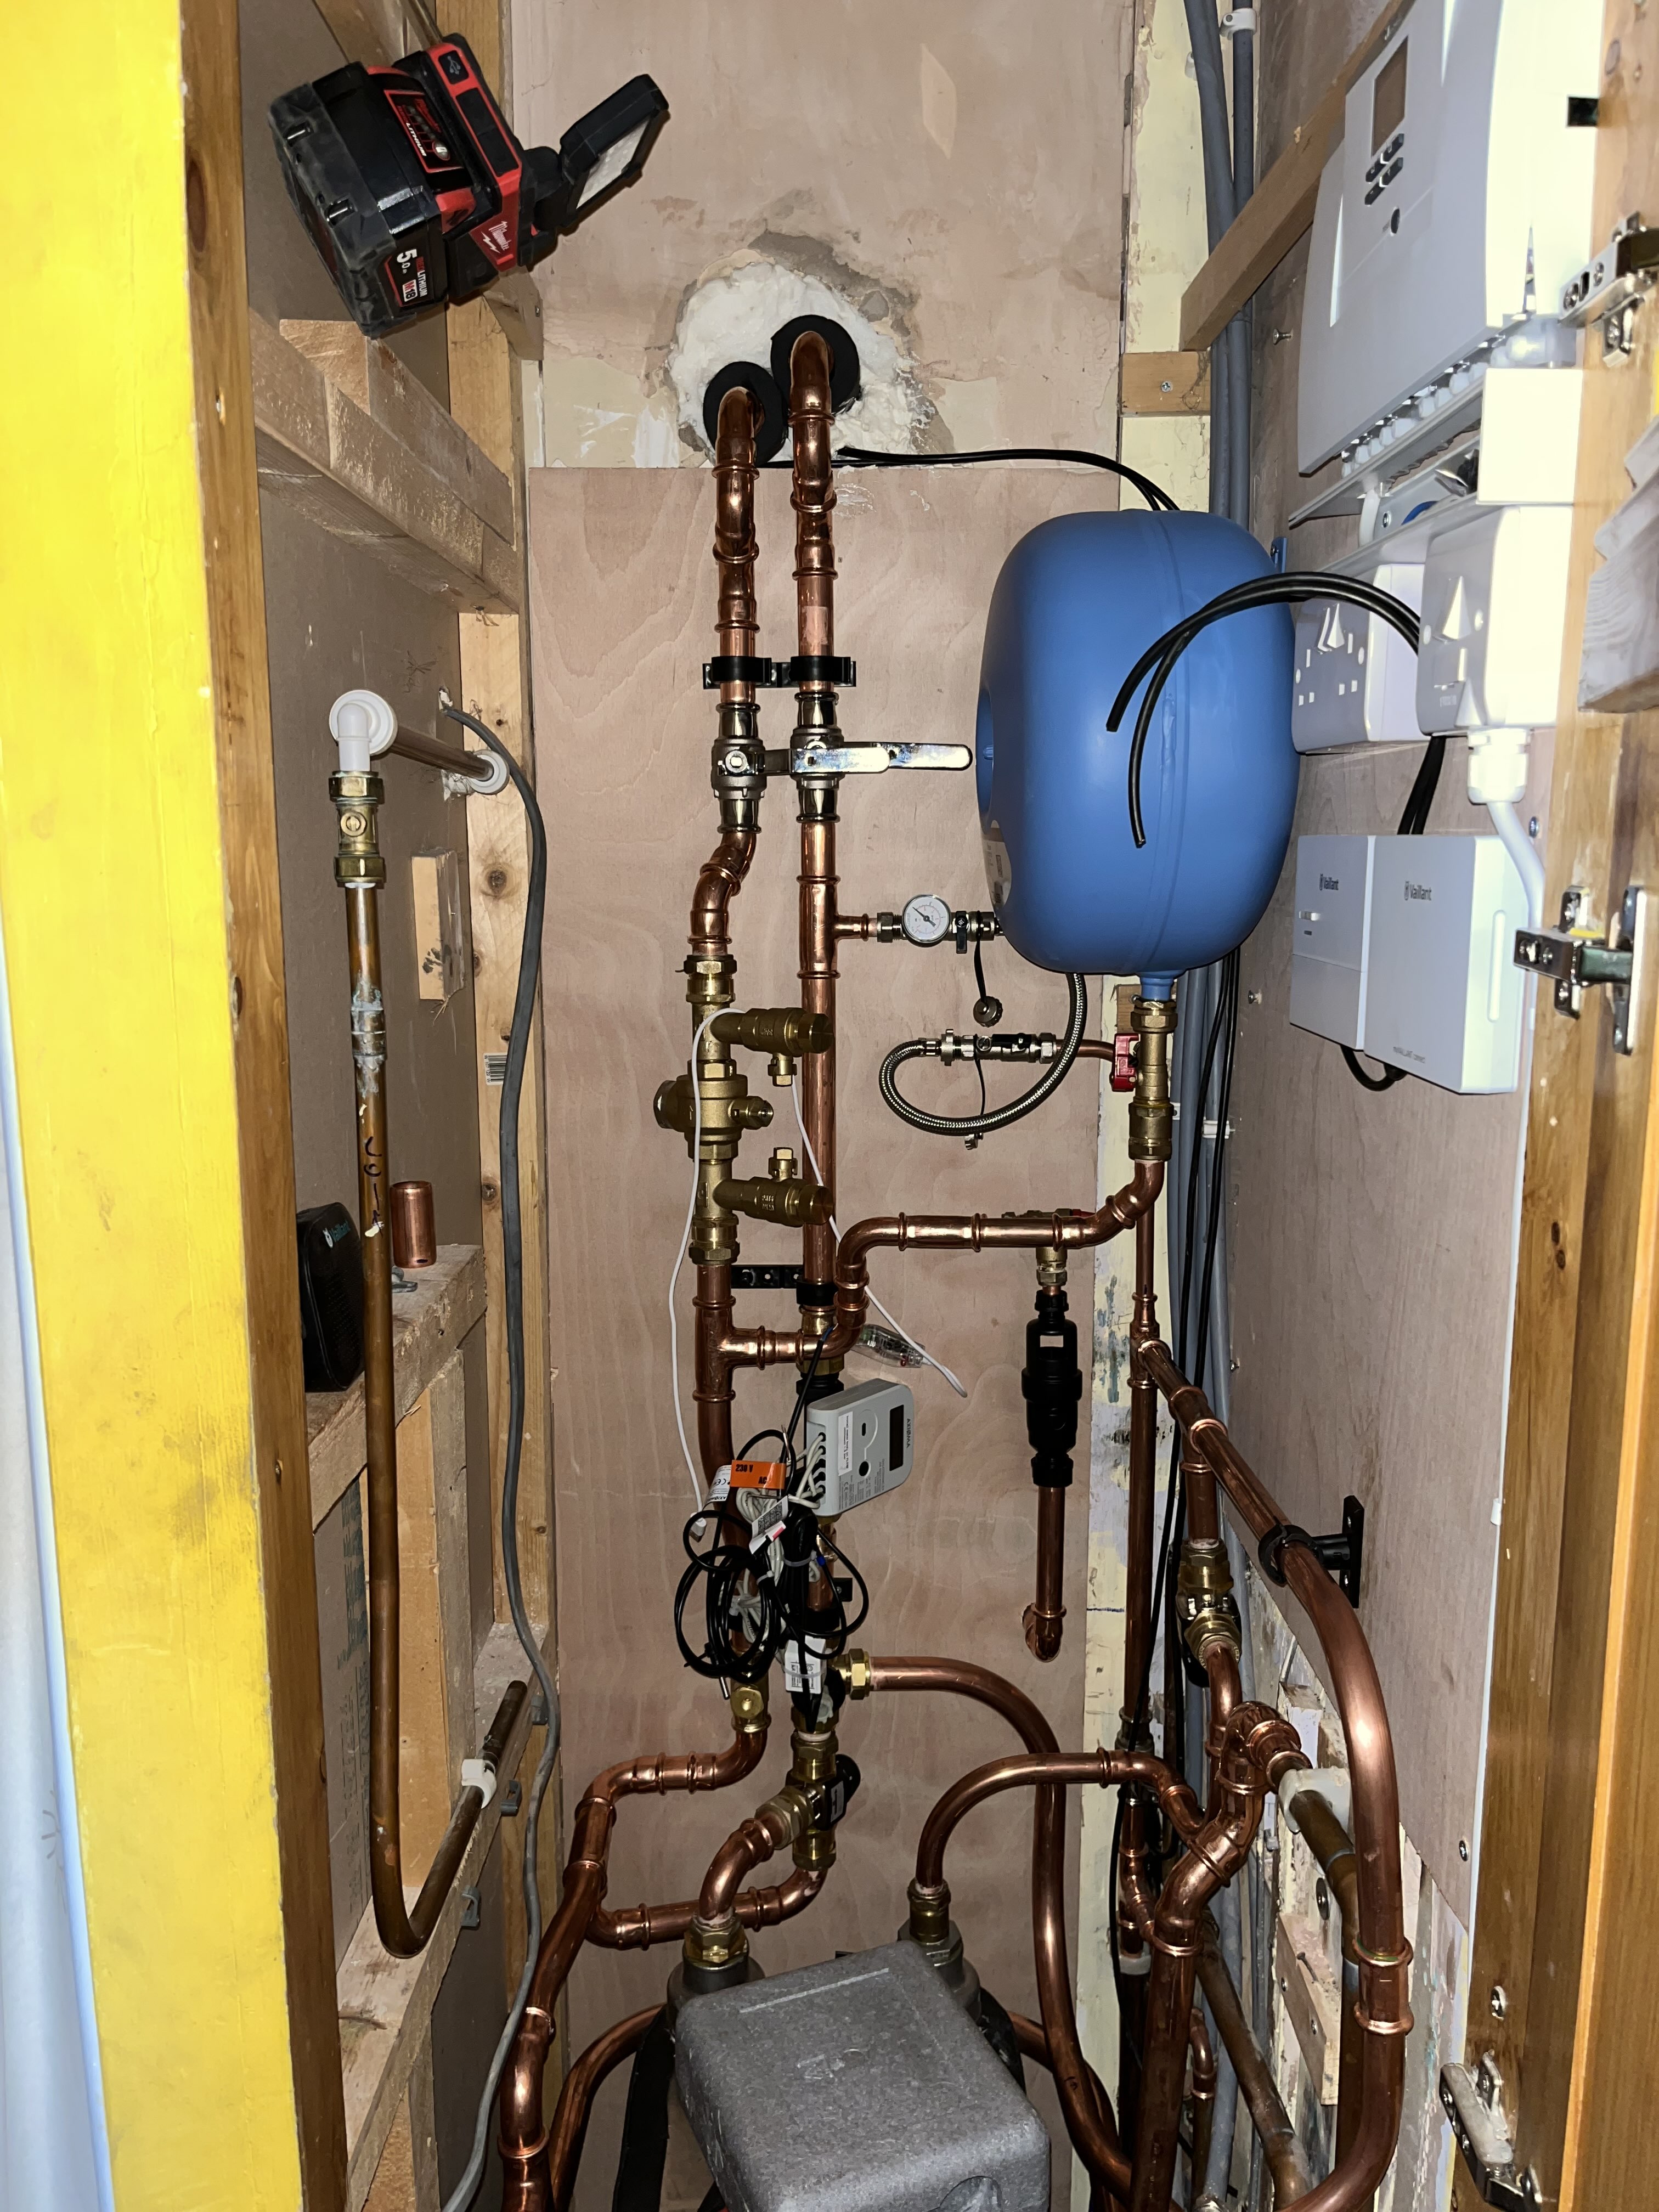
It’s a pretty simple setup. Water flows from the heat pump into a diverter valve controlled by an ESBE actuator. When the heating circuit is active, water flows through the radiators before returning to the heat pump. When the DHW circuit is active, water flows through the mystery hot water system before returning to the heat pump.
A spur pipe leads from the return to an expansion vessel and a pressure relief valve. The expansion vessel maintains an even pressure in the system as the water temperature changes. The pressure relief valve vents outside if something goes wrong and the pressure becomes too high.
There’s a filling loop connected to the flow pipe which can be used to top up the system pressure. There’s also the confusingly named “Impel Filling Device” on the return pipe. The main purpose seems to be as a removable filter that catches any crud from our old pipes and radiators before it can reach the heat pump.
Electrics
It seems like every modern hardwired electrical appliance expects to have its own consumer unit. Our meter cupboard is getting ridiculously overcrowded. We had another pair of henley blocks fitted when our EV charger was updated. The old charger worked perfectly well on a dedicated circuit in our main consumer unit but things have changed and the new one had to have its own consumer unit. Another two consumer units for our home battery are out of shot to the right.
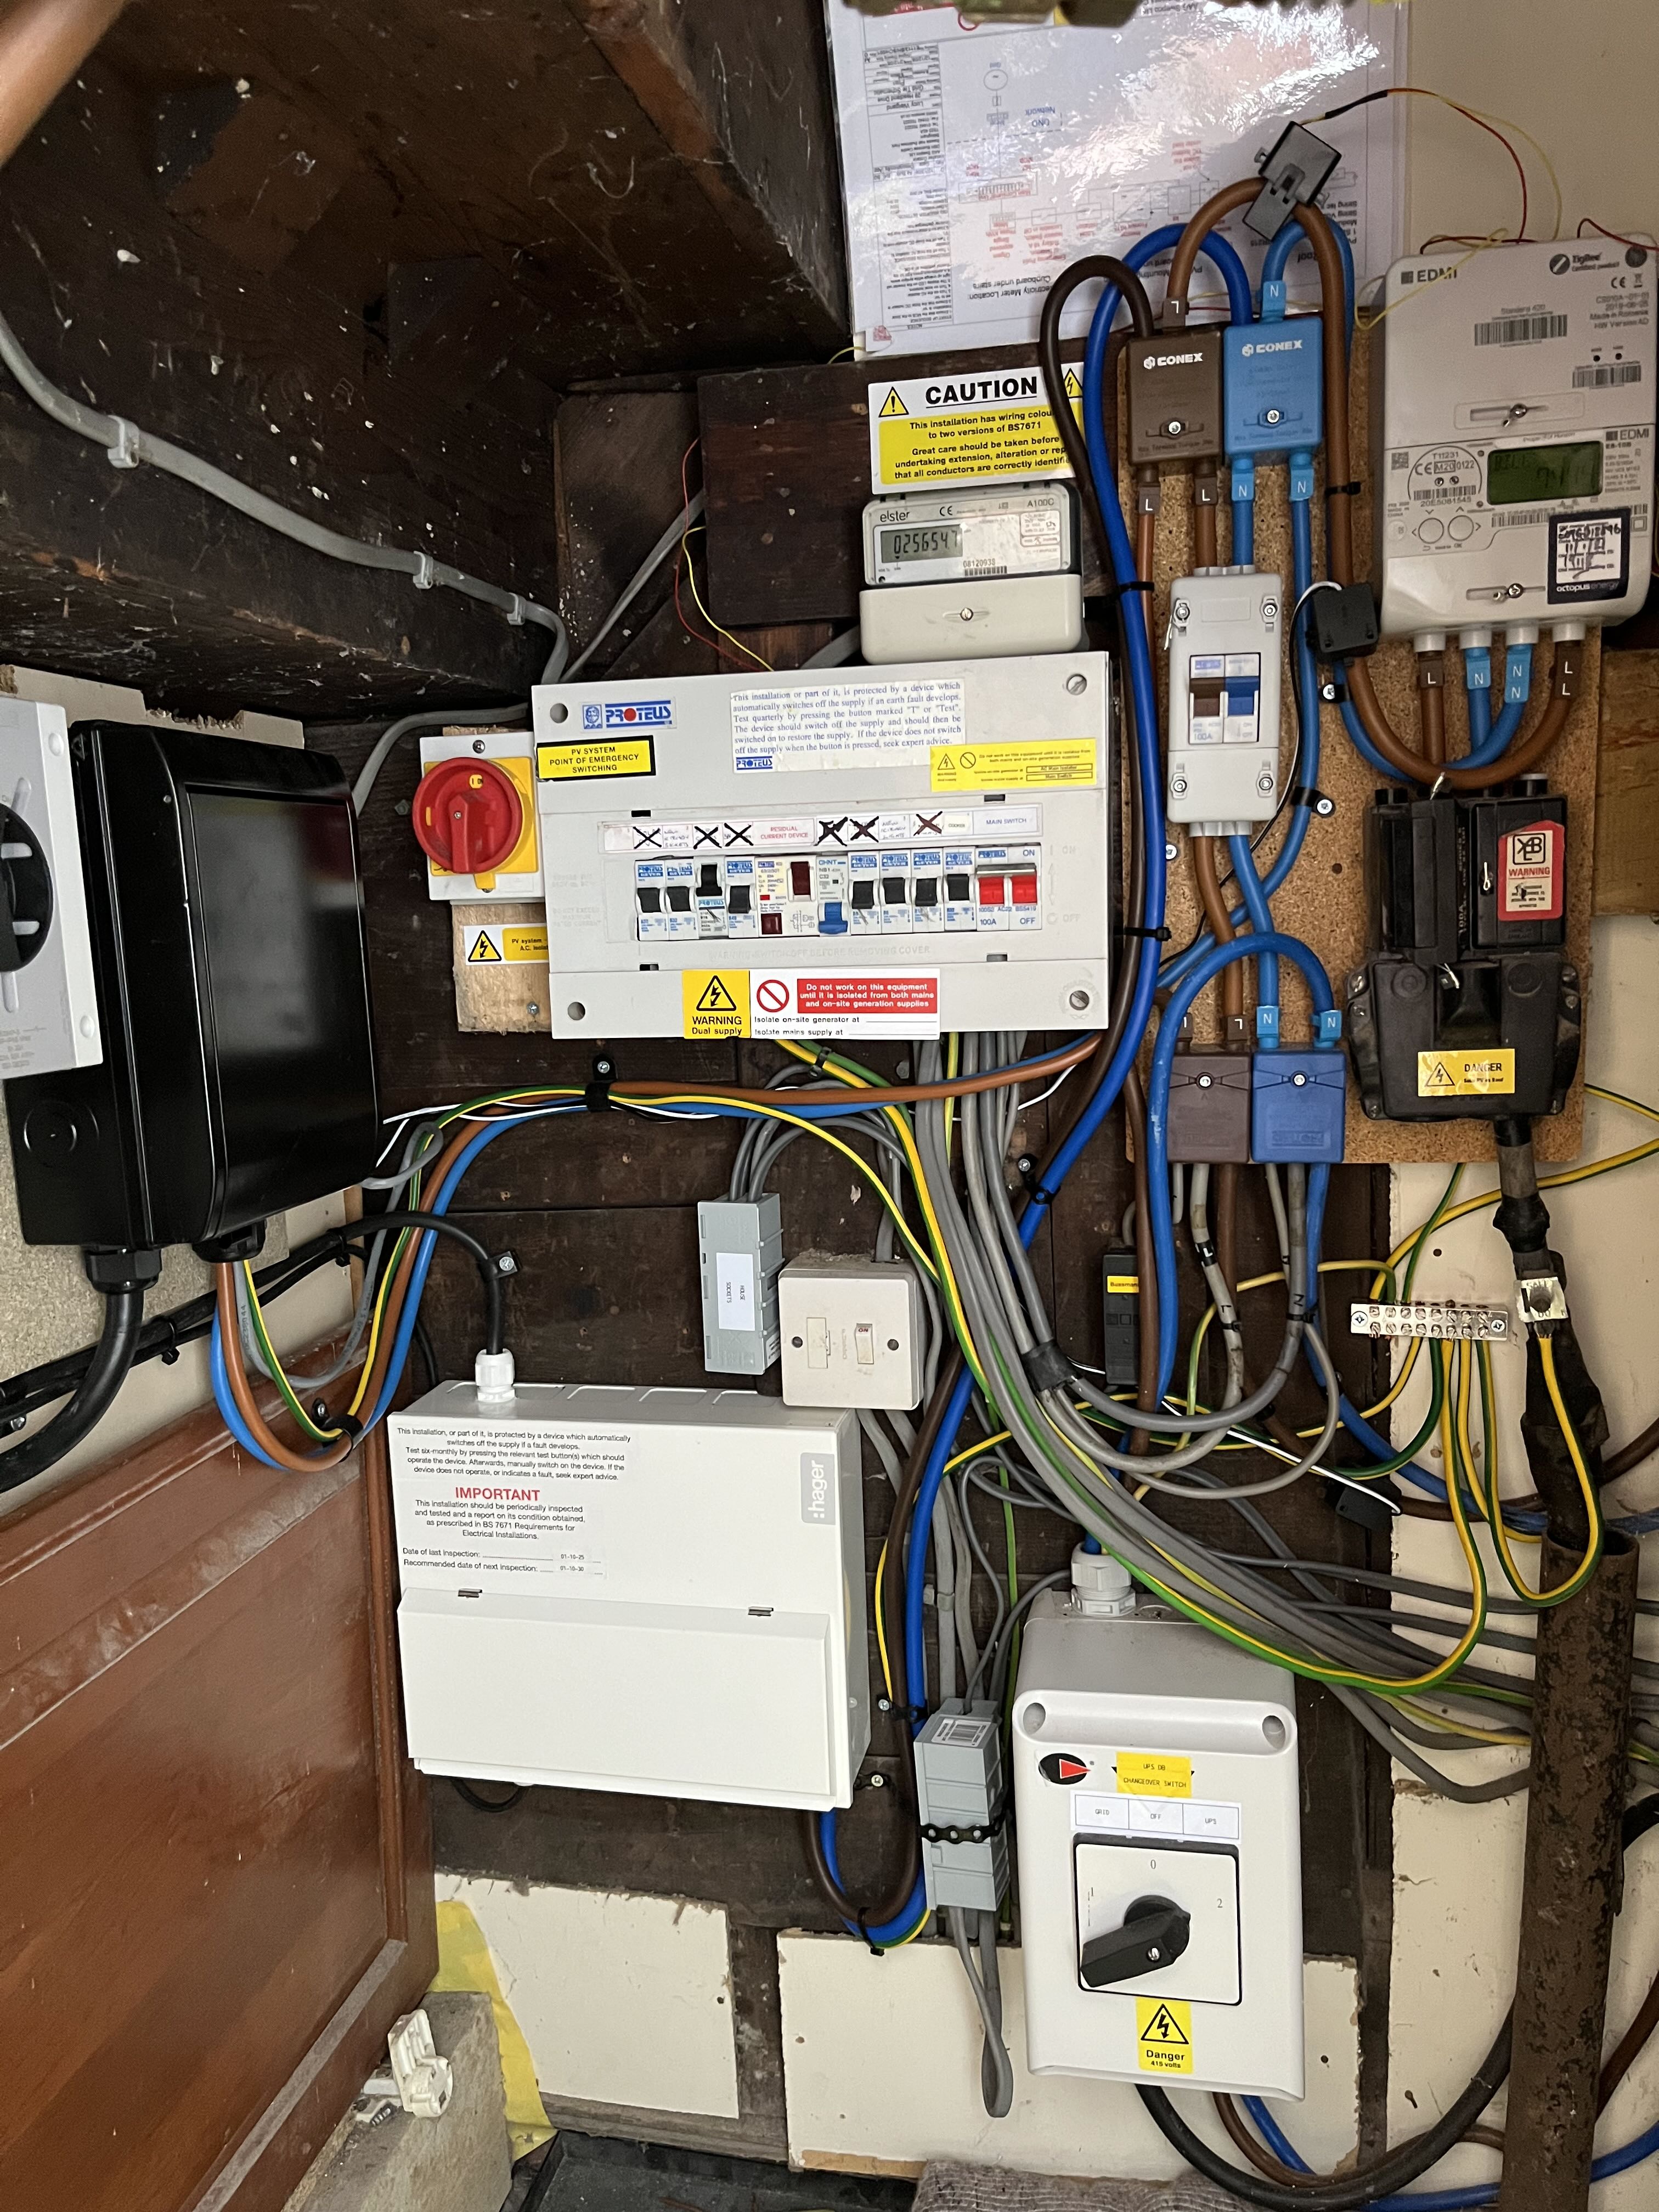
The spare ways in the new henley blocks were gobbled up by the heat pump with an enormous new consumer unit (bottom left). That required moving some of the existing wiring to make room. The first attempt at it was even messier than this.
Here’s what the overall electrical system looks like.

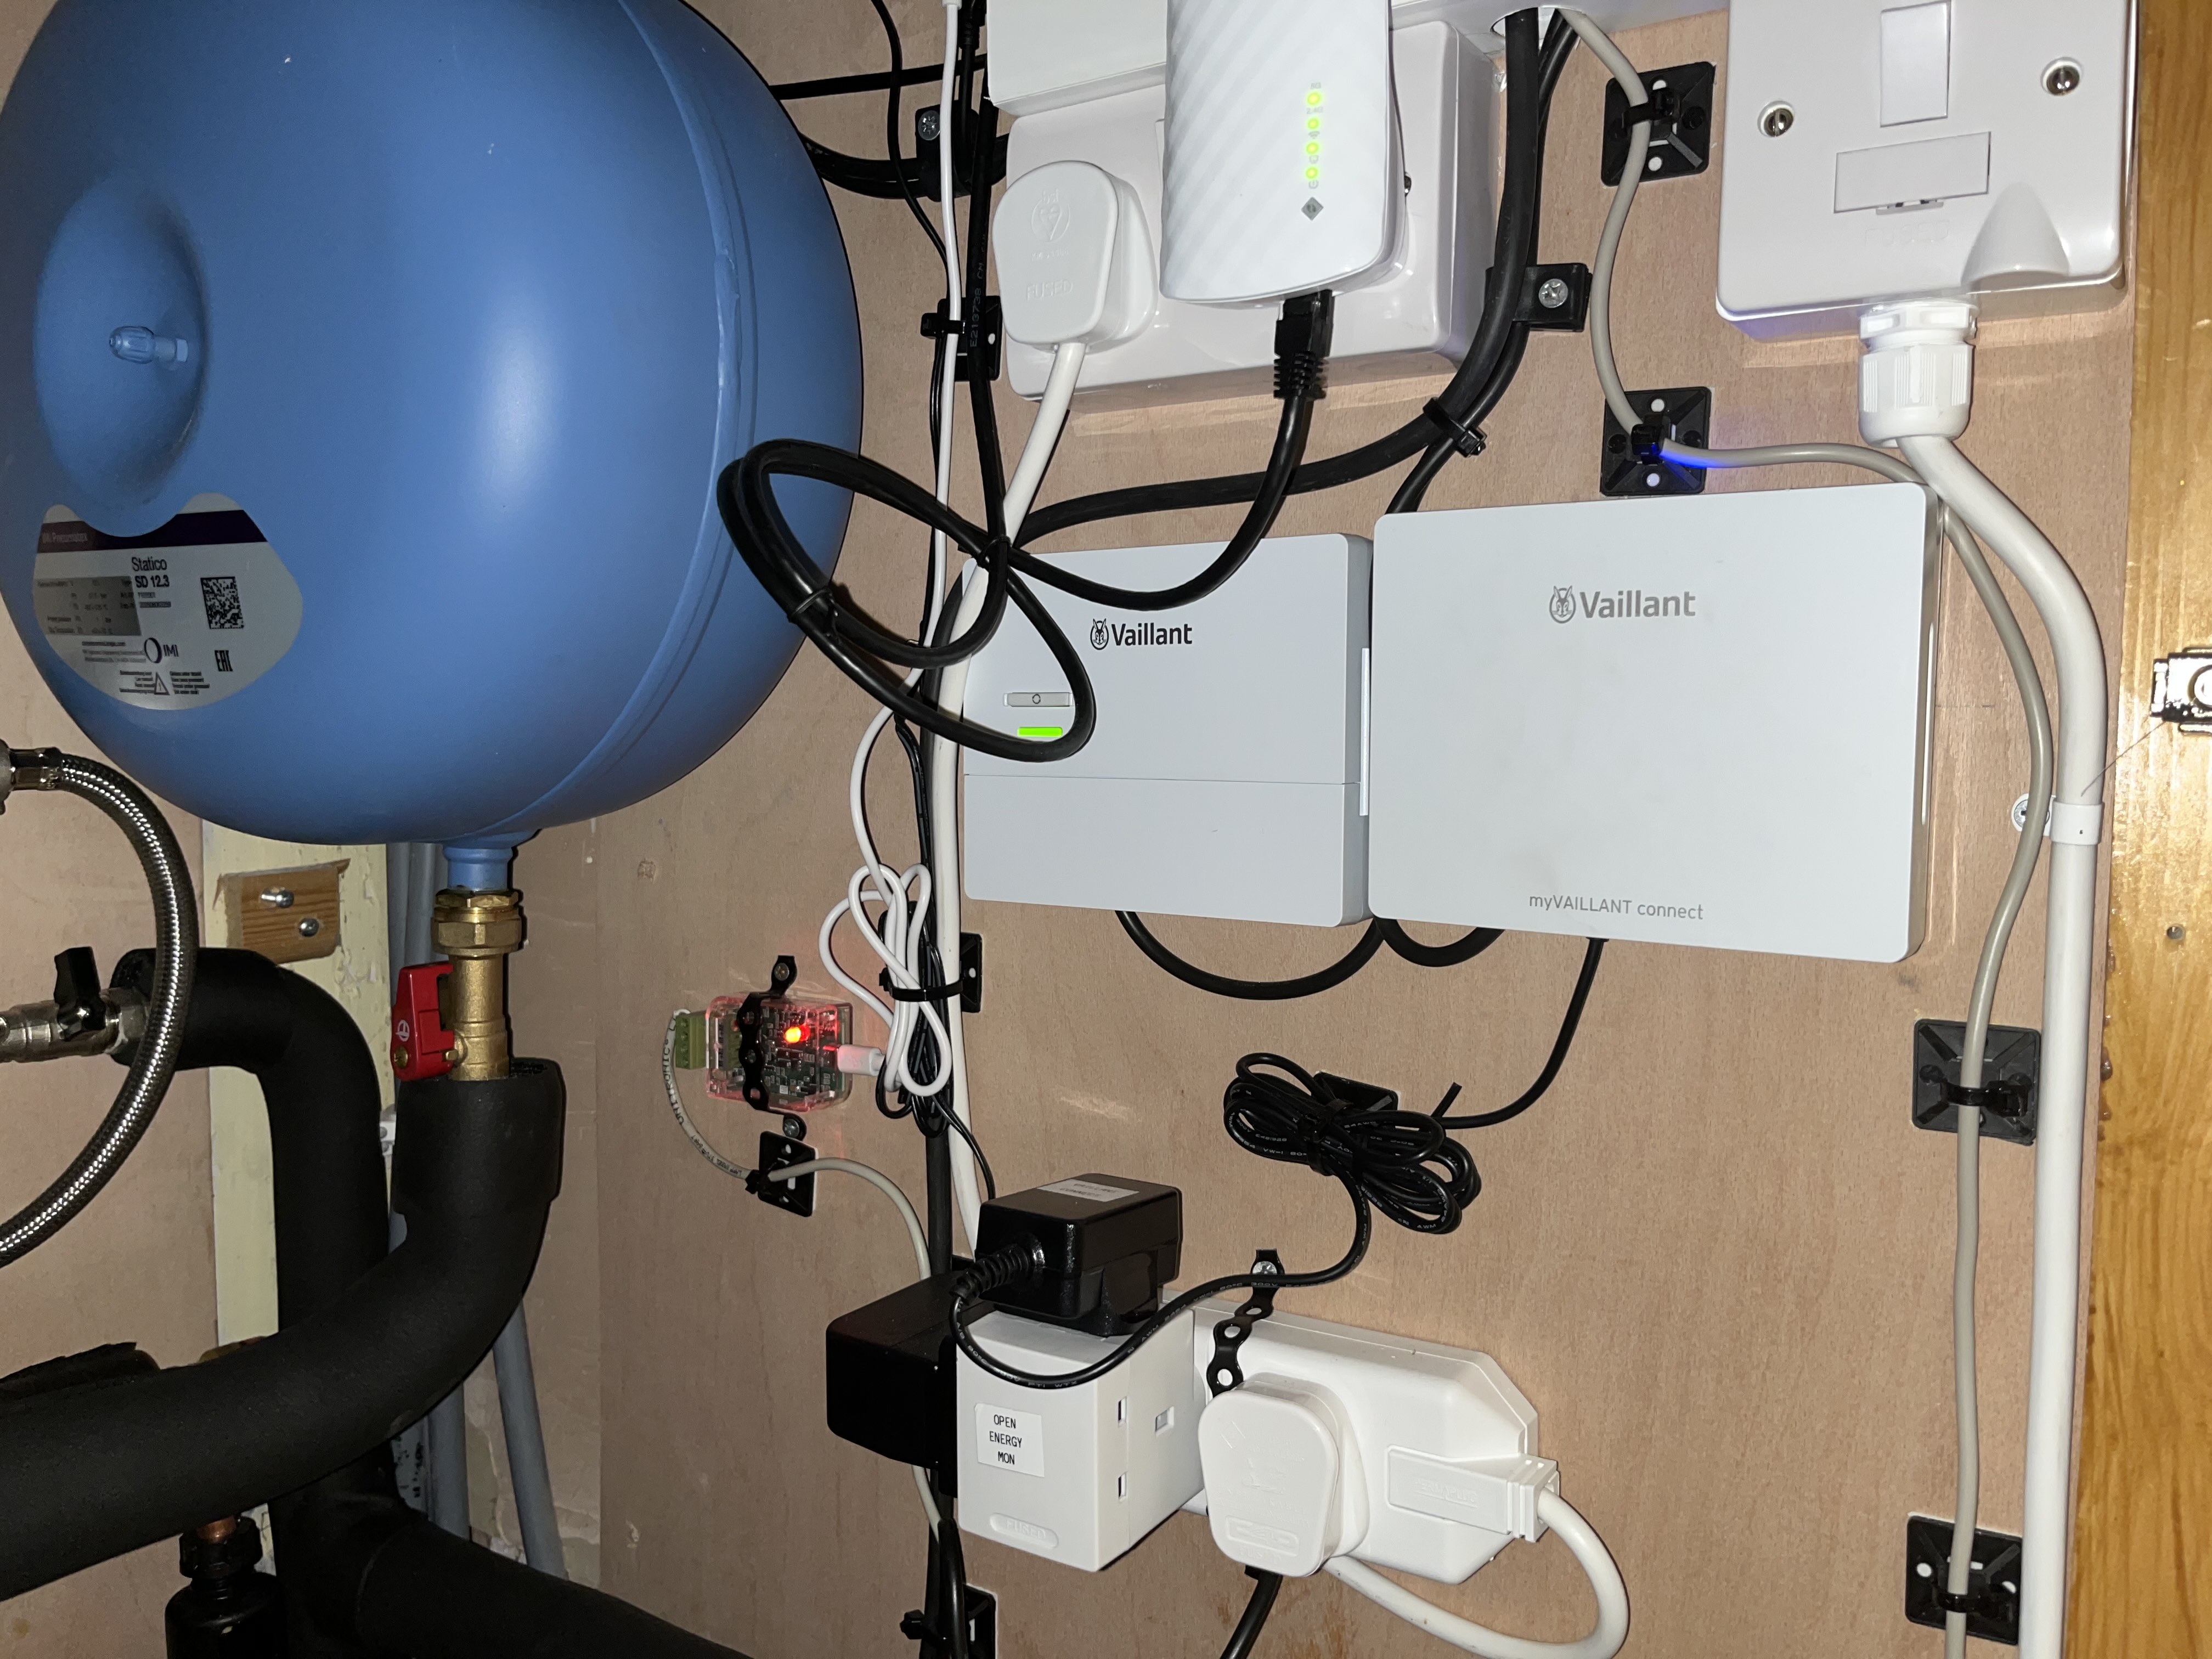
The new consumer unit includes a dedicated electricity meter for the heat pump. This feeds into an Open Energy Monitoring setup in the boiler cupboard. There’s a surprising amount of kit involved. The emonHP data logger is the brains of the system. It’s basically a Raspberry Pi in a ruggedized case. It has three sensor inputs: the electricity meter readings via an external Modbus reader, heat meter readings via an M-Bus reader and the position of the DHW-Heating actuator via a 240V status sensor.
The logged data is transferred to the Open Energy Monitoring backend via a wifi connection to our router. The heat meter consists of a flow meter for the flow pipe from the heat pump and temperature sensors for both flow and return pipes. You can calculate heat generated from the flow rate and temperature difference between flow and return.
The appliance interface is the brains for the heat pump. It controls the heat pump’s activity and switches the actuator between DHW and heating circuits. The same 240V control line is connected to the Open Energy Monitoring DHW status sensor.
There are two additional boxes on the wall. The radio receiver is part of the wireless sensoCOMFORT package. It receives signals from the outdoor temperature sensor and sensoCOMFORT control. The myConnect gateway connects the system to the internet via wifi to our router and provides support for the myVaillant phone app.
Initial Performance
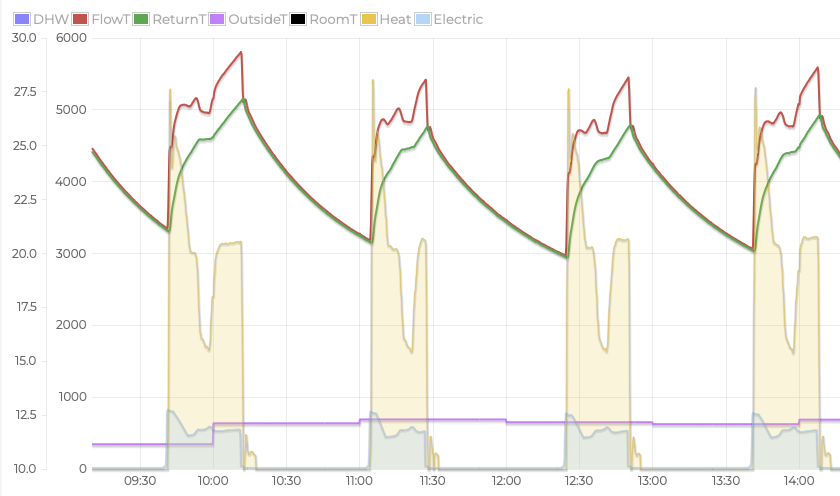
This is a graph from Open Energy Monitoring. There’s easy access to your data by scanning the QR code on the side of the data logger. The blue shading shows the electricity consumed by the heat pump and the beige shading the corresponding heat generated.
The heat pump is cycling on and off which is supposed to be bad. Each cycle the heat pump ramps up to 800W power consumed and then throttles back to 500-600W. It runs for 30 minutes and then turns off for 50 minutes. Water continues to be pumped round the heating circuit while the heat pump is off.
According to the sensoCOMFORT, the target flow rate is about 24 degrees. The heat pump is overshooting. I tried using the live monitoring feature on the appliance interface to try and work out what was going on. All the values reported made sense apart from this weird “Energy integral” thing that has units in °min. Time for some research.
After a long trip down the rabbit hole I have a much better understanding of how things work. The first thing to understand is that heat pumps have a minimum speed at which they can run. For my heat pump that minimum corresponds to 550W of power. At this time of year, the heat pump is producing too much heat to run continuously.
Energy integral is a really clever idea for controlling when the heat pump turns on and off. The implementation uses a stored counter. The counter is incremented by the difference between the actual and target flow temperatures at regular time intervals. Which explains why the value is displayed in °min. During the first half of a cycle, the value increases until it hits a configurable limit. The heat pump turns off and the hot water in the pipes continues to circulate. The counter continues to increase until the water has cooled to below the target flow temperature, at which point it starts to decrease. Once the counter gets back to its starting point the cycle starts again.
The end result is that the average amount of heat delivered is equivalent to consistently running at the target flow temperature. To make things more confusing, instead of starting at 0 and turning the heat pump off when you hit the limit, you start at -limit and turn off when the counter reaches 0. Although it does mean that you can tell by the sign of the integral whether heat is currently over or under delivered.
The default start point is -60. Using -120 instead of -60 will double the amount of energy the heat pump can overshoot by, increasing the length of each cycle. This should improve efficiency as the heat pump runs for longer at a time with fewer cycles. However, if the cycle is too long you’ll notice swings in temperature in the house. Something to experiment with.
Living with a Heat Pump
The first thing I noticed was how quiet it was. You get used to the sound a gas boiler makes when it ignites. It was shocking when it wasn’t there anymore.
The app tells me the heat pump is working, otherwise I wouldn’t know. If you stand in front of the heat pump during a heating cycle, you can feel the cold air blowing out, but can barely hear it. It’s more noticeable when running full speed, similar to a fridge. Even then, you can’t hear anything inside the house.
At this time of year, the flow temperature is around 22°C. The radiators don’t feel warm to the touch. However, the house maintains a stable, comfortable temperature. I had to knock the heat curve down a couple of times when I noticed the temperature gradually creeping up over the first few days. The temperature has remained within a degree or so of the set point for the last week. There is some variation, particularly from solar gain on sunny days, but it evens out over time.
I adjusted the schedule from 24x7 running to make the most of our overnight cheap rate. The heating turns off late at night before the cheap rate starts, then off again early morning after it ends. We make up for it by generating extra heat when electricity is cheap. This is the opposite of the normal practice of a slightly lower set back temperature at night. It helps that our attic bedroom doesn’t have any radiators and remains cool for sleeping.
We don’t use the sensoCOMFORT at all day to day. It turns itself off after use and takes 5 seconds to turn back on. Once it’s on, you find that everything you need is buried three menus deep, scattered among a multitude of confusingly named sub-menus. It has touch controls but not a touch screen, which makes navigation painful.
In contrast, the most important information is on the front page of the app. Everything else is logically placed a click or two below the widgets on the front page. The only annoyance is that the data displayed is laggy as changes have to bounce off Vaillant’s internet servers to get from the appliance interface to the app.
We have to use the sensoCOMFORT to make more advanced configuration changes. In theory these could be done through the heat pump appliance interface. Unfortunately, integrating the sensoCOMFORT disables the overlapping functionality in the appliance interface. Apart from that, the only thing the sensoCOMFORT does is provide the indoor temperature displayed in the app.
Next Time
Oh yes, what about the mystery hot water system? I’ll tell you all about that next time.