A few weeks ago I described our heat pump installation, which included a mystery hot water system. The mystery hot water system, as some of you already guessed, is a prototype Heat Geek NanoStore.
Traditionally, heat pumps are paired with a large hot water cylinder. This is heated low and slow, the way heat pumps work best, once or twice a day. It needs enough capacity to cover the household’s hot water needs for the day. Modern cylinders are supplied with a large amount of insulation preinstalled. You need plenty of space.
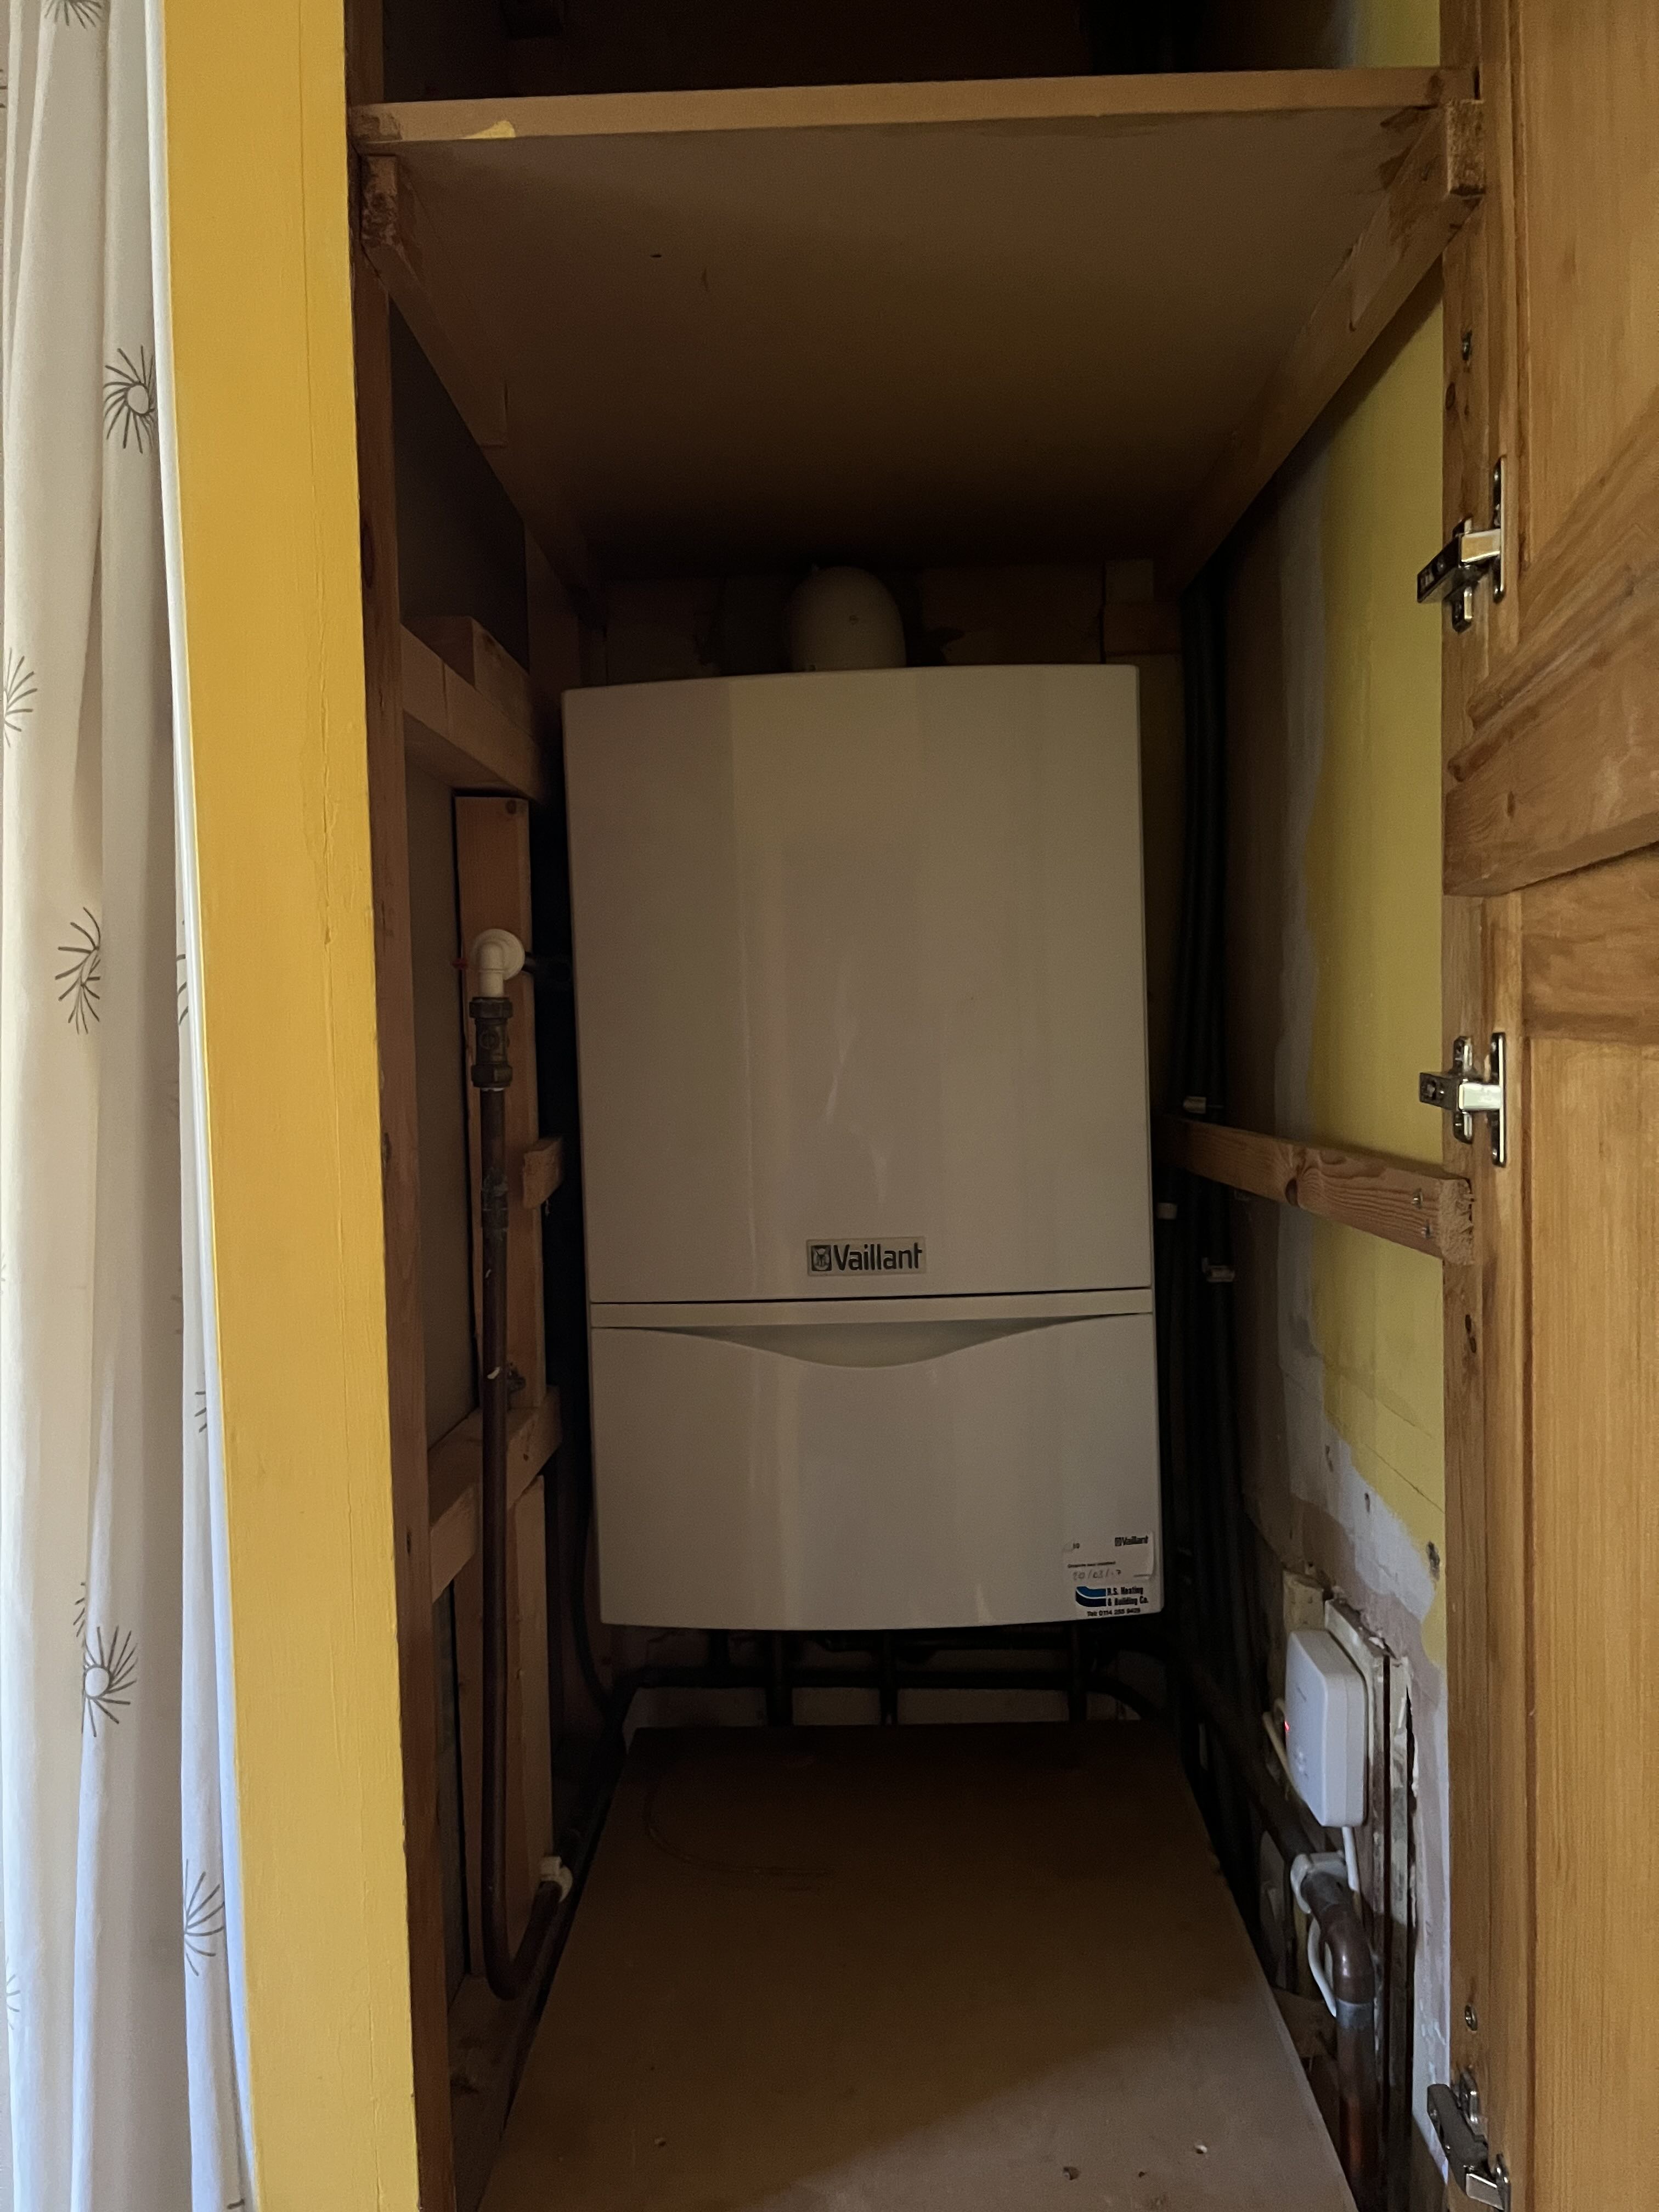
We didn’t have much space. Our old combi boiler was installed in a narrow airing cupboard. The cupboard is 690mm deep, 600mm wide and 2400mm tall (floor to ceiling). The heat pump plumbing, controls and hot water system all had to fit in the same space. Ideally, leaving as much space as possible for storage.
A modern hot water cylinder doesn’t fit.
MiniStore
Heat Geek have an existing solution for this problem, the MiniStore. A MiniStore is a small hot water cylinder plumbed in reverse. The heat pump directly heats the water in the tank. Cold water flows through a central coil, picking up heat, connecting into the domestic hot water supply. The cylinder acts as a heat store.
There’s enough stored heat to cover a few minutes of hot water demand. That, in theory, gives just enough time for the heat pump to kick in, ramp up and start replacing the lost heat. Our heat pump is capable of generating 9.5kW of heat when running flat out, equivalent power to an average electric shower. The end result is effectively a heat pump “combi”.
Our original design included a 110L MiniStore Tall. The cylinder has a 475mm diameter and is 1100mm tall, including 50mm of insulation all round. The external volume is 195L. Allowing room for access and pipework round the sides, it will just fit.
MiniStores come in a variety of sizes, down to the 60L MiniStore XS. The smaller they get, the less well they work. There’s less heat stored, fewer minutes of hot water, they’re less effective at transferring heat. Any smaller than the XS and they don’t work at all.
NanoStore
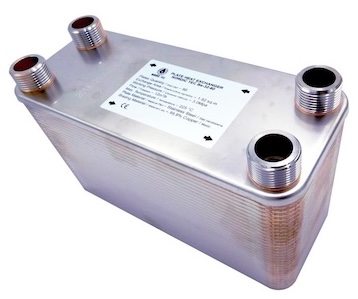
This is where the NanoStore comes in. Instead of starting with a hot water cylinder and adapting it to work as a heat exchanger, the NanoStore starts with a heat exchanger and adapts it to work as a heat store.
Heat Geek have done some experiments of their own with promising results. They were looking for volunteers to try a prototype NanoStore for real. They offered us a discount, free Open Energy Monitoring, and a guarantee to replace it with a MiniStore if it didn’t work out for us.
The prototype NanoStore in Adam’s video is built around a Nordic Tec BA-115-100 plate heat exchanger. Heat is stored in the metal body of the heat exchanger as well as the 30L of water inside it. Add a thick layer of insulation and you have a heat store. It’s more compact than a MiniStore, with much better energy transfer.
The complete solution adds two mixing valves. One blends hot water from the heat exchanger down to a safe temperature, which also increases the volume of water that can be supplied. The other is on the heat pump side of the exchanger. It acts as a diverting valve so that water flowing from the heat pump only goes into the heat exchanger when it’s reached a suitable temperature.

Our heat exchanger is twice the size of the one in the video. Based on the external dimensions, it looks like a BA-115-170. It weighs just over 100kg, so very difficult for two people to maneuver up the stairs and into a narrow cupboard. It’s about the same size as the old combi boiler, but has to sit on the floor as it’s too heavy to wall mount. The connectors are a massive 2.5 inch in diameter which means they need adaptors to connect to domestic pipework. The team needed half a day of installation time, and a lot of swearing, to get all the joints to seal.
The heat exchanger is 535mm deep, 253mm wide and 428mm high for a volume of 58L. However, it’s been heavily insulated and sits on feet. The overall dimensions are 620mm deep, 320mm wide and 550mm high. The volume of cupboard space occupied is 109L.
The data sheet doesn’t say how much water it holds but we can work it out. Stainless steel has a density of 8kg per litre, so 100kg of steel needs 12.5L of space, leaving 45.5L for water. Conveniently, water has 8 times the heat capacity of steel, which means a litre of steel holds the same heat as a litre of water. The overall heat capacity is equivalent to 58L of water.
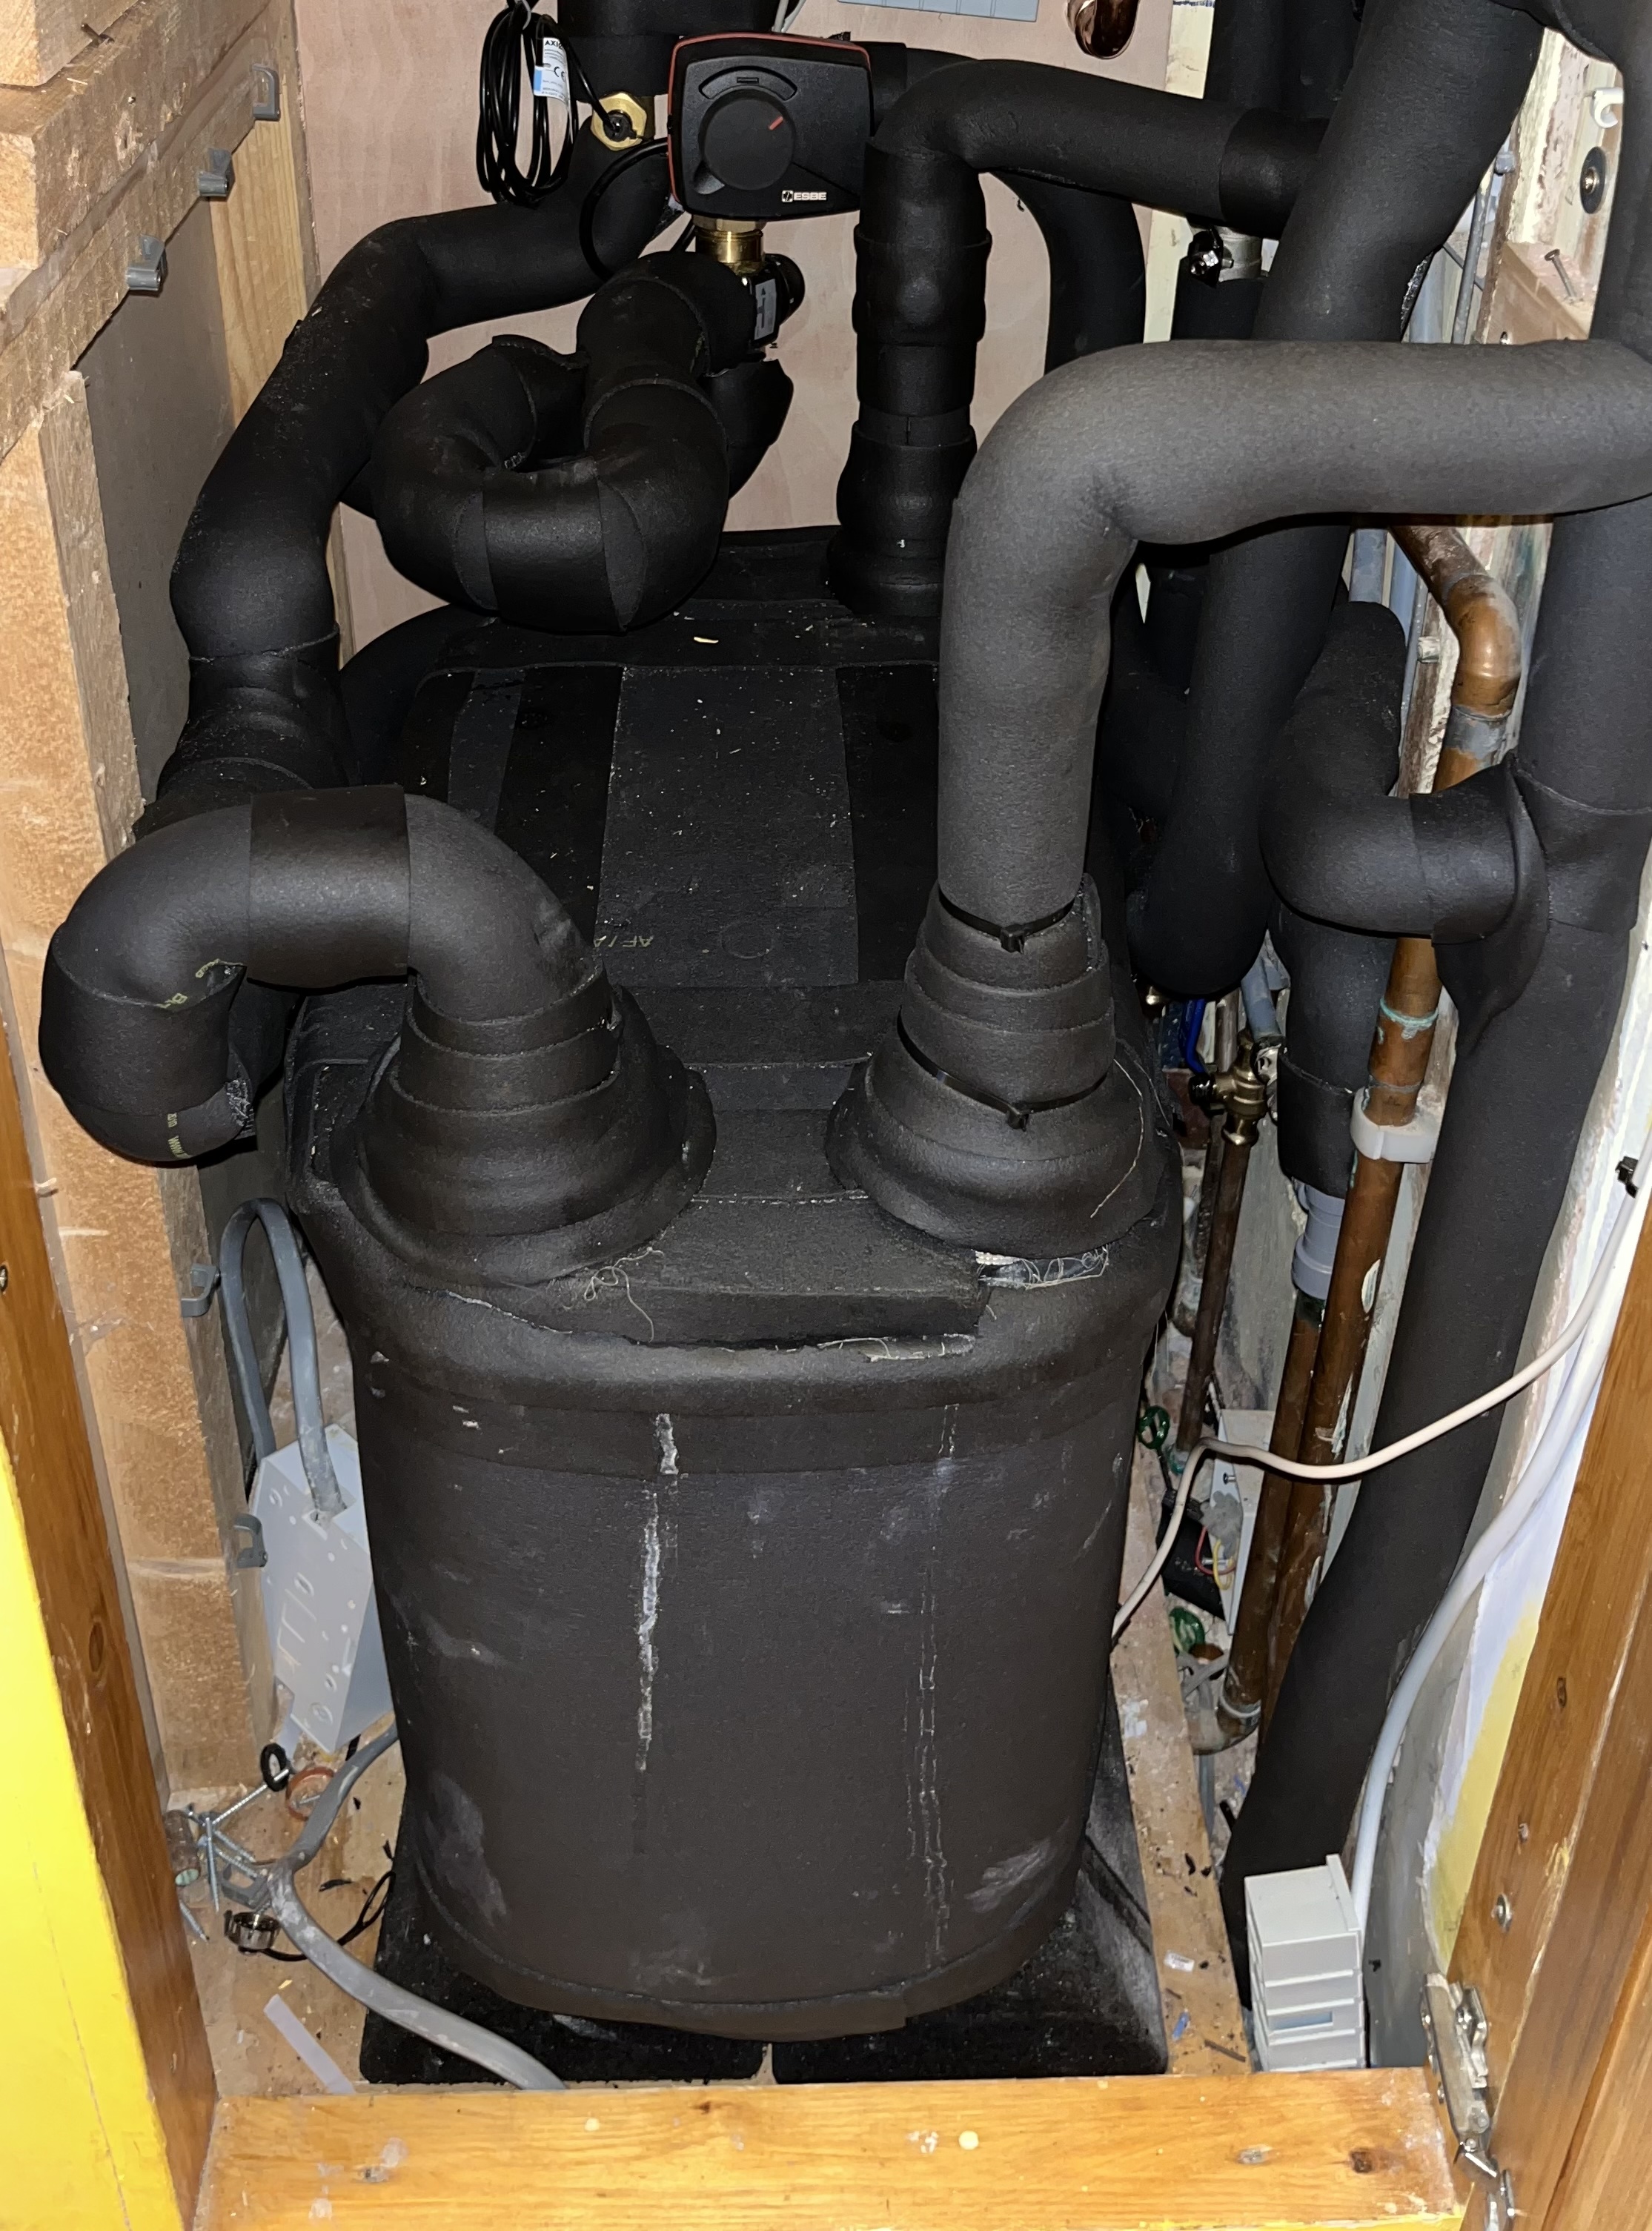
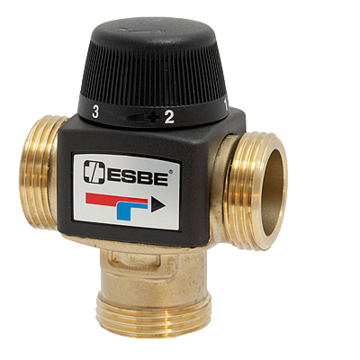
The mixing valves are two ESBE VTA 370/570 series thermostatic mixing valves. They have a 20-55°C range, with an adjustment knob to select temperature from 1 to 6.
The NanoStore has equivalent heat capacity to a 60L MiniStore XS and occupies roughly the same volume of space. However, the cuboid shape means there’s more usable space. The NanoStore fits into the space below the lower shelf in the original picture.
According to the Nordic Tec website, the BA-115-170 is a “large industrial plate heat exchanger” with “significant weight” that is “not a heat exchanger for single-family homes”. Of course, Heat Geek aren’t using it in a typical way. It needs to be big enough to act as a heat store for the time it takes for the heat pump to react and build up to full power.
The one we’ve got is so much bigger because we have two showers and Heat Geek want to see whether both can be used simultaneously. Plus installing a range of sizes gives them more data to work out the optimal size for future installs.
The Heat exchanger plus Open Energy Monitoring level 3 is £3000 worth of kit, at list prices, so we got a good deal for being guinea pigs.
Non-stop DHW Cycles
The installation was completed late on Friday so my first proper day of testing was Saturday. It was the tail end of storm Amy, a much colder day than the previous week. It was never above 10°C, mostly around 8°C.
The heat pump was running but only for DHW (domestic hot water) cycles, every 60-90 minutes. No heating cycles. I messaged Damon, our installer, who replied almost instantly. He suggested bumping the heat curve right up to 2.2 to give 55°C flow temp, which would force a heating cycle.
After a long drawn out few minutes it finally kicked in. Took an hour to get the house up to temperature, after which I went back to the design heat curve of 0.7. The house stayed at temperature but the overall behavior was the same. A DHW cycle every 60-90 minutes. No heating cycle. COP around 2.5.
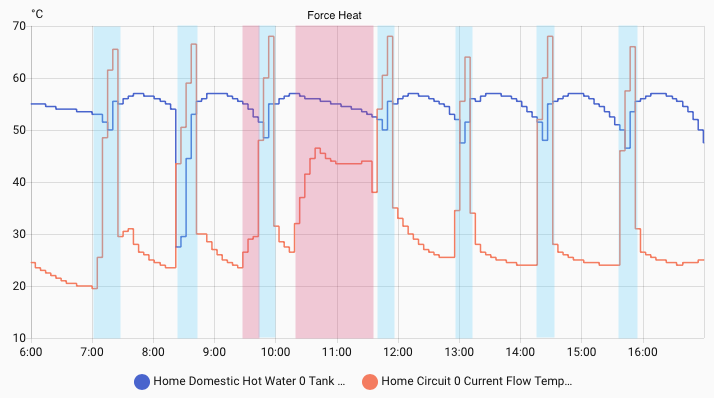
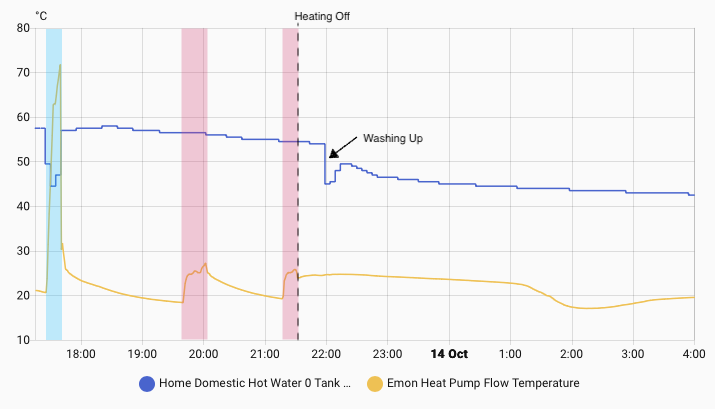
This is an annotated history graph from Home Assistant. The blue line shows the reported hot water temperature, the red line is the heat pump flow temperature. The blue shading shows when the heat pump is generating heat with the DHW circuit active. The red shading shows when it’s generating heat with the heating circuit active. The rest of the time water is being pumped round the heating circuit but the heat pump isn’t generating heat.
I tried increasing cylinder hysteresis from 2.5°C to 4°C, so that DHW cycles would be less frequent. Made barely any difference. After a DHW cycle, the flow temperature never drops far enough to trigger a heating cycle before the start of the next DHW cycle.
Thermosiphoning
Where was the heat coming from? Given the rapid loss of heat from the heat exchanger, without the airing cupboard or outside of the insulation feeling over warm, it seemed most likely that it was escaping into the heating circuit. Almost at the same time, I got a message from Damon saying it was most likely to be thermosiphoning. Fixing it would need no-return check valves to be installed.
I suspect this is a consequence of floor mounting the heat exchanger with all connections on top. It’s easy for convection to move heat up the heat pump return connection and on to where it joins the return from the heating circuit. Similarly, heat can also convect up the cold water supply pipe.
I turned off the hot water. We can heat on demand when we need it and use it immediately. The normal heating cycle kicked in after a couple of hours. Reasonable COP around 5.
Damon messaged again the following day. The whole team were heading out for a remote week-long job but he would send one of them back a day early so they can fit the valves on Friday. He also offered to cover my electricity costs until the problem is sorted. At the end of the week, he had to rearrange again to the following Monday.
Installation took an afternoon to do. It was a belt and braces approach using four check valves. Two spring loaded ones on the inflows and two flutter valves on the outflows. Some of the pipework runs had to be altered to get long enough straight sections to fit the valves in.

We fired everything up, turned on the hot water and heating, and crossed fingers.
Much better. Store loses a little less than 1°C per hour.
Blending Down
Initially, the hot water blending valve was set on maximum. Hot water came out of the shower head scalding hot, then gradually reduced in temperature, leading to constantly having to bump the shower temperature up.
I turned the blending valve down from 6 to 4.5. On testing, I thought I was getting 41°C at the tap, so maybe 45°C out of the valve. After several complaints from the rest of the household and checking temperatures at all taps and showers, I ended up setting the valve to 5.5. That gives a stable temperature at the shower with water hot enough for everybody, at every outlet.
There does seem to be a psychological element at play. It’s not enough that the water is hot enough. You need the maximum temperature to be a little bit too hot, so that you can turn it down and feel that you’ve got it just right.
Instant Hot Water
The idea is that the NanoStore holds enough heat to provide hot water until the heat pump kicks in and ramps up to full power “combi” mode. My first test was using the shower at its natural flow rate. We’re at the top of a hill with low water pressure, so it’s not excessive flow. About 8L a minute.
I got 5 minutes of hot water before the shower started to go cold, ending up at around 30 degrees. Not freezing cold but not a pleasant experience. I kept going for another 10 minutes in the name of science. It didn’t get any hotter.
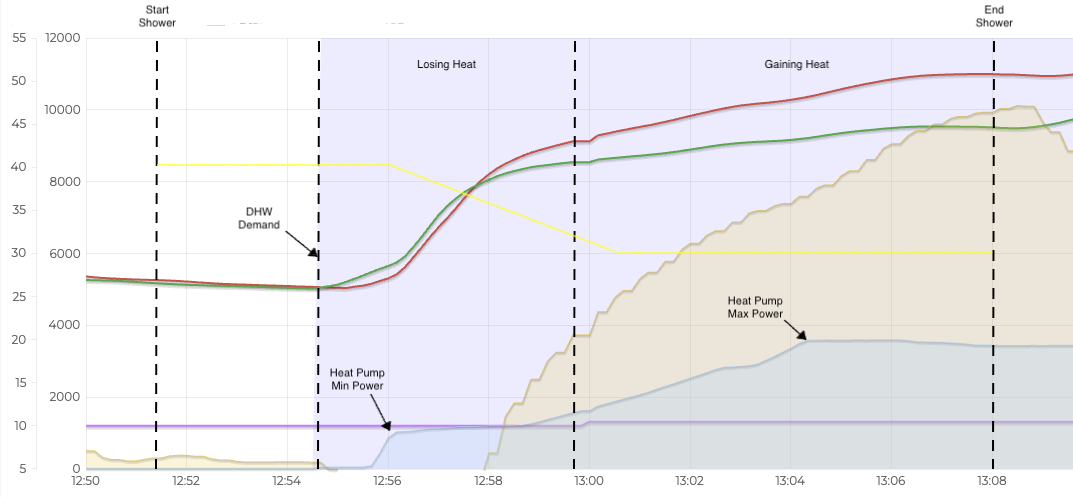
This is an annotated power graph from Open Energy Monitoring. The red and green lines are flow and return temperatures. The blue and brown shading are electric power in and heat power out. I’ve added the the yellow line which shows perceived hot water temperature. I didn’t have a thermometer to hand. Three things jump out.
It took 3 minutes from starting to shower before DHW demand was signalled. The water had been heated to a 55°C target shortly before the test. The temperature sensor sits between the body of the heat exchanger and the surrounding insulation, close to the cold water inlet. The idea is that it should react quickly when water is drawn off. The downside is that it lags when heating water. Once temperature had equalized across the store, it ended up at 59°C. With a 2.5°C hysteresis, the temperature has to fall to 52.5°C before a DHW cycle is triggered.
Once the DHW cycle starts, the NanoStore loses heat for the first 3 minutes. The return temperature is higher than the flow temperature. We’re 8 minutes into the shower before there’s a net heat gain. The average shower would be over by now.
There’s a one minute delay from DHW demand to the heat pump starting. It ramps up quickly to its minimum 600W power level. It takes a long 8 minutes for it to get to it’s 3300W full power. Power barely increases while the store is actively losing heat, then starts ramping up slightly faster. Once it’s going full throttle, it puts out the expected 9.5kW of heat.
Hot Water Theory
How much initial hot water should we expect? The NanoStore holds 45L of water at around 55°C. There’s 22.5L on the DHW side and 22.5L on the heat pump side. Turn on the shower, and 22.5L of water at 55°C flows out, then gets blended down to about 45°C.
Assume incoming cold water at 10°C. Blending at a 4:1 ratio of hot:cold averages out at 46°C. Giving 28L after blending. At 8L a minute that’s about 3.5 minutes of hot water.
Cold water enters the heat exchanger as the hot water is drawn off. The other side of the heat exchanger is at 55°C, so will warm the incoming water. Let’s assume the heat exchanger does its job and raises the water to at least 45°C. That’s an increase of 35°C. The hot side of the heat exchanger holds 22.5L of water and the equivalent of another 12.5L in the steel body. Heating 1L of water by 35°C will decrease the temperature of the heat exchanger by about 1°C. That gives at least another minute of showering before the temperature is reduced too far for the heat exchanger to work effectively.
So, we should expect about 4.5 minutes of hot water, which is close to what I experienced.
Best Case Scenario
Adam from Heat Geek suggested using water saving shower heads for a 6L a minute flow rate and heating the store to 65°C. Blending at 2:1 averages out at 46.5°C, giving 34L after blending. At 6L a minute that’s about 5.5 minutes of hot water. You’d then get at most 3 minutes more with the heat exchanger temperature reducing from 65°C to 47°C.
Will that be enough? Let’s put it to the test.

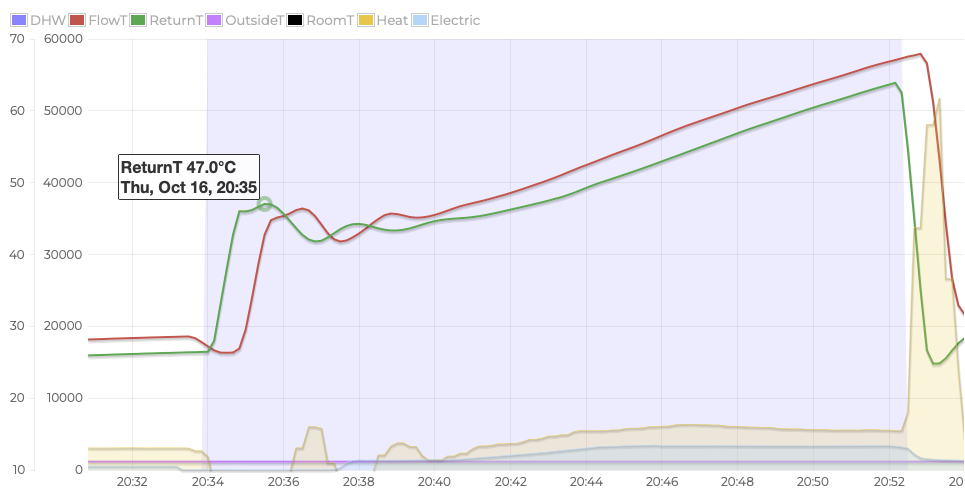
The water was preheated to 65°C but there was a delay before showering. The water was at 63°C when I started. That’s in the expected range for a 2.5°C hysteresis and should be the best case scenario. The DHW cycle kicks in after a minute of showering.
To my great surprise the water started going cold after 5 minutes. However, this time it went hot again 4 minutes later. Not quite as hot as when it started but an adequate temperature. It maintained that temperature to the end of the shower.
What’s going on? The downside of starting the DHW cycle sooner, is that the heat store starts losing heat sooner. Heat is being drawn out of the stored water. Clearly, the diverting valve isn’t working as intended. Some of the initial cold water from the heat pump is passing through the store, removing heat and circulating it back to the heat pump.
That heat isn’t lost. Eventually it comes back round, just as the heat pump hits full power, going into “combi” mode at a sustained 55°C flow temperature, 49°C return.
Diverting Valve
My first thought was that the diverting valve had the wrong setting. It was installed with the mark for the current setting facing the back wall. The only number you could see, facing you, was 3. There was only movement one way, so it was set at one end of the range. Just in case it was the wrong end, I tried changing it all the way to the opposite end of the range.
This must be the minimum setting, and the original setting was the maximum, theoretically opening up at 55°C. I changed the setting back to how it was.
The valve must be partially open at lower temperatures for the store to lose heat. I also have my suspicions that it doesn’t fully open at high temperatures. On some of my overnight DHW runs, heating to 65°C on cheap rate electricity, the flow temperature approaches 80°C and the heat pump shuts down. Open Energy Monitoring shows a DHW cycle is still active but the heat pump isn’t doing anything. Water temperature eventually settles around 63°C. Which suggests that not enough of the generated heat is getting into the store.
Those of you paying attention to the plumbing schematics may have already realized that there’s something odd about the diverting valve. It isn’t a diverting valve. It’s a mixing valve plumbed in backwards. Water from the heat pump is connected to the outlet, with the cold water inlet connected to the NanoStore and the hot water inlet to the return pipe.
You can see that it might work. A mixing valve opens the cold water inlet when the valve gets too hot. When water from the heat pump gets to temperature, the valve gets hot which should open the cold water side, letting water into the NanoStore.
There’s nothing in the ESBE data sheet which suggests that it can be used backwards. ESBE also sell a dedicated thermostatic diverting valve, which makes me think it’s not the same as a backwards mixer.
Damon has ordered a replacement valve. Apparently, there were none in the country, so it had to be shipped from Sweden. At the time of writing, the valve has arrived and is waiting for Damon to get back from another remote job. I’m hoping that it will prevent the store from losing heat and allow the NanoStore to gain heat more quickly when it opens. If I’m really lucky the heat pump will decide to ramp more quickly when it sees that the heat produced is being used.
Boost Shower Strategy
Until then we’re using a boost shower strategy. I do a DHW run to 62°C at 5am, the end of the cheap rate period. Hot water is off during the rest of the day. If no one has a shower, the water gradually cools to 42°C at the end of the day, with occasional use for hand washing and washing up.
When someone wants a shower, they put the hot water on boost. Then wait for 10 minutes. The heat pump should now be running at full power with the flow rate up to 55°C, ready to go into “combi” mode. We get hot showers at full flow rate that easily last 15 minutes. Lower the flow rate to 6L, and you can shower indefinitely.
The biggest downside is if you leave it too long before getting in the shower. There’s a 5 minute window until the water reaches temperature and the heat pump turns off. Miss that and you’ll be back to a cold shower after 5 minutes.
Leaks
Just as Damon was heading off to his remote job, I noticed a couple of water trails down the front of the NanoStore. You can see them in the picture above. There wasn’t any running water but they were wet to the touch. The floor directly below the NanoStore was also wet.
It looked like water was seeping out of the join in the insulation. I felt behind the insulation and the body of the heat exchanger was wet.
Damon was unavailable but Heat Geek found another local Heat Geek who came round the next day. There was a small leak at the cold water inlet. Water had spread across the body of the heat exchanger and then made its way out via gaps in the insulation. The connection joint was resealed and, touch wood, is still holding a week later.
Insulation
The NanoStore loses 10°C in under 8 hours. The MiniStore Tall is specified to lose 1.27kWh over 24 hours. It takes 1.16Wh to raise 1L of water by 1°C. The MiniStore Tall holds 110L of water, which means it loses 11.5Wh per litre over 24 hours. Which is near enough 10°C.
The MiniStore XS holds 60L so should be a fairer comparison for what the NanoStore could achieve. It loses 0.96kWh, or 16Wh per litre, equivalent to 13.5°C over 24 hours. Still much better than the NanoStore.
The MiniStore is supplied preassembled with 50mm insulation around the inner cylinder. The prototype NanoStore has 20mm of hand applied insulation. Which suggests that more or better insulation should help.
The space around the NanoStore isn’t useful for anything. It’s too close to the sides of the cupboard. We’re going to try packing the space with more insulation and see how much of a difference that makes.
Costs
When set up for instant hot water, the NanoStore will be recharged whenever it loses 2.5°C. Unfortunately, that’s a really inefficient way to use a heat pump.

Each cycle has 10 minutes of ramp up time for zero heat gain, 5 minutes gaining heat while flow temperature climbs to 70 degrees, then all the excess built up heat is dumped. It adds 0.3kWh of heat to the store at a COP of 0.5, with 1kWh left over. In the winter the excess heat is dumped into the heating circuit, which is useful but inefficient. In the summer, the hot water will sit in the external pipes between the heat pump and the NanoStore, with the heat gradually radiating away.
The new valve should shorten the cycle time and get more of the generated heat into the store. In addition, the extra insulation should reduce the number of DHW cycles needed during the day.
In contrast, the boost shower strategy is already pretty efficient, all things considered. There’s a 10 minute ramp up (0.28 kWh, COP 0.7), followed by a 10 minute combi shower (0.56 kWh, COP 3) and then 7 minutes reheating the water (0.4 kWh, COP 1.3). Overall that’s 1.25kWh used, with a COP of 2. The new valve should help push that up higher.
Current cost is 40p per shower at peak rate, or 10p using stored off-peak electricity from our home battery. Our old gas combi would use 2.5kWh gas to produce the same amount of heat (assuming 100% efficiency). Looking at our old gas bills (with detailed smart meter based usage) confirms that to be about right. Would have cost 15p.
Coming Up
Did the new valve and extra insulation make any difference? Will the promise of instant hot water be delivered? And, what happens when it gets really cold outside?