We recently had a Vaillant heat pump and Heat Geek NanoStore installed. The NanoStore contains a small amount of hot water which should be just enough to meet demand until the heat pump can kick in and ramp up to full power. Currently the hot water runs out after five minutes while the heat pump takes ten minutes to reach full power.
A replacement valve is on the way. Until then, we’re using a boost shower strategy. We leave the hot water turned off during the day. When someone wants a shower, they use the boost button in the Vaillant app. Then wait for ten minutes. At this point, the water should be up to temperature and the heat pump running at full throttle.
The strategy mostly works. If the starting water temperature is too low it takes longer than ten minutes to get up to temperature. If the heating is active when you boost, it will take less than ten minutes. You have a five minute window to get in the shower before the heat pump turns itself off.
Unfortunately, the current status displayed in the Vaillant app is useless. It’s only updated every five minutes. The end result is occasional cold showers and complaints sent in my direction.
Shower Dashboard
Can I build a better experience using Home Assistant? Let me introduce you to the Shower Dashboard.
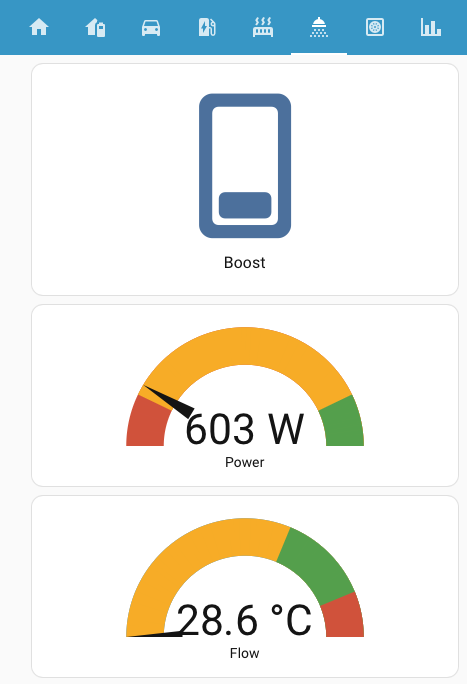
The boost button turns on the hot water boost. Once a DHW (domestic hot water) cycle has started, an additional card is displayed that shows the elapsed time since the start.
- type: horizontal-stack
  cards:
    - type: button
      entity: switch.home_domestic_hot_water_0_boost
      name: Boost
    - type: tile
      visibility:
        - condition: numeric_state
          entity: sensor.emonhp_dhw
          above: 0
      entity: sensor.emonhp_dhw
      name: ' Started'
      icon: mdi:heat-wave
      state_content: last_changed
Two gauges are used to show when the shower is ready. Both have to go green.
The top gauge is the heat pump power consumption. It needs to be above 3kW for “combi” mode.
- type: gauge
  entity: sensor.emonhp_elec
  name: Power
  min: 0
  max: 3500
  needle: true
  segments:
    - from: 0
      color: var(--error-color)
    - from: 500
      color: var(--warning-color)
    - from: 3000
      color: var(--success-color)
The bottom gauge is the return flow temperature to the heat pump. Painful experience shows it needs to be above 55°C to ensure a decent temperature in the tank and enough headroom for “combi” mode. Once the temperature goes past 65°C (the red zone), the tank temperature will soon reach target and the heat pump will shut down.
- type: gauge
  entity: sensor.emonhp_returnt
  name: Flow
  needle: true
  min: 30
  max: 70
  segments:
    - from: 0
      color: var(--warning-color)
    - from: 55
      color: var(--success-color)
    - from: 65
      color: var(--error-color)
I can’t use tank temperature directly as that comes via the myVaillant app with its five minute granularity. All the sensors I’m relying on come from Open Energy Monitoring and are updated once a minute.
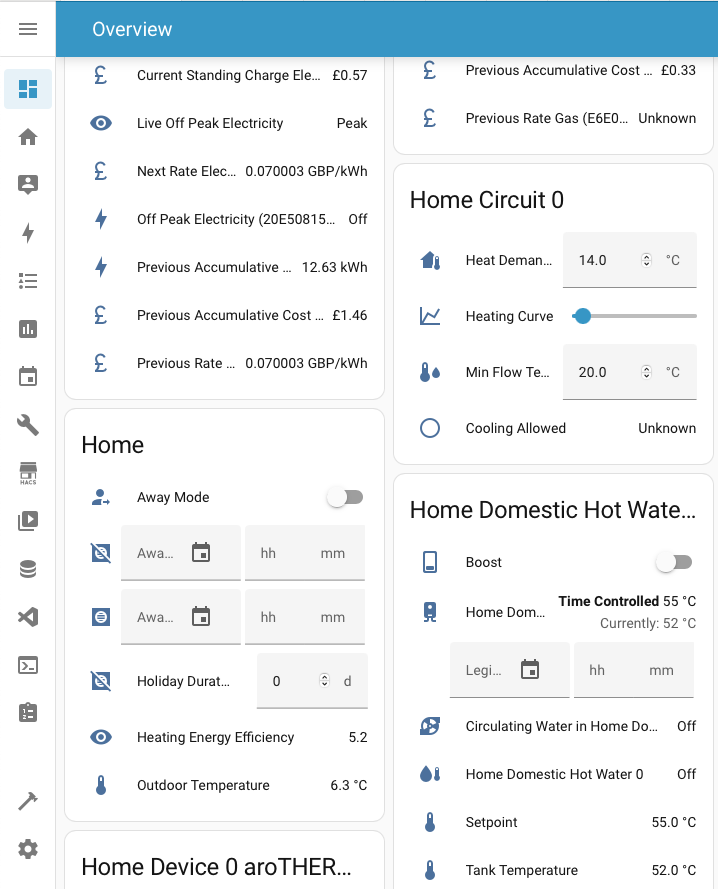
Home Assistant UX
The big question is whether the other members of the household will use the dashboard. The initial experience in Home Assistant is too techy for casual users, with too many sensitive areas that they could change by accident.
Guest User
I started by adding a new non-admin user to my Home Assistant instance. The others will be using shared family tablets as well as their phones to access the dashboard. I want to make it as simple as possible, so I created a common “guest” user.
So far, there’s not much you can configure per user in Home Assistant, beyond removing admin privileges. That does at least remove access to Settings and all the developer tools.
Default Dashboard
You can make a custom dashboard the default, on a per device basis, in the dashboard settings menu. That’s not needed in my case because the Home Assistant Companion app remembers the last used page and restores it on startup.
I can install the app on each device, log in with the guest user and select the shower view on my custom dashboard. Whenever the app is started, the guest user is automatically logged back in and the shower view selected.
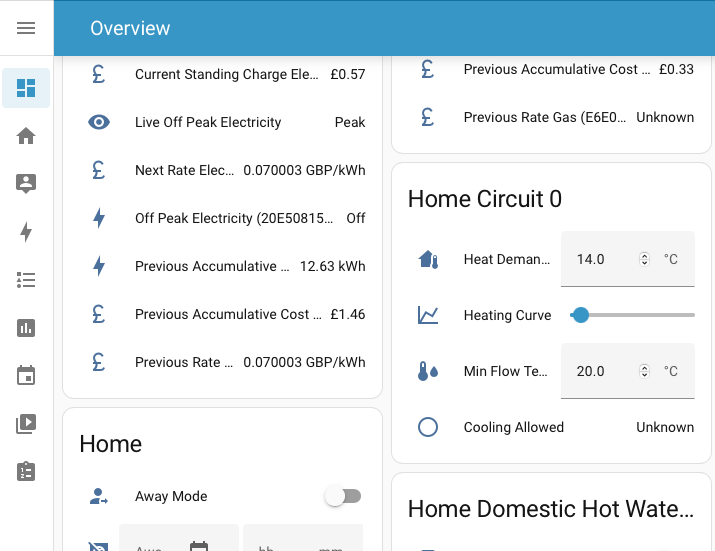
Kiosk Mode
There’s still a chance that they could fat finger an item in the sidebar menu and get lost. There’s no need for them to stray outside of the custom dashboard views. As always, there’s a solution out there.
Kiosk Mode is a third party integration for Home Assistant available via HACS. The usual use case is to configure the app when running on a dedicated device, like a wall mounted tablet.
The integration lets you choose which parts of the normal frontend UX to hide. The most common choices are to hide the sidebar and top header. Beyond that are a wealth of options to control access in fine grained detail.
I’m going to start by disabling the sidebar. Kiosk mode is only active for specified dashboards. You need to edit the configuration YAML for each dashboard and add the appropriate kiosk mode options.
My initial impression from scanning the documentation and reading forum posts was that kiosk mode would only be applied to non-admin users. I was wrong. As I found out after saving my config changes, leaving edit mode and seeing the sidebar disappear.
Fortunately, there’s an escape hatch. When using a web browser, add ?disable_km to the end of the URL to disable kiosk mode for that page. Then go back and use the right settings.
Kiosk Mode options can be global, specific only to non-admin users, or specific to named users. Both JavaScript and Jinja templates are supported for arbitrary conditional logic. A common pattern is to use an input helper to control whether kiosk mode is enabled with a dashboard button that turns it on and off.
Once I got my head round it, the options I needed were simple enough
kiosk_mode:
  non_admin_settings:
    hide_sidebar: true
Emoncms Integration
There’s no point doing all this work unless my shower dashboard works better than the Vaillant app. The Home Assistant emoncms integration pulls data from my local Open Energy Monitoring data logger every minute. That just about works. There’s a five minute window before the heat pump will shut down, so plenty of time to notice that the gauges have jumped into the green.
Unfortunately, it doesn’t feel great, especially if you’re watching the gauges. It can seem like an eternity waiting for them to change. It’s especially annoying when I know that the data logger captures changes every ten seconds.
Home Assistant integrations that poll a remote data source follow a common pattern. You create a Coordinator object and pass it to the Home Assistant core. The coordinator has an update_interval property that defines how often data should be updated. The Home Assistant core calls the coordinator back when it’s time to update the data.
  def __init__(
      self,
      hass: HomeAssistant,
      config_entry: EmonCMSConfigEntry,
      emoncms_client: EmoncmsClient,
  ) -> None:
      """Initialize the emoncms data coordinator."""
      super().__init__(
          hass,
          LOGGER,
          config_entry=config_entry,
          name="emoncms_coordinator",
          update_interval=timedelta(seconds=60),
      )
      self.emoncms_client = emoncms_client

  async def _async_update_data(self) -> list[dict[str, Any]]:
      """Fetch data from API endpoint."""
      data = await self.emoncms_client.async_request("/feed/list.json")
      if not data[CONF_SUCCESS]:
          raise UpdateFailed
      return data[CONF_MESSAGE]
Most integrations have some sort of configuration option to control the update interval used. However, as you can see, emoncms has a hardcoded update interval.
Fork It
Home Assistant is open source, so my first thought was to see if I could hack the integration and change the interval. Obviously I’d have to setup a development environment. Fork the source code. Rename things so that my hacked integration didn’t interfere with the real one.
Which seems like a lot of work. Then I realized that the integration updates the data whenever it’s told to do it. All I need is some way to trigger a call to _async_update_data.
Update Entity
It turns out that an action that does exactly that is built into Home Assistant. The update_entity action forces a list of entities to refresh their data, ultimately calling the _async_update_data method on each entity’s coordinator and updating the stored state.
I can create an automation that updates the entities corresponding to my local Emoncms feeds every 10 seconds.
triggers:
  - trigger: time_pattern
    seconds: /10
actions:
  - action: homeassistant.update_entity
    data:
      entity_id:
        - sensor.emonhp_dhw
        - sensor.emonhp_elec
        - sensor.emonhp_flowt
        - sensor.emonhp_returnt
        - sensor.emonhp_flowrate
        - sensor.emonhp_heat
There’s a huge amount of flexibility here. You can tune the update rate of any sensor as needed. For example, I could have enabled high frequency updates just when a DHW cycle is active. In my case, there’s no worries about overwhelming the remote server. It lives in the airing cupboard three meters away from the Home Assistant instance that is the one and only client making requests.
I was worried that updating a list of entities would mean redundantly calling the same feed list API for each entity. Fortunately, Home Assistant has debouncing logic which batches up calls to the same coordinator update method so that it only runs once.
Product Market Fit
So far, the feedback from the household has been great. They’re all using the dashboard. No complaints so far, and most importantly, no cold showers either.