Last time, I left you with a cliffhanger. I had a long list of issues with our prototype Heat Geek NanoStore, together with a plan to fix them all.
How did it work out?
The Plan
The heat exchanger will be re-oriented on its end. Both valves will be replaced. The long awaited dedicated diverter valve on the way in, and a new VTA320 series mixer valve on the way out.
The heat exchanger will be boxed in with 50mm PIR insulation board to match the MiniStore’s 50mm insulation.
Damon will also add a T-connector at the cold water inlet that can be used as a sensor pocket. The temperature sensor should respond much quicker when hot water is drawn off.
The Reality
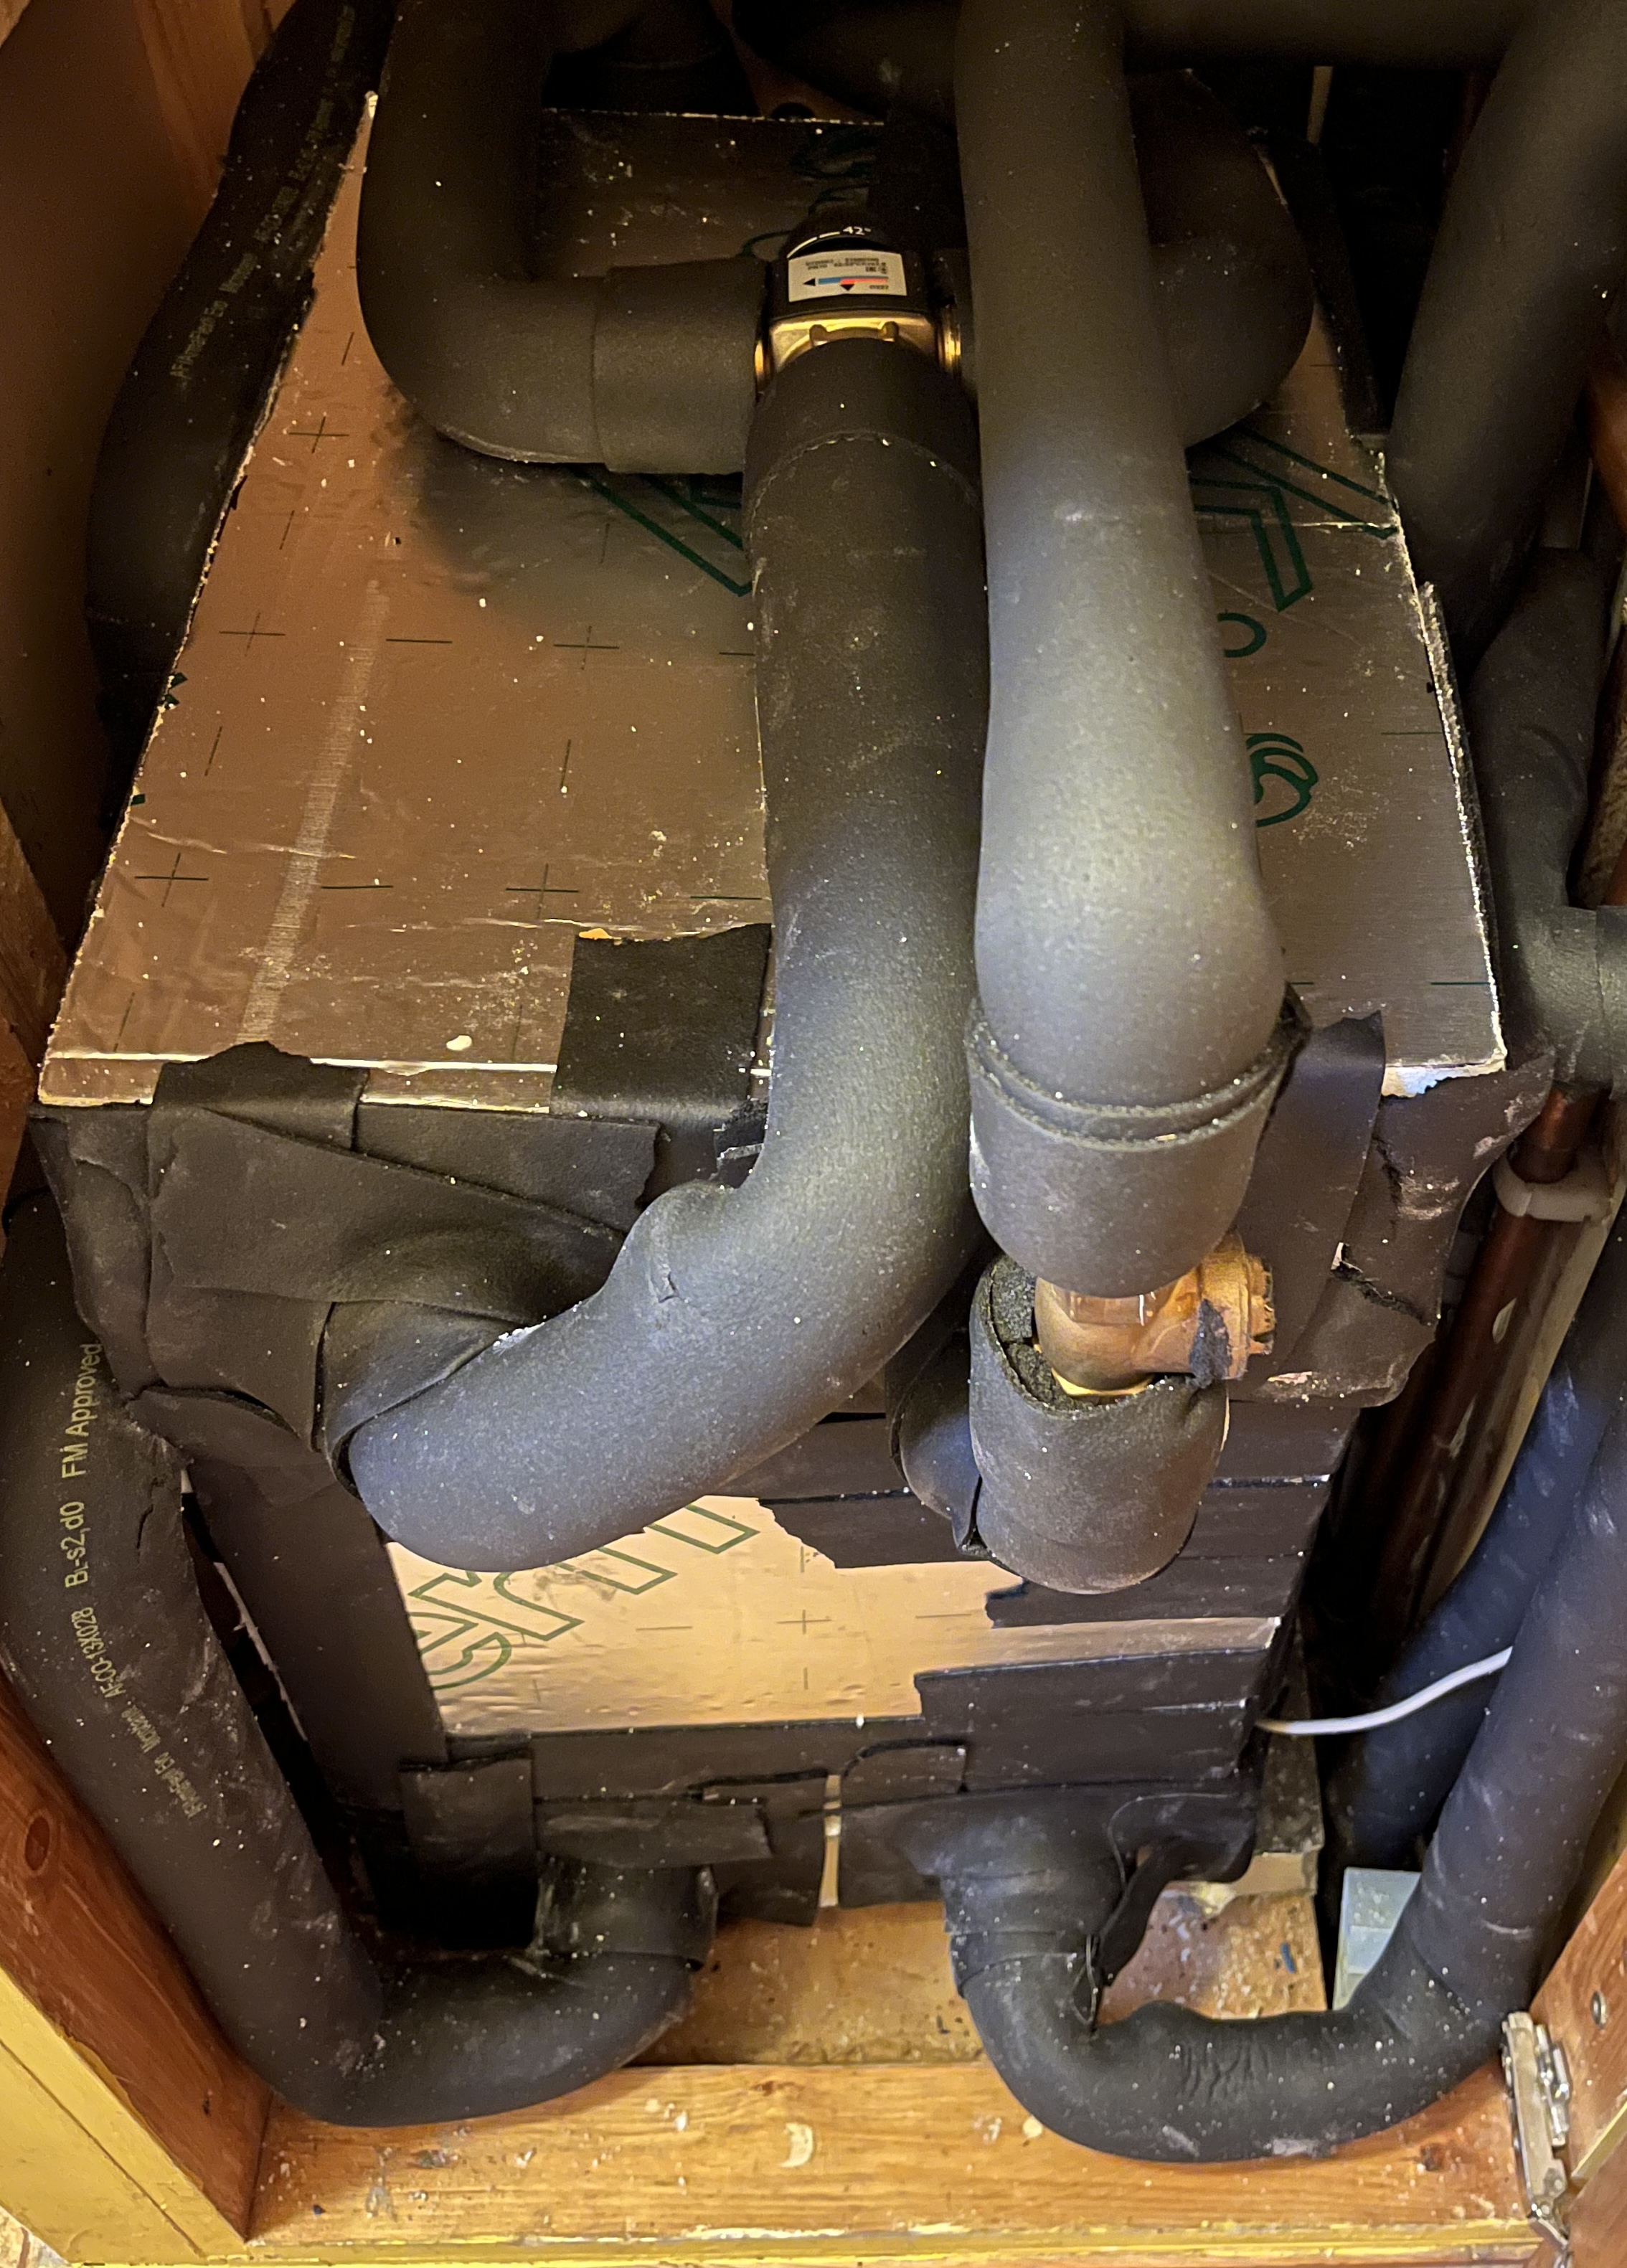
Damon spent 20th January trying to find a way to fit everything into our small airing cupboard. The big problem with standing the heat exchanger on its end is that you need more front-to-back space for the connecting pipework.
To avoid having to rework the existing heating circuit pipework, the heat exchanger has to sit 150mm forward from the back wall. In the end, the only way of doing it was with connections facing forward towards the door. There’s only just enough room to take the pipework round and back while still being able to shut the door.
There wasn’t enough room to include the T-connector sensor pocket. The tank temperature sensor is on the side of the heat exchanger near the cold water inlet.

Damon got everything plumbed in and running but ran out of time to box in the heat exchanger with insulation board.
Tank Temperature
The lack of additional insulation gave me the chance to better understand how the temperature sensor behaves with a stratified heat store. The NanoStore is now much more like a normal hot water cylinder.
The sensor is placed near the bottom to be responsive to hot water demand when setup for instant hot water. When doing a DHW run, flow temperature gets close to 70°C before the sensor reaches the 55°C tank set point. When the DHW run ends, the measured temperature drops to around 48°C within 5-10 minutes, due to stratification.
At this point, I measured the temperature of the heat exchanger using a probe thermometer. The top of the heat exchanger (near the hot water outlet) is at 66°C, half way down is 61°C and right next to the cold water inlet is 42°C. According to Adam from Heat Geek, this is normal for a hot water cylinder.
The overnight DHW run (using cheap rate electricity) heats the water to 62°C. It takes a few hours for the temperature to drop to 48°C. This time, the measured temperatures are less stratified with 55°C at the top, 48°C half way down and 44°C at the bottom.
I dropped the tank set point to 45°C during the day (and 60°C overnight) to allow for stratification. When 45°C is reached at the bottom of the tank, the top should be around 55°C. You can think of the measured value as the minimum temperature of hot water in the “tank”. As hot water is drawn off, the measured temperature drops quickly, down to 30°C or less. This is misleading. The water at the top is still just as hot.
I had to increase hysteresis for recharging to 10°C, allowing for the 7°C drop at the end of a DHW run plus 3°C heat loss over time. That does mean instant hot water will only work if temperature at the sensor drops more than 10°C on DHW demand.
Insulation
Damon returned a couple of days later to finish the job. There was only room on the bottom and at the front for 50mm of PIR board. The top and sides have 25mm. That still exceeds MiniStore levels of insulation taking into account the existing 25mm foam cell insulation. If needed, we could also stuff the gaps between the heat exchanger and the walls with wool insulation.
I compared the times needed for heat to drop 4°C from the “nominal” temperature for different setups. This is the expected temperature measured after a DHW run.
| Orientation | Insulation | Nominal °C | Hours |
|---|---|---|---|
| Back | 25mm foam cell | 55 | 2.5 |
| Back | 25mm foam cell + laundry | 55 | 3 |
| Vertical | 25mm foam cell | 45 | 3.5 |
| Vertical | 25mm foam cell + 25/50mm PIR board | 45 | 7 |
The current heat loss is equivalent to 0.57°C an hour, which is almost exactly what you’d expect from a 60L MiniStore XL. The end result for us is that an overnight DHW run provides enough hot water for one quick shower and hand washing throughout the day, while still being hot enough for washing up in the evening.
Diverter Valve
The new diverter valve works as advertised, with some interesting consequences.
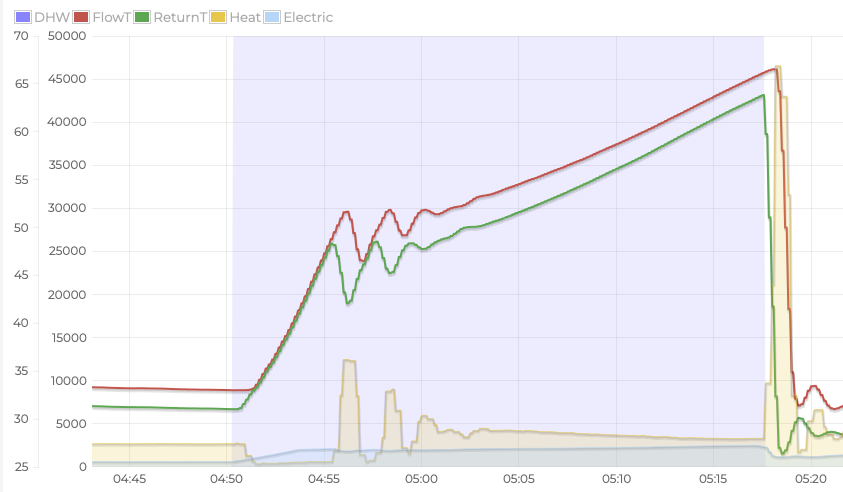
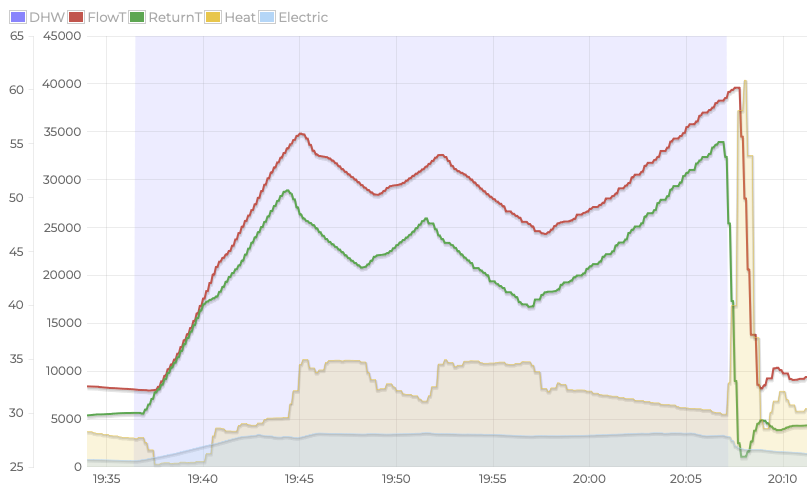
This is an overnight DHW run with the valve set to open at 48°C. Unlike the previous valve, there’s now no heat lost at all as the flow temperature ramps. The valve is clearly fully shut. Once the valve reaches the required temperature it opens fully and there’s a huge dump of heat with a deltaT up to 13°C.
As the cold water pushed out of the bottom of the heat exchanger flows back round through the heat pump, the flow temperature falls back to 42°C, and the valve briefly closes again while the temperature ramps back up. There are spikes of heat as pulses of cooler water circulate round to the heat pump and back, before eventually settling into a steady ramp with an initial 4°C deltaT that narrows to 3°C for flow rates over 50°C.
I was hoping that the new valve together with the reorientation of the heat exchanger would charge the heat store significantly faster. However, once you get to the point of steady ramping, there’s not much difference.
Mixer Heaven
The new VTA320 series mixer valve has a nominal 35°C-60°C range, accurate to ±2°C, down to 4L/min flow rate. There are no temperatures or numbers marked on the valve. Just turn it until you get what you want.
We tested the temperature at the bathroom tap with the valve fully closed and fully open. We got a range of 34°C-61°C. The top end result suggests that the temperature is stable even with less than 10°C difference between the hot input and desired output.
We adjusted the valve until we were getting 45°C at the tap.
The valve is a total game changer. Shower temperatures are rock solid stable. Doesn’t matter what the flow rate is, even below 4L/min. Doesn’t matter what the input temperature is, even down to 45°C. As far as I can tell, there’s no cold water mixed in once the input temperature is below 45°C.
You absolutely can shower indefinitely, even during cold weather, by lowering the flow rate appropriately.
Instant Hot Water
Now for the big test. Does this setup give you instant hot water? As much as you need?
There was a DHW run to 45°C, 20 minutes before my shower. The top of the tank was measured at 55°C. There’s a 10°C hysteresis. The diverter valve is set at 50°C. We want 45°C at the tap, so that seems like a reasonable margin.
When I started the shower, the tank sensor reported 40°C. Unfortunately, the Vaillant controls only update the reported value at 5 minute intervals. The next sample reported a temperature of 23°C. Well beyond what’s needed to overcome the hysteresis.
I set the shower to a 6L/min flow rate, standard for a water saving shower head. It took 3 minutes from the start of the shower for the DHW cycle to kick in. Similar to the response time for the previous setup.
The shower temperature was stable for 8.5 minutes and then started to get gradually cooler. I reduced the flow rate to 4L/min.
Ten minutes into my shower, the water is getting really quite cold. The heat pump has reached the 50°C threshold and started adding heat. Another minute, and the water is back at temperature and stayed stable for the rest of the shower.
The Open Energy Monitoring graph is much more dramatic than the shower felt. It took so long for the heat pump to ramp up that temperature in the store was well below the 50°C threshold. You get a huge dump of heat into the store, before the cold water pushed out and circulated round closes the diverter valve. After a couple of minutes the flow rate is at 50°C again and the cycle repeats.
The shower is taking energy out of the store at the same rate that, on average, the heat pump is adding it. The added heat lasts just long enough to keep the shower hot until the next heat dump. The temperature in the shower stays perfectly stable.
My first reaction was disappointment. My shower went cold! On reflection, I shouldn’t have been. We’re getting 8 minutes of hot water from the stored heat. That’s longer than the average UK shower. It doesn’t matter that the heat pump takes an age to generate heat. You’re finished before the hot water runs out and the water will be reheated ready for the next shower.
If you want to shower indefinitely, treat it like an electric shower. A 9kW electric shower will have a 4L/min flow rate in cold weather. If we do the same, we get 12 minutes of stored hot water. Plenty of time for the heat pump to fire up.
Finally, there’s no need to wait for the heat pump to notice that hot water is being drawn off. Push the hot water boost button in the myVaillant app and get in the shower. The DHW cycle starts immediately and the heat pump will be up and running by the time you start the shower, hitting full power 5 minutes later.
Boost Shower
I still think our boost shower strategy is optimal. There’s no need for DHW runs during the day to keep water at the bottom of the tank close to the nominal temperature. Heat once on cheap rate electric overnight. Only reheat when needed.
The pain point previously was finding no hot water left for washing up at the end of the day. It’s not worth doing a full DHW run, so we ended up boiling a kettle.
Now the hot water lasts all day. The other day Lucy had a quick shower at lunch time using overnight hot water and didn’t bother to boost it. The remaining water was still hot enough for washing up in the evening.
It took a few attempts to adjust our strategy for the new reality. The heat exchanger is working so well that the flow temperature from the heat pump only needs to be a few degrees above the desired output temperature. I nudged the diverter valve down to 48°C. The optimum time to get into the shower is when the return flow rate hits 50°C. Any cycling of the diverter valve has stopped and heat is being consistently added to the store.
The problem is that it’s too efficient now. The temperature sensor hits the 45°C set point when the flow rate reaches 53°C. That’s too short a window between noticing the shower is ready and getting in. There were repeated occasions where family members got in just after the heat pump turned off. If you only need a short shower that doesn’t matter, there will be enough stored. It’s not great if you want a long shower.
I don’t want to heat water hotter than needed just to get a longer window. I decided to extend the window the other way, so you get in while the heat pump is still ramping up and use a couple of minutes of stored water before heat starts being added. I also set the diverter valve to 42°C, the bottom of its range. The idea is to steal a little stored heat when the valve opens in exchange for avoiding cycling and making the final jump up to combi flow temperatures more quickly. This also gets heat into the tank more quickly if we started from cold.
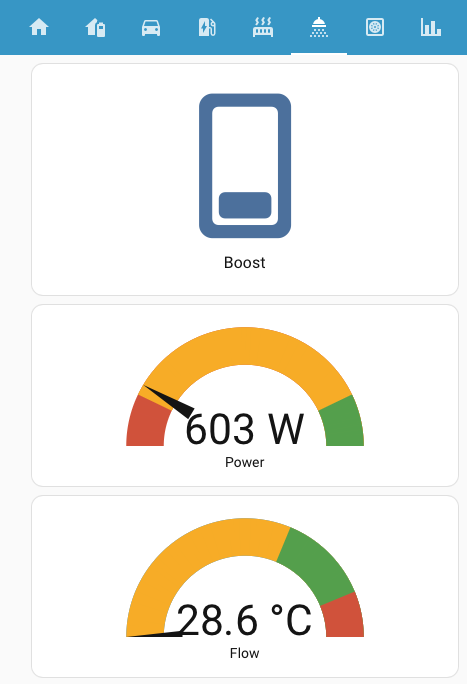
You now start the shower when return flow rate reaches 45°C (the green region on our Home Assistant shower dashboard). Again, this is after the end of any valve cycling if we started with cold water in the tank.
To make things more predictable I stopped using the tank temperature sensor to end the hot water boost. The set point is now 60°C, which we’ll never reach. Instead, I use a Home Assistant automation to cancel the boost once the return flow temperature hits 55°C (the red region on the dashboard).
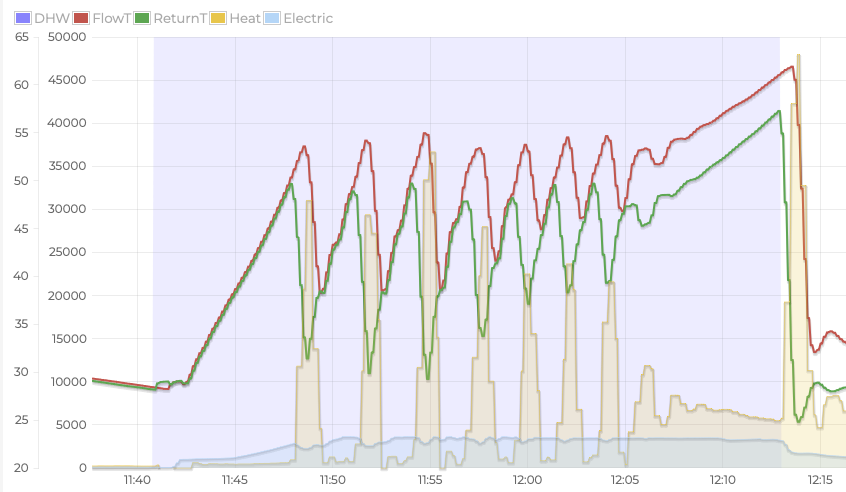
This graph shows two back to back showers at the end of a cold day. It’s 3°C outside. The water was last heated during the previous overnight DHW run and now has a reported temperature of 35°C. There’s no moderation involved. We’re using the full 8L/min flow rate. Temperature at the shower head stays stable throughout.
It took 6 minutes from hitting the boost button for the return flow rate to reach 45°C. By the time Lucy got in the shower it was at 50°C. The ramping process added 0.4kWh of heat at a COP of 1.23. This is why you want to avoid short cycles with a heat pump. Starting a cycle is always inefficient.
There was no cycling of the diverter valve, suggesting that most of the stored water was well above the 35°C measured at the bottom.
The first shower lasted 5 minutes with 0.6kWh of heat added at a COP of 3.1. That’s surprisingly good for a heat pump running flat out on a cold day. The heat exchanger is brilliant at transferring everything the heat pump can produce into the water flowing through, with a deltaT of 6°C.
It took 3 minutes to recharge back to a flow rate of 48°C, adding 0.5kWh of heat at a COP of 2.4. The heat exchanger is designed to work best when water is flowing through both circuits. It’s less efficient at heating stationary water, but still has a deltaT of 4°C at these flow temperatures. It’s impressive how quickly it recharges to the point where another shower can start.
The second shower lasted 6 minutes with 0.8kWh of heat added at a COP of 3.1. I pushed this one to the limit, with incoming flow at 47°C when I stopped. Any longer and the shower temperature would start to drop. Of course, I could have reduced the flow rate at any time to get a longer shower.
The final recharge took 10 minutes to get up to a flow rate of 55°C. This time we added 1.2kWh heat at a COP of 2.1 Once the temperature sensor had settled, the water at the bottom of the tank was at 41°C.
Overall, the whole DHW cycle generated 3.7kWh of heat at a COP of 2.3. Efficiency is better than the results I reported with the old setup, despite it being 10°C colder outside.
DHW Frost Protection
We often have a quick shower without boosting, particularly if we don’t need any more hot water that day. Water heating is off, but occasionally a DHW run will happen anyway.
If you shower long enough, the temperature sensor reading drops close to the temperature of the cold water entering the bottom of the heat exchanger. Our mains water can be as low as 7°C in cold weather, with sensor readings below 10°C. As Adam never tires of telling me, we have unusually cold mains water. Once water stops flowing through the heat exchanger, temperatures equalize a bit, and the sensor reading slowly rises to 20°C.
Apparently, Vaillant’s frost protection feature also applies to hot water cylinders. If the temperature falls significantly below 10°C, it will force a short (and inefficient) DHW run. This isn’t documented, but according to forum posts, has been confirmed verbally by Vaillant. There’s no way to adjust the thresholds used.
Current Status
How does my list of issues look now?
- Works. I’d expect 5 mins of stored hot water from a 60L heat store and that’s at least what I get, more if I use a lower flow rate.
- Works. Once the heat pump is in combi mode the heat exchanger sustains 10kW of heat transfer.
- Works. When charging the heat store, temperatures at the top of the heat exchanger are close to the incoming flow temperature. Our overnight DHW runs heat the water to 60°C at the bottom, with a maximum flow temperature of 66°C.
- Doesn’t. DHW takes too long to respond when you start a shower. Up to 2-3 minutes. No improvement but I don’t care. I’m happy to push boost before getting in the shower, or to just rely on the stored hot water.
- Works. With a flow rate comparable to an electric shower you can have instant hot water that lasts indefinitely. There’s no loss of heat while the heat pump ramps up.
- Doesn’t. It can take much longer than 10 minutes to ramp up if you’re unlucky. E.g. If the heating cycle finishes just before you start a shower, or if the heat pump decides to defrost. I can live with this one too. If I’m having a quick shower it doesn’t matter how long the heat pump takes to start. If I’m using the boost shower strategy, I wait until the heat pump is ramping up.
- Works. In cold weather 10kW isn’t enough to sustain 6L/min at a decent temperature. Just like an electric shower, you can turn the flow rate down for indefinite hot water.
- Works. Our 60L NanoStore retains heat about as well as a 60L MiniStore XL.
Cold Hard Cash
I was going to wait for the planned work to be completed and for everything to settle down before finally comparing bills before and after installing the heat pump and NanoStore.
Octopus, our energy provider, beat us to it. Our Direct Debit is currently £150 a month, the same amount we paid before the heat pump. Octopus reached out to suggest that we should reduce the direct debit to £100 a month, as otherwise we would build up a large credit balance.
| Month | Old Gas | New Gas | Old Elec | New Elec | Old Total | New Total |
|---|---|---|---|---|---|---|
| November | 85.12 | 11.26 | 40.47 | 92.22 | 125.59 | 103.34 |
| December | 101.96 | 11.42 | 43.00 | 111.43 | 144.96 | 122.85 |
| January | 134.25 | 11.88 | 44.08 | 138.02 | 178.33 | 149.90 |
We still have a gas hob for cooking. Most of our gas bill is made up of standing charges. We’re waiting to see what happens with the promised new low standing charge tariffs before deciding whether to switch to an induction hob and disconnect the gas supply.
Our monthly costs are lower but not as dramatic as the Octopus direct debit crystal ball suggests. On the other hand, we’ve only just got the hot water sorted out, which will lower our electricity consumption even further for future months.
MiniStore vs NanoStore
So, what hot water system should you get if you have a heat pump installed?
Firstly, if you have the space, the best choice is a hot water cylinder big enough to meet your daily demand for hot water. Heat it up once a day on cheap overnight electricity and forget about it. This is the cheapest and most efficient way of heating water. COP can be as high as 4.5 with the right cylinder, way better than I can get out of a NanoStore.
If you don’t have the space, or have highly variable hot water demand, should you go with a MiniStore or a NanoStore?
First, a disclaimer. I’ve never used a MiniStore, so I’m basing this comparison on Newark Cylinder’s performance data, and anecdotal evidence from those that have. We have a higher output temperature (45°C vs 40°C) and lower input temperature (7°C vs 10°C) than the MiniStore performance data. That makes the MiniStore look better than it actually is.
I’m assuming store temperatures are equivalent. Both have the sensor at the bottom, level with the cold water inlet. Note that the Newark data assumes that the heat pump will deliver heat after 2.5 minutes. That’s absurdly optimistic in my experience.
I rely on OpenEnergy monitoring and Home Assistant to get the most out of the NanoStore. In particular, mitigating the effects of slow response to DHW demand. I suspect a MiniStore would benefit from this too.
My NanoStore is a prototype unit based on a 60L heat capacity heat exchanger and a hefty amount of hand applied insulation. It’s paired with a 7kW Vaillant Arotherm plus heat pump. YMMV.
The 60L NanoStore together with its pipework and valves uses the full 600mm width and 690mm depth of our airing cupboard. It uses 850mm of the cupboard’s height. If you were installing it from scratch, I think you could save 150mm of depth. It would then need the same space as the equivalent heat capacity MiniStore XS. The MiniStore XS is designed to fit in a kitchen base unit (600mm width, max depth 560mm).
According to the Newark performance data, no MiniStore (not even the 130L XL) will combi indefinitely with a 7kW heat pump. They’re designed to use the heat pump to extend the volume of hot water. Our 60L NanoStore does everything we need at a store temperature of 45°C. MiniStores need a store temperature at least 10°C higher.
The 60L NanoStore is better in every way than a 60L MiniStore.
Our original design was for a 110L MiniStore Tall. That would take another 450mm of cupboard height but nearly doubles the stored heat capacity. The advantage is that the extra stored heat lets you sustain high flow rates for longer. A MiniStore Tall would give you a 10 minute shower at 8L/min flow rates with a 55°C store temperature. The NanoStore would need a 65°C store temperature to match it. Heating a larger volume of water to a lower temperature is much more efficient.
I don’t know yet which versions of the NanoStore will make it into production. A 30L version seems most likely. That’s the one in Adam’s video which will fit in the same size cupboard as a combi boiler. It sits neatly in the range below the MiniStore XS.
A 30L NanoStore will combi just as well as a 60L NanoStore. Both have a much bigger heat exchanger than needed to transfer 10kW of heat. However, half the stored heat capacity is not enough for a reasonable length shower without the heat pump contributing.
If you don’t have the space for anything bigger, a 30L NanoStore should work well enough. Ideally it would have something to ensure a fast response from the heat pump when hot water is taken off. The most effective would be to use the same approach as a combi boiler, with a flow switch to sense when there’s a significant hot water flow rate.
Conclusion
Our usage is a mix of short showers at high flow rates and indefinite showers at low flow rates. The NanoStore is a perfect fit for us. I like the flexibility the larger 60L size gives us. It’s reassuring that we can get a reasonable shower from stored heat alone. Even better, all this works with a 45°C store temperature.
We’re sticking with our 60L NanoStore.
If you get one yourself, make sure it’s installed the right way up and is paired with the right valves for the job. I’m very happy with the ESBE VTD500 diverting valve and VTA320 mixing valve we ended up with. I highly recommend OpenEnergy monitoring and Home Assistant to get the most out of your system.