It’s been more than two months since my post about our prototype Heat Geek NanoStore. At the end of that post, we were waiting for a new diverting valve and extra insulation to be installed, while also looking ahead to colder weather.
The diverting valve had to be shipped from Sweden. It had arrived and would be installed once Damon got back from a remote job. So, what took so long?
Apparently, there was a miscommunication and the valve hadn’t arrived. It would actually be another month. A month came and went, now it would arrive in two weeks. Christmas arrived and with it another two week delay.
The valve finally turned up on 19th January. In between, the cold weather arrived.
Cold Weather
I wrote a separate post about Heat Pump Cold Weather Performance. I didn’t say anything about the NanoStore. Adam from Heat Geek asked me to hold off until all the remedial work was done. The cold weather exposed a couple more problems with the existing setup.
Double DHW Cycles

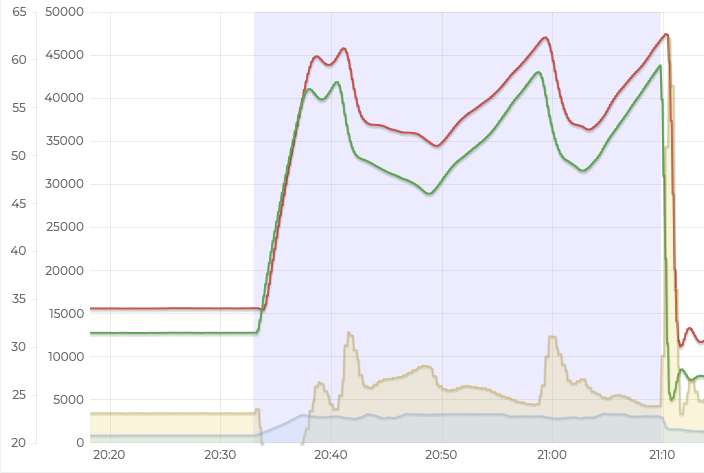
Here’s an interesting graph. This is an overnight DHW run on November 15th, just as the weather turned colder. I have a 60 minute window for water heating using noise reduction mode to force low and slow behavior. The tank temperature sensor gets hot enough to turn off at 62°C but manages to drop 2.5°C within a few minutes, triggering another DHW run.
I think this is the stored heat equalizing once the DHW cycle ends. You can also see a dip in temperature that then recovers on milder nights. The dip is now big enough to exceed the 2.5°C hysteresis threshold. I increased hysteresis to 4°C and reduced the DHW window to 40 minutes.
Even on the coldest night, a hot water run takes just over 30 minutes. The shorter window means less cooling time before the water is used. It doesn’t matter if the cycle is clipped slightly.
Short Showers
This is Nov 19th. It’s 0°C outside, cold water coming into the house is 7°C at the kitchen tap. The graph shows back to back showers using our Home Assistant shower dashboard to ensure that the heat pump is at full power and flow temperature is at 60°C before each shower starts.
You can see that the flow temperature falls rapidly. The heat pump running at full power extends showering time by 2-3 minutes but the water still goes cold if you want a longer shower.
No problem, there’s a simple solution. At full power the heat pump is producing more than 9kW of heat, the same as an electric shower. In cold weather, an electric shower keeps the water hot by reducing the flow rate. We should be able to shower indefinitely if we reduce the flow rate to 4L/min.
Except it doesn’t work. If you go below 6L/min, the water goes cold.
Mixer Valve
It doesn’t make any sense. The heat pump is still producing 9kW of heat. The same heat into a lower volume of water should mean hotter water. The only thing I could think of was the mixing valve that keeps the delivered hot water temperature stable while the output from the heat exchanger drops from 60+°C to 50°C .
The mixing valve has a 20-55°C range with an adjustment knob to select temperature from 1 to 6. After some experimenting, we ended up with a setting of 5.5 to ensure water hot enough to keep everyone happy. Which should be around 52°C.
“It goes cold at low flow rates” is a very subjective statement from someone shivering in the shower. I decided to do some science and measure temperature at the bathroom tap at different flow rates. To minimize the number of variables I used stored hot water. The heat pump isn’t running. I checked the temperature at the start and end of my tests to make sure the store temperature hadn’t had time to drop during testing.
My first test was with water from the overnight DHW run a few hours previously. Tank temperature was at 51°C. Temperature at the tap was 40C at 6L/min, 33C at 4L/min and 29C at 2L/min. There’s clearly something wrong here. Allowing for some temperature drop to get to the tap, I should be seeing at least 48°C.
I did a second test with freshly heated water, the tank temperature reading 62°C. This time I thought to try it with the tap fully open. I got 48°C at 12L/min, 43°C at 5L/min and 33°C at 2L/min.
The valve is an ESBE 370/570 series thermostatic mixing valve. I found the product page on their website and went through the details with a fine tooth comb.
The series VTA370 and VTA570 are the number one choice for heating and cooling applications. The valves provide an overtemperature protection function, which is important in order to protect e.g. under floor heating pipes and also the floor itself from an uncontrolled rise of temperature.
Temperature stability valid at unchanged hot/return water pressure, minimum flow rate 9 l/min. Minimum temperature difference between hot water inlet and mixed water outlet 10°C and recommended maximum temperature difference between cold water and mixed water outlet: 10°C.
The Right Valve for the Job
Now it makes sense. When showering our maximum flow rate is 8L/min. The flow rate is always below the specified minimum for the valve. The temperature is increasingly inaccurate at low flow rates, always biased towards colder temperatures.
The valve is intended to prevent excessive temperatures for under floor heating. It’s built to always mix some cold water in and to fail safe towards colder temperatures.
We’re effectively compensating for the inaccuracy by setting the valve at the top end of the range. That gives you water hot enough for showering at 6-8L/min but means you get scalded if you turn a tap on full. It’s still not enough to keep the water hot below 6L/min.
ESBE do other valves which look more suitable. I like the look of the VTA320.
The series VTA320 for domestic hot water distribution, anti-scalded tempering in line applications and where further temperature control devices have been installed at the water taps.
Valid at unchanged hot/cold water pressure, minimum flow rate 4 l/min. Minimum temperature difference between hot water inlet and mixed water outlet 10°C
It’s intended for use with domestic hot water rather than underfloor heating, and it supports a minimum 4L/min flow rate. The language used also implies that it doesn’t have the aggressive fail safe towards colder temperatures.
Worst Case Scenario DHW Boost

The first time I saw this I thought I was seeing a defrost with DHW active. Which would have been bad. Before the DHW cycle started, the heat pump had been running continuously at minimum power with a steady COP of 4.4. There were none of the tell-tale signs that a defrost is needed.
If you look really closely you can see that the heat pump turned off just before the DHW demand came in. The drop in flow temperature is the normal end of heating cycle. Then once the DHW circuit is active, some hot water is returned from the NanoStore and gets pumped round the circuit resulting in the rising part of the V.
It then takes the heat pump much longer than normal to do it’s pre-flight checks and power up again to start heating the water. The end result was that it took 22 minutes to be ready for showering rather than the usual 10. If this happens with an instant hot water setup you’re going to be left very disappointed.
Insulation
We’re losing 1.5°C an hour from the NanoStore, much worse than the 0.5°C expected loss from a MiniStore. While waiting for Damon to install extra insulation we did some experiments of our own.
We packed sleeping bags and the former contents of the airing cupboard around and on top of the heat exchanger. Heat loss is down a bit but still over 1°C an hour. We didn’t expect much but at least it shows that more insulation will be useful.
Current Status
That’s how things stood at the beginning of January. Here’s a summary of what works and what doesn’t.
- Works. I’d expect 5 mins of stored hot water from a 60L heat store and that’s what I get.
- Works. Once the heat pump is in combi mode the heat exchanger sustains 10kW of heat transfer.
- Doesn’t. During an overnight DHW run the heat exchanger can’t accept heat fast enough. Flow temperatures ramp up to 79°C while the hot water is only at 62°C. Let the heat pump run any longer and it shuts down.
- Doesn’t. DHW takes too long to respond when you start a shower. Up to 2-3 minutes.
- Doesn’t. We run out of hot water before the heat pump gets to combi mode after 10 minutes. The NanoStore loses heat at the start of the DHW cycle and the heat pump doesn’t ramp fast enough.
- Doesn’t. It can take much longer than 10 minutes if you’re unlucky. E.g. If the heating cycle finishes just before you start a shower, or if the heat pump decides to defrost.
- Doesn’t. In cold weather 10kW isn’t enough to sustain 6L/min at a decent temperature. Just like an electric shower, you need to turn the flow down. However, if flow is less than 6L/min the water goes cold.
- Doesn’t. I’d expect a 60L NanoStore to retain heat about as well as a 60L MiniStore XL. It’s about three times worse.
Orientation
Adam had some results from another NanoStore test. The current orientation of the heat exchanger (on its back, with connections on top) might be causing some issues. He suggested lying it on its side (with connections on the side) to see how that improved things.
A NanoStore is a Nordic Tec plate heat exchanger wrapped in some insulation. I went digging on the Nordic Tec website and found an article explaining how their heat exchangers should be installed. Nordic Tec say that vertical orientation (stood on its end) is the only correct way to do it. They explicitly say don’t put it on its side.
I also found a Nordic Tec blog on common connection mistakes.
“Never mount it horizontally, sideways, or—worst of all—”on its back” (connections facing up), which causes immediate clogging.”
“Mounting the heat exchanger in a different position, e.g., horizontally, does not guarantee proper venting of the device and will cause blockages or poor heat transfer if air bubbles do not escape from the device. Generally, a horizontally connected plate exchanger will not operate correctly (in a standard heating or domestic hot water system). Clogging of the exchanger can lead to irreversible damage, such as leakage.”
Adam was keen to follow the scientific method and try all the different orientations. It’s useful for Heat Geek to have more options for how they’re fitted. I couldn’t understand why you would ever want to fit it the wrong way when the manufacturer is very clear about how it should be used.
Plate Heat Exchangers
It’s helpful to understand how plate heat exchangers are constructed.

Internally, there’s a stack of metal plates with connections in each corner. On each plate, two of the connections are sealed off pass-throughs, while water can flow across the plate between the other two. The plates are stacked with alternating orientations. The result is two separate circuits through the heat exchanger.
Water entering through the blue inlet flows through the pass-through connections on the red plates, across the blue plates and then back through the blue outlet. Similarly, water entering through the red inlet flows through the pass-through connections on the blue plates, across the red plates and then back through the red outlet.
The plates are corrugated to increase the surface area that heat can be exchanged across, and to promote turbulent flow which also improves heat transfer.
Just like a radiator, air can become trapped. Unlike a radiator, there’s no valve you can use to release trapped air. The only way out is through one of the two open connections on each plate. Air will move upwards, so you need to orient the heat exchanger so that there’s an open connection at the top of each plate.
This doesn’t work at all if the heat exchanger is on its back. Air bubbles get stuck in the corrugations. It also makes for a poor heat store. Heat stores work best if they promote stratification. Hot water stays at the top of the tank where it’s drawn off, while cold water enters the tank at the bottom and stays there. If the heat exchanger is on its back, the stored water can’t move vertically.
The heat exchanger will stratify if placed on its end or on its side. However, air can only escape from all plates if the heat exchanger is oriented vertically, on its end. Nordic Tec heat exchangers are unusual in that the connections for each circuit are on the same side, unlike the diagram where they’re in opposite corners. If you put the heat exchanger on its side, one of the circuits will have both its connections on the bottom. The only orientation that works is on its end.
The Plan
I agreed with Damon to have one last throw of the dice. It’s taken long enough already. We can’t keep doing one little change at a time.
The heat exchanger will be re-oriented on its end. Both valves will be replaced. The long awaited dedicated diverter valve on the way in, and a new VTA320 series mixer valve on the way out.
The heat exchanger will be boxed in with 50mm PIR insulation board to match the MiniStore’s 50mm insulation.
Damon will also add a T-connector at the cold water inlet that can be used as a sensor pocket. The temperature sensor should respond much quicker when hot water is drawn off.
Next Time
That’s enough for one post. I’ll tell you how it all turned out next time.